L231
- Vue和 React越来越接近
- Vue3 Options API 对应 React class Component
- Vue3 Composition API对应React Hooks
前端组件库
一、Vue
Vue官方文档
Vue3官方文档
Chuckie’s Blog - Vue
- v-show和v-if 的区别
- 为何v-for 中要用key
- 描述Vue 组件生命周期(有父子组件的情况)
- vue 组件如何通讯
- 描述组件渲染和更新的过程
- 双向数据绑定v-model的实现原理
Vue使用
Vue基础知识点
- 插值操作
- computed 和watch
- computed有缓存,data 不变则不会重新计算
- watch 如何深度监听?
- watch 监听引用类型,拿不到oldVal, 因为oldVal 和 val都是存储的引用地址,而引用地址是没有变化的只是引用的堆中的值类型发生了变化
1
2
3
4
5
6
7
8
9
10
11
12
13
14
15
16
17
18
19
20
21
22
23
24
25
26
27
28
29
30
31
32
| <template>
<div>
<input v-model="name"/>
<input v-model="info.city"/>
</div>
</template>
<script>
export default {
data() {
return {
name: '双越',
info: {
city: '北京'
}
}
},
watch: {
name(oldVal, val) {
// eslint-disable-next-line
console.log('watch name', oldVal, val) // 值类型,可正常拿到 oldVal 和 val
},
info: {
handler(oldVal, val) {
// eslint-disable-next-line
console.log('watch info', oldVal, val) // 引用类型,拿不到 oldVal 。因为指针相同,此时已经指向了新的 val
},
deep: true // 深度监听
}
}
}
</script>
|
class和style的绑定及使用
列表渲染,v-for
- v-if和v-for不能同时使用,因为是先执行v-for,再执行v-if,而生成的每一个子标签都要进行v-if判断就太耗费性能了
事件
- event参数,自定义参数
- 事件修饰符,按键修饰符
- 【观察】事件被绑定到哪里?
- event的原型对象是DOM的原生事件
- event 是原生的
- 事件被挂载到当前元素(@在哪个元素上,事件就挂在哪个元素上)
- 和 DOM 事件一样
- v-on修饰符
- v-on按键修饰符
表单
- v-model
- 常见表单项textarea checkbox radio select
- 修饰符lazy number trim
Vue组件使用
组件间通讯
组件生命周期
1
2
3
4
5
6
7
8
9
10
11
12
13
14
15
16
17
18
19
| 父组件-beforeCreate
父组件-created
父组件-beforeMount
子组件-beforeCreate
子组件-created
子组件-beforeMount
子组件-mounted
父组件-mounted
父组件 beforeUpdate
子组件 beforeUpdate
子组件 updated
父组件 updated
父组件 beforeDestroy
子组件 beforeDestroy
子组件 destroyed
父组件 destroyed
|
Vue高级特性(重点)
自定义v-model
1
2
3
4
5
6
7
8
9
10
11
12
13
14
15
16
17
18
19
20
21
22
23
| //父组件
<template>
<div>
<!-- 自定义 v-model -->
<p>{{name}}</p>
<CustomVModel v-model="name"/>
</div>
</template>
<script>
import CustomVModel from './CustomVModel'
export default {
components: {
CustomVModel
},
data() {
return {
name: 'Chuckie'
}
}
}
</script>
|
1
2
3
4
5
6
7
8
9
10
11
12
13
14
15
16
17
18
19
20
21
22
23
24
25
26
27
28
29
30
| //子组件
<template>
<!-- 例如:vue 颜色选择 -->
<input type="text"
:value="text1"
@input="$emit('change1', $event.target.value)"//将更新后的值传给v-model的回调函数
>
<!--
1. 上面的 input 使用了 :value 而不是 v-model
2. 上面的 change1 和 model.event1 要对应起来
3. text1 属性对应起来
-->
</template>
<script>
export default {
model: {
prop: 'text1', // 对应 props text1
event: 'change1' //对应父组件中v-model默认处理绑定的函数
},
props: {
text1: {
type: String,
default() {
return ''
}
}
}
}
</script>
|
$nextTick
- Vue是异步渲染(原理部分会详细讲解)
- data改变之后,DOM不会立刻渲染
- $nextTick 会在DOM渲染之后被触发,以获取最新DOM节点
- 注意
ref和this.$refs的配合使用
1
2
3
4
5
6
7
8
9
10
11
12
13
14
15
16
17
18
19
20
21
22
23
24
25
26
27
28
29
30
31
32
33
34
35
36
37
38
39
40
41
42
43
44
45
46
47
48
49
50
51
52
53
| <template>
<div id="app">
<ul ref="ul1">
<li v-for="(item, index) in list" :key="index">
{{item}}
</li>
</ul>
<button @click="addItem">添加一项</button>
</div>
</template>
<script>
export default {
name: 'app',
data() {
return {
list: ['a', 'b', 'c']
}
},
methods: {
addItem() {
this.list.push(`${Date.now()}`)
this.list.push(`${Date.now()}`)
this.list.push(`${Date.now()}`)
// 获取 DOM 元素
const ulElem = this.$refs.ul1
// eslint-disable-next-line
console.log( ulElem.childNodes.length ) //------------- 分析点1 -------------
// 1. 异步渲染,$nextTick 待 DOM 渲染完再回调
// 2. 页面渲染时会将 data 的修改做整合,多次 data 修改只会渲染一次,例如上面添加3个值,但只渲染了一次
this.$nextTick(() => {
// 获取 DOM 元素
const ulElem = this.$refs.ul1
// eslint-disable-next-line
console.log( ulElem.childNodes.length )//------------- 分析点2 -------------
})
}
}
}
</script>
//分析点1
第一次执行输出3
虽然data已经更新,此时list添加了3个值,长度应该是6
但是渲染是异步的,此时页面还没有渲染就执行到了分析点1的位置
所以此时拿到的是还没渲染之前的dom结构,所以长度是3
//分析点2
第一次执行输出6
因为是分析点2的代码在$nextTick的回调函数里
而$nextTick的回调函数在页面渲染后才会调用
所以此时拿到的dom结构时更新后的dom,及data的更新已经渲染到页面,所以长度为6
|
slot
动态、异步组件
- 动态组件应用场景
- 新闻详情页,不确定新闻是文本还是图片还是视频,文本图片视频的结构也不清楚
- 拿到的数据给定了新闻的文本图片视频的展示情况
- 根据具体的展示情况在渲染对应的文本组件或图片组件或视频组件
1
2
3
4
5
6
7
8
9
10
11
12
13
14
15
16
17
18
19
20
21
22
23
24
25
26
27
28
29
30
31
32
33
34
35
36
37
38
39
40
41
42
43
44
45
| <template>
<div>
<!-- 动态组件 -->
<component :is="NextTickName"/><!-- 此处渲染NextTick组件 -->
<div v-for=" ( val, key) in newsData" :key="key">
<component :is="val.type"/> <!-- 此处渲染2个Text组件1个Image组件1个Viedo组件 -->
</div>
</div>
</template>
<script>
import NextTick from './NextTick
import Text from './Text
import Image from './Image
import Video from './Video
export default {
components: {
NextTick,
Text,
Image,
Video
},
data() {
return {
NextTickName: "NextTick",
newsData: { //新闻数据,给定了现有2个文本,再有一个图片,再有一个视频
1:{
type: 'Text'
},
2: {
type: 'Text'
},
3:{
type: 'Image'
},
4:{
type: 'Video'
}
}
}
}
}
</script>
|
- 异步组件
- 异步组件就是异步加载(在项目打包时,一般的组件都是同步加载的)
- 使用场景:某个组件体积很大,且不一定在一开始加载就需要使用,则可以在使用时再引入
- 使用:引入方式不同
1
2
3
4
5
6
7
|
import FormDemo from ' ../BaseUse/FormDemo '
export default {
components: {
FormDemo
}
}
|
1
2
3
4
5
6
|
export default {
components: {
FormDemo: () => import(' ../BaseUse/FormDemo')
}
}
|
keep-alive
缓存组件
常见使用场景:tab切换控制的组件
- 如果没有
keep-alive的包裹,则组件在不显示(v-if判断为false)时就会销毁,再次显示时需要再次加载,这样就会耗费性能
- 如果有
keep-alive的包裹,则组件在不显示时并不会销毁,会缓存下来,再次显示时直接使用
1
2
3
4
5
| <keep-alive> <!-- tab 切换 -->
<KeepAliveStageA v-if="state === 'A'"/> <!-- v-show -->
<KeepAliveStageB v-if="state === 'B'"/>
<KeepAliveStageC v-if="state === 'C'"/>
</keep-alive>
|
- v-if:
- 属于条件显示,满足条件就显示元素,不满足就删除元素,通过操作DOM元素完成。
- v-if的首次渲染显示的开销较小,因为它只渲染满足条件的那一个元素,切换组件时开销较大,因为它每切换以此就要重新触发生命周期渲染显示新元素
- v-if值为false时,会将该元素节点从DOM树中删除,也就是会删除它的依赖、事件监听等。
- v-show:
- 原理是通过控制元素的display属性来决定是否显示元素,属于响应式的。
- 首次渲染的开销较大,因为它会将所有页面全部渲染好之后,在由display属性来决定显示谁。切换开销较小,因为已经全部全然完成,只需要改display属性便可以显示。
- 适用于:小组件的切换
- keep-alive:
- 用于缓存活动组件,一开始并不会渲染全部组件,而是会渲染需要显示的组件,当切换组件时,会把之前已经渲染的组件缓存,每一次切换都会缓存该组件。缓存时通过vue框架的js层面实现的。
- 属于按需渲染实现,所以它的切换开销和首次渲染开销都较小
- 适用于:大组件的切换,例如tab组件的切换
- v-show和keep-alive的区别
- 渲染机制不同
- v-show是首次全部渲染完成,首次渲染的开销较大,切换开销较小
- keep-alive是按需渲染,使用时才渲染,首次渲染开销和切换开销都较小
- 实现方式不同
- v-show是css控制
- keep-alive是vue框架实现的缓存
- 相同点
mixin(混入)
mixin官方教程-vue2.x
混入提供了一种将组件中共有的部分抽离实现可复用的功能。
组件中的任何部分都可抽离(data,methods,生命周期函数等)
- mixin的使用场景:
- mixin的问题(Vue 3提出的Composition API旨在解决这些问题)
- 变量来源不明确,不利于阅读
- 多mixin可能会造成命名冲突
- mixin和组件可能出现多对多的关系,复杂度较高
- 合并策略
- 组件data,methods优先级高于mixin data,methods优先级
- 值为对象的选项,例如
methods、components 和 directives,将被合并为同一个对象。两个对象键名冲突时,取组件对象的键值对。
- 数据对象在内部会进行递归合并,并在发生冲突时以组件数据优先
- 生命周期函数,先执行mixin里面的,再执行组件里面的
- 同名钩子函数将合并为一个数组,因此都将被调用。另外,混入对象的钩子将在组件自身钩子之前调用。
- 自定义的属性,组件中的属性优先级高于 mixin 属性的优先级
1
2
3
4
5
6
7
8
9
10
11
12
|
export default {
data() {
return {
}
},
methods: {
},
mounted() {
}
.......
}
|
1
2
3
4
5
6
7
8
9
10
11
| //mixin的使用
<template>
</template>
<script>
import myMixin from './mixin'
export default {
mixins: [myMixin], // 可以添加多个,会自动合并起来
}
</script>
|
- 全局mixin
- 所有组件不需要mixin关键字注册,即可全部默认引入
- 组件需要使用全局mixin的属性直接使用即可
- 不推荐使用,维护性不高,耦合性太高
1
2
3
4
5
6
7
8
9
10
11
| app.mixin({
data() {
return {
}
},
methods: {
},
mounted() {
}
.......
})
|
1
2
3
4
5
6
7
8
9
10
11
12
13
14
15
16
17
18
19
20
21
22
23
24
25
26
27
28
29
30
31
32
33
34
35
36
37
| <!DOCTYPE html>
<html lang="en">
<head>
<meta charset="UTF-8">
<meta name="viewport" content="width=device-width, initial-scale=1.0">
<title>lesson 28</title>
<script src="https://unpkg.com/vue@next"></script>
</head>
<body>
<div id="root"></div>
</body>
<script>
const myMixin = {
number: 1
}
const app = Vue.createApp({
mixins: [myMixin],
number: 2,
template: `
<div>
<div>{{this.$options.number}}</div>
</div>
`
});
app.config.optionMergeStrategies.number = (mixinVal, appValue) => {
return mixinVal || appValue;
}
const vm = app.mount('#root');
</script>
</html>
|
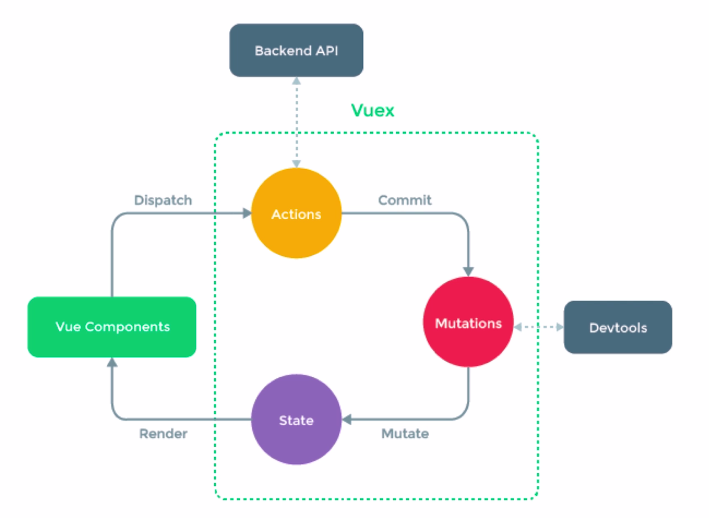
Vuex 待完成
Vuex官网
面试考点主要是state的设计
- 基本概念
- State
- Getter
- Mutation
- Action
- Module
- 组件中使用
- 访问 State 和 Getter
- 为了访问 state 和 getter,需要创建
computed 引用以保留响应性,这与在选项式 API 中创建计算属性等效。
- 访问 Mutation 和 Action
- 要使用 mutation 和 action 时,只需要在
setup 钩子函数中调用 commit 和 dispatch 函数。
- state的设计(待完成)
Vue-router
路由模式( hash、H5 history )
路由配置(动态路由、懒加载)
- 动态路由是指可以在路径中携带参数
- 懒加载是指异步加载
Vue-router路由模式
- hash模式(默认) ,如
http://abc.com/#/user/10
- H5 history模式,如
http://abc.com/user/20
1
2
3
4
5
6
7
8
9
|
import { createRouter, createWebHistory } from 'vue-router'
const router = createRouter({
history: createWebHistory(),
routes: [
],
})
|
Vue原理
组件化
数据驱动视图
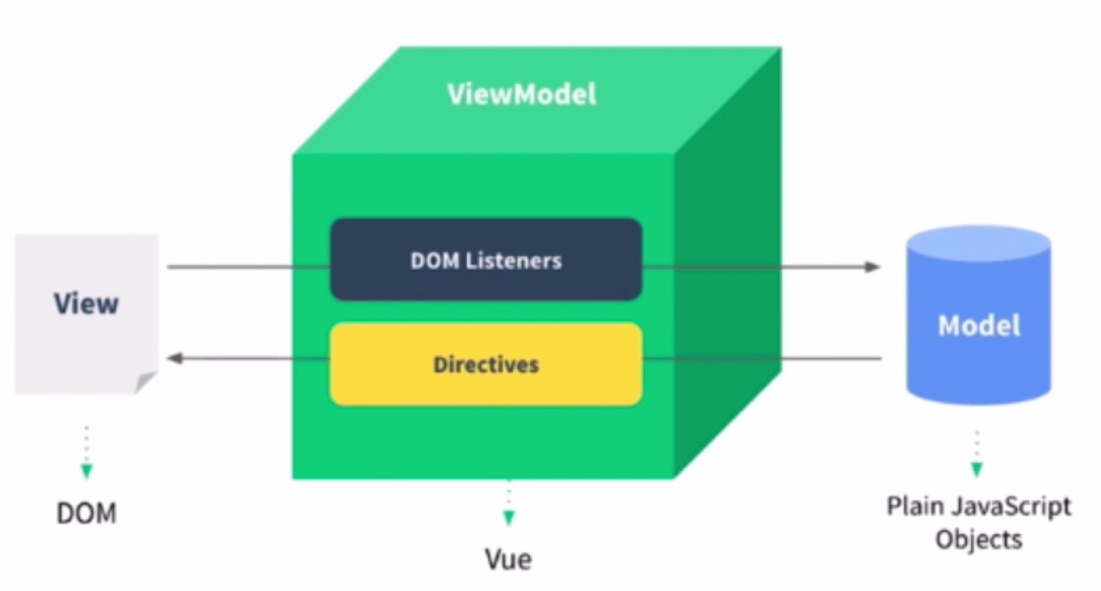
- 传统组件,只是静态渲染,更新还要依赖于操作DOM,
- 数据驱动视图- Vue MVVM, 不再需要操作DOM,更新数据即可使页面更新并渲染
- 数据驱动视图- React setState ,不再需要操作DOM,更新数据即可使页面更新并渲染
Vue中的MVVM
- 数据修改vue就可以实现自动驱动页面的渲染
- 不用开发者去操作DOM,可以专注于业务的开发,实现更复杂的功能
响应式
组件data的数据一旦变化,立刻触发视图的更新
vue.js关于Object.defineProperty的利用原理
Object.defineProperty方法(详解)
- 实现响应式的核心API —— Object.defineProperty
1
2
3
4
5
6
7
8
9
10
11
12
13
14
15
16
17
18
19
20
21
22
23
24
25
26
27
28
29
30
31
32
33
34
35
36
37
38
39
40
41
42
43
44
45
46
47
48
49
50
51
52
53
54
55
56
57
58
59
60
61
62
63
64
|
const data = {}
let name1 ='zhangsan'
Object.defineProperty(data,'name', {
get: function () {
console.log( 'get')
return name1
},
set: function (newVal) {
console.log('set')
name1 = newVal
}
});
console.log(data.name)
data.name = 'lisi'
console.log(data.name)
const data = {
name: 'zhangsan'
}
function observer(data,key,value){
Object.defineProperty(data,'name', {
get: function () {
console.log( 'get')
return value
},
set: function (newVal) {
console.log('set')
value = newVal
}
})
}
observer(data,'name',data.name)
console.log(data.name)
data.name = 'lisi'
console.log(data.name)
const data = {
name: 'zhangsan'
}
Object.defineProperty(data,'name', {
get: function () {
console.log( 'get')
return data.name
},
set: function (newVal) {
console.log('set')
data.name = newVal
}
})
console.log(data.name)
data.name = 'lisi'
console.log(data.name)
|
- 深度监听data变化及监听数组变化
- 深度监听data变化用到了递归的方式
- 监听数组变化主要是对数组原生方法对数组的修改做到了监听
1
2
3
4
5
6
7
8
9
10
11
12
13
14
15
16
17
18
19
20
21
22
23
24
25
26
27
28
29
30
31
32
33
34
35
36
37
38
39
40
41
42
43
44
45
46
47
48
49
50
51
52
53
54
55
56
57
58
59
60
61
62
63
64
65
66
67
68
69
70
71
72
73
74
75
76
77
78
79
80
81
82
83
84
85
86
87
88
89
90
91
92
93
94
95
96
97
|
function updateView() {
console.log('视图更新-Object.defineProperty监听')
}
function updateViewArray() {
console.log('视图更新-数组原生方法监听')
}
const oldArrayProperty = Array.prototype
const arrProto = Object.create(oldArrayProperty);
['push', 'pop', 'shift', 'unshift', 'splice'].forEach(methodName => {
arrProto[methodName] = function () {
updateViewArray()
oldArrayProperty[methodName].call(this, ...arguments)
}
})
function defineReactive(target, key, value) {
observer(value)
Object.defineProperty(target, key, {
get() {
return value
},
set(newValue) {
if (newValue !== value) {
observer(newValue)
value = newValue
updateView()
}
}
})
}
function observer(target) {
if (typeof target !== 'object' || target === null) {
return target
}
if (Array.isArray(target)) {
target.__proto__ = arrProto
}
for (let key in target) {
defineReactive(target, key, target[key])
}
}
const data = {
name: 'zhangsan',
age: 20,
info: {
address: '北京'
},
nums: [10, 20, 30]
}
observer(data)
data.nums.push(4)
console.log(data.nums)
data.nums = [1,2,3,4]
console.log(data.nums)
data.nums[2] = 1000
console.log(data.nums)
|
- Object.defineProperty的一些缺点( Vue3.0启用Proxy )
- 深度监听,需要递归到底,一次性计算量大
- 无法监听新增属性/删除属性(用Vue.set和 Vue.delete专门来处理新增和删除属性的响应式 )
- 无法原生监听数组,需要特殊处理,
- 即原生数组的方法(push、pop、shift等等)对数组的修改无法通过Object.defineProperty监听到,所以需要对这些原生方法做特殊处理,
- 通过索引对数组的修改可以通过Object.defineProperty监听到
- Proxy有兼容性问题,Proxy兼容性不好,且无法polyfill
虚拟DOM和diff
虚拟DOM
虚拟DOM的解决方案:
用JS模拟DOM结构:
1
2
3
4
5
6
| <div id="div1" class=container"">
<p>vdom</p>
<ul style="font-size: 20px">
<li>a</li>
</ul>
</div>
|
1
2
3
4
5
6
7
8
9
10
11
12
13
14
15
16
17
18
19
20
21
22
23
24
|
{
tag:'div',
props:{
id: 'div1',
className: 'container'
},
children:[
{
tag: 'p',
chuildren:'vdom'
},
{
tag: 'ul',
props:{
sytle: 'font-size: 20px'
},
children: [
tag: 'li',
children: 'a'
]
}
]
}
|
通过snabbdom学习vdom:
snabbdom英文文档
snabbdom中文文档
snabbdom-github
- 简洁强大的vdom库,易学易用
- Vue参考它实现的vdom和diff
- Vue3.0重写了vdom的代码,优化了性能
- 安装及使用
- 安装snabbdom:
npm i snabbdom
- 使用snabbdom: 官方文档有案例
- snabbdom核心内容
- h函数
- vnode数据结构
- patch函数 (比对新旧vnode就是用的diff算法)
1
2
3
4
5
6
7
8
9
10
11
12
|
let vnode = h('sel', {data}, [children])
const vnode = h("div#container.two.classes", { on: { click: someFn } }, [
h("span", { style: { fontWeight: "bold" } }, "This is bold"),
" and this is just normal text",
h("a", { props: { href: "/foo" } }, "I'll take you places!"),
]);
|
1
2
3
4
5
| const container = document.getElementById("container")
patch(container, vnode)
patch(vnode, newVnode)
|
1
2
3
4
|
{ sel, data, children, text, elm, key }
|
vdom总结
- 用JS模拟DOM结构(vnode)
- 新旧vnode对比,得出最小的更新范围,最后更新DOM
- 数据驱动视图的模式下, 有效控制DOM操作
- jQuery的更新是整体页面刷新,但是vdom只更新需要更新的局部地方,效率更高
1
2
3
4
5
6
7
8
9
10
11
12
13
14
15
16
17
18
19
20
21
22
23
|
const h = snabbdom.h
const container = document.getElementById('container')
const vnode = h('ul#list', {}, [
h('li.item', {}, 'Item 1'),
h('li.item', {}, 'Item 2')
])
patch(container, vnode)
document.getElementById('btn-change').addEventListener('click', () => {
const newVnode = h('ul#list', {}, [
h('li.item', {}, 'Item 1'),
h('li.item', {}, 'Item B'),
h('li.item', {}, 'Item 3')
])
patch(vnode, newVnode)
})
|
diff算法
比较两个对象的diff算法-github
diff算法概述
- 树diff的时间复杂度O(n^3)
- 第一,遍历tree1 ;
- 第二, 遍历tree2
- 第三, 排序
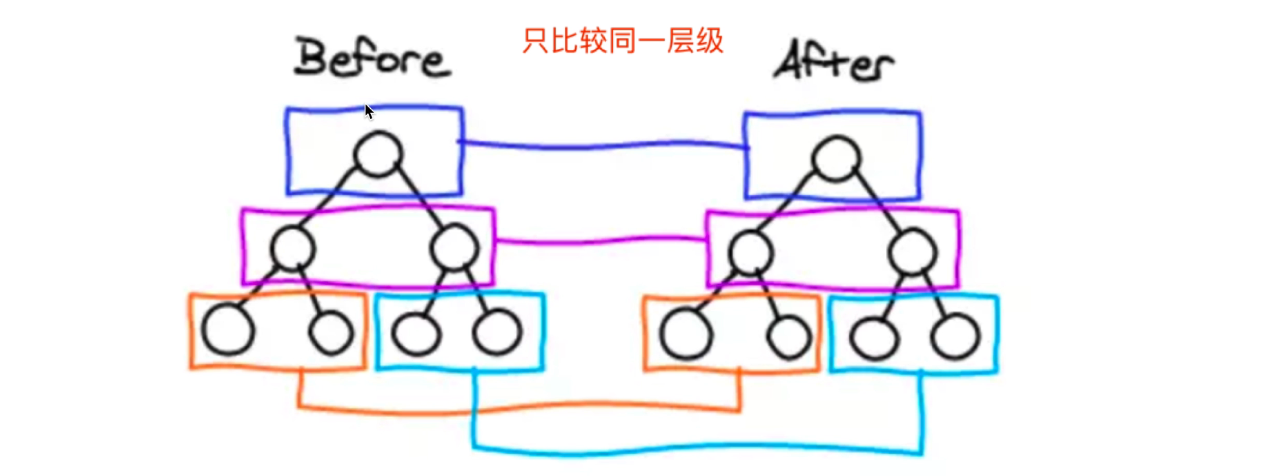
- 优化时间复杂度到O(n)
- 只比较同一层级,不跨级比较
- 树结构的同层级比较,是线性比较,时间复杂度O(n)
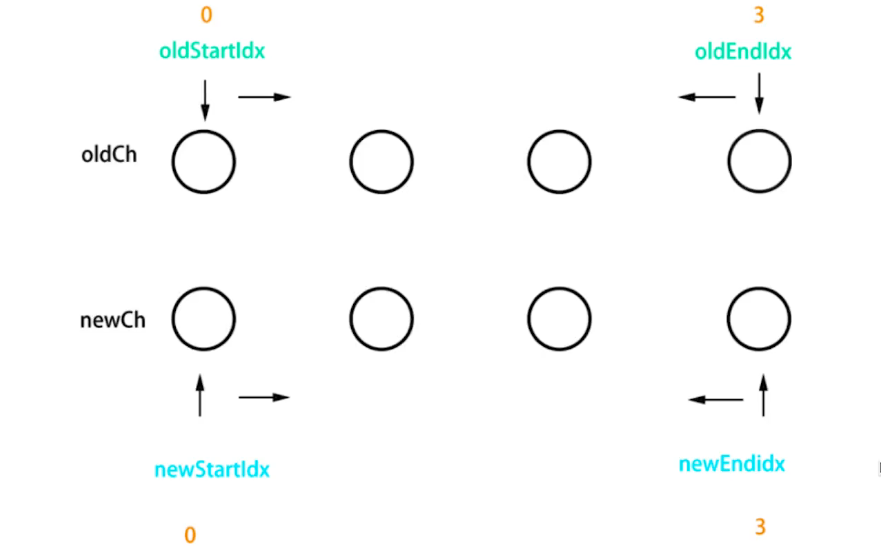
- snabbdom中子节点的比较方式是:头对头,头对尾, 尾对尾,尾对头
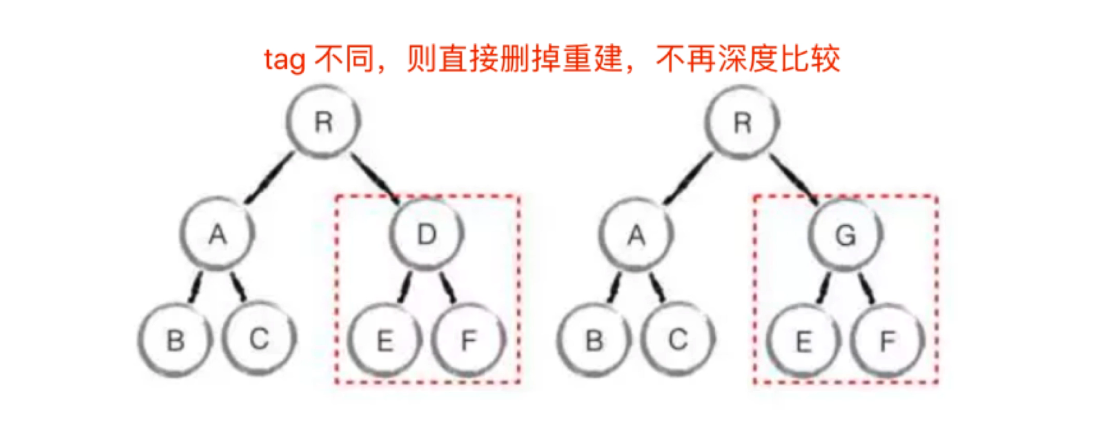
- tag和key不相同,则直接删掉重建,不再深度比较
- tag和key ,两者都相同,则认为是相同节点,不再比较其它属性,直接继续比较其子节点
diff源码解读-snabbdom源码
1
2
3
4
5
6
7
8
9
10
11
12
13
14
15
16
17
18
19
20
21
22
23
|
function patch(oldVnode: VNode | Element, vnode: VNode): VNode {
if (!isVnode(oldVnode)) {
oldVnode = emptyNodeAt(oldVnode);
}
if (sameVnode(oldVnode, vnode)) {
patchVnode(oldVnode, vnode, insertedVnodeQueue);
} else {
elm = oldVnode.elm!;
parent = api.parentNode(elm) as Node;
createElm(vnode, insertedVnodeQueue);
}
};
|
1
2
3
4
5
6
7
8
|
function sameVnode(vnode1: VNode, vnode2: VNode): boolean {
const isSameKey = vnode1.key === vnode2.key;
const isSameIs = vnode1.data?.is === vnode2.data?.is;
const isSameSel = vnode1.sel === vnode2.sel;
return isSameSel && isSameKey && isSameIs;
}
|
patchVnode()
- oldCh和newCh都有Children则调用updateChildren
- newCh有Children, oldCh无Children则调用addVnodes
- oldCh有Children, newCh无Children则调用removeVnodes
1
2
3
4
5
6
7
8
9
10
11
12
13
14
15
16
17
18
19
20
21
22
23
24
25
26
27
28
29
30
31
32
33
34
35
36
37
38
39
40
41
42
43
44
45
46
47
|
function patchVnode(
oldVnode: VNode,
vnode: VNode,
insertedVnodeQueue: VNodeQueue
) {
const elm = (vnode.elm = oldVnode.elm)!;
const oldCh = oldVnode.children as VNode[];
const ch = vnode.children as VNode[];
if (isUndef(vnode.text)) {
if (isDef(oldCh) && isDef(ch)) {
if (oldCh !== ch) updateChildren(elm, oldCh, ch, insertedVnodeQueue);
} else if (isDef(ch)) {
if (isDef(oldVnode.text)) api.setTextContent(elm, "");
addVnodes(elm, null, ch, 0, ch.length - 1, insertedVnodeQueue);
} else if (isDef(oldCh)) {
removeVnodes(elm, oldCh, 0, oldCh.length - 1);
} else if (isDef(oldVnode.text)) {
api.setTextContent(elm, "");
}
} else if (oldVnode.text !== vnode.text) {
if (isDef(oldCh)) {
removeVnodes(elm, oldCh, 0, oldCh.length - 1);
}
api.setTextContent(elm, vnode.text!);
}
}
|
updateChildren()
- 头对头,头对尾, 尾对尾,尾对头的比较
- 如何以上都没有命中则判断新节点中有没有key和老节点是一样的(v-for用key的原因)
- 如果没有则直接添加新节点
- 如果有则再判断是否sel(节点标签)也一样
- 如果不是则直接添加新节点
- 如果是(key和sel都相同)则调用patchVnode继续比较子节点
1
2
3
4
5
6
7
8
9
10
11
12
13
14
15
16
17
18
19
20
21
22
23
24
25
26
27
28
29
30
31
32
33
34
35
36
37
38
39
40
41
42
43
44
45
46
47
48
49
50
51
52
53
54
55
56
57
58
59
60
61
62
63
64
65
66
67
68
69
70
71
72
73
74
75
76
77
78
79
80
81
82
| function updateChildren(
parentElm: Node,
oldCh: VNode[],
newCh: VNode[],
insertedVnodeQueue: VNodeQueue
) {
while (oldStartIdx <= oldEndIdx && newStartIdx <= newEndIdx) {
if (oldStartVnode == null) {
oldStartVnode = oldCh[++oldStartIdx];
} else if (oldEndVnode == null) {
oldEndVnode = oldCh[--oldEndIdx];
} else if (newStartVnode == null) {
newStartVnode = newCh[++newStartIdx];
} else if (newEndVnode == null) {
newEndVnode = newCh[--newEndIdx];
} else if (sameVnode(oldStartVnode, newStartVnode)) {
patchVnode(oldStartVnode, newStartVnode, insertedVnodeQueue);
oldStartVnode = oldCh[++oldStartIdx];
newStartVnode = newCh[++newStartIdx];
} else if (sameVnode(oldEndVnode, newEndVnode)) {
patchVnode(oldEndVnode, newEndVnode, insertedVnodeQueue);
oldEndVnode = oldCh[--oldEndIdx];
newEndVnode = newCh[--newEndIdx];
} else if (sameVnode(oldStartVnode, newEndVnode)) {
patchVnode(oldStartVnode, newEndVnode, insertedVnodeQueue);
api.insertBefore(
parentElm,
oldStartVnode.elm!,
api.nextSibling(oldEndVnode.elm!)
);
oldStartVnode = oldCh[++oldStartIdx];
newEndVnode = newCh[--newEndIdx];
} else if (sameVnode(oldEndVnode, newStartVnode)) {
patchVnode(oldEndVnode, newStartVnode, insertedVnodeQueue);
api.insertBefore(parentElm, oldEndVnode.elm!, oldStartVnode.elm!);
oldEndVnode = oldCh[--oldEndIdx];
newStartVnode = newCh[++newStartIdx];
} else {
if (oldKeyToIdx === undefined) {
oldKeyToIdx = createKeyToOldIdx(oldCh, oldStartIdx, oldEndIdx);
}
idxInOld = oldKeyToIdx[newStartVnode.key as string];
if (isUndef(idxInOld)) {
api.insertBefore(
parentElm,
createElm(newStartVnode, insertedVnodeQueue),
oldStartVnode.elm!
);
} else {
elmToMove = oldCh[idxInOld];
if (elmToMove.sel !== newStartVnode.sel) {
api.insertBefore(
parentElm,
createElm(newStartVnode, insertedVnodeQueue),
oldStartVnode.elm!
);
} else {
patchVnode(elmToMove, newStartVnode, insertedVnodeQueue);
oldCh[idxInOld] = undefined as any;
api.insertBefore(parentElm, elmToMove.elm!, oldStartVnode.elm!);
}
}
newStartVnode = newCh[++newStartIdx];
}
}
}
|
- diff算法总结
- patchVnode
- addVnodes removeVnodes
- updateChildren ( key的重要性)
模板编译
with语法
- 改变{}内自由变量的查找规则,当做obj属性来查找
- 如果找不到匹配的obj属性,就会报错
- with要慎用,它打破了作用域规则,易读性变差
1
2
3
4
| const obj = {a: 100, b: 200}
console.log(obj.a)
console.log(obj.b)
console.log(obj.c)
|
1
2
3
4
5
6
7
|
with(obj) {
console.log(a)
console.log(b)
console.log(c)
}
|
理解模板编译
- 模板不是html , 有指令、插值、JS 表达式,能实现判断、循环
- htmI是标签语言,只有JS才能实现判断、循环(图灵完备的)
- 因此,模板一定是转换为某种JS代码,即编译模板(将.vue文件中的模板编译成js代码的过程)
- 模板编译成的js代码就是render函数,执行render函数返回vnode
- 基于vnode再执行patch和diff ,实现虚拟dom, 页面渲染
- 使用webpack vue-loader , 会在开发环境下编译模板(重要,因为在开发环境下完成模板编译,使得生产环境不用再进行模板编辑,减少了计算,提高了性能)
- vue组件可以用render代替template
1
2
3
4
5
6
7
8
9
10
11
12
13
14
15
16
17
18
19
20
21
22
23
24
| Vue.component( 'heading', {
render: function (createElement) {
return createElement (
'h' + this. Level,
[
createElement('a', {
attrs: {
name: ' headerId' ,
href: '#' + 'headerId'
}
},'this is a tag')
]
)
}
})
Vue.component( 'heading', {
template:`
<h1>
<a name="headerId" href="headerId"/>
</h1>
`
})
|
vue中的模板编译
使用vue-template-compiler
搭建测试环境
1
| npm install vue-template-compiler --save
|
实现模板编译相关函数理解
1
2
3
4
5
6
7
8
9
10
11
12
13
14
15
16
17
18
19
20
21
22
23
24
25
26
27
28
29
30
31
32
33
34
35
36
37
38
39
40
41
42
43
44
45
46
47
48
49
50
51
52
53
54
55
56
57
58
59
60
61
62
63
64
65
66
67
68
69
70
71
72
73
74
75
76
77
78
79
80
81
82
83
| const compiler = require('vue-template-compiler')
const template = `<input type="text" v-model="name">`
const res = compiler.compile(template)
console.log(res.render)
|
渲染过程
前端路由
- hash模式(默认) ,如
http://abc.com/#/user/10
- H5 history模式,如
http://abc.com/user/20
hash模式
1
2
3
4
5
6
7
8
|
location.protocol
location.hostname
location.host
location.port
location.pathname
location.search
location.hash
|
- hash模式特点
- hash变化会触发网页跳转,即浏览器的前进、后退
- hash 变化不会刷新页面,SPA(单页面应用)必需的特点
- hash永远不会提交到server端(前端自生自灭)
- hash核心API
1
2
3
4
5
6
7
8
9
10
11
12
13
14
15
16
17
18
19
20
21
22
23
24
25
26
27
28
29
30
31
32
33
34
35
36
| <!DOCTYPE html>
<html lang="en">
<head>
<meta charset="UTF-8">
<meta name="viewport" content="width=device-width, initial-scale=1.0">
<meta http-equiv="X-UA-Compatible" content="ie=edge">
<title>hash test</title>
</head>
<body>
<p>hash test</p>
<button id="btn1">修改 hash</button>
<script>
window.onhashchange = (event) => {
console.log('old url', event.oldURL)
console.log('new url', event.newURL)
console.log('hash:', location.hash)
}
document.addEventListener('DOMContentLoaded', () => {
console.log('hash:', location.hash)
})
document.getElementById('btn1').addEventListener('click', () => {
location.href = '#/user'
})
</script>
</body>
</html>
|
H5 history
- H5 history 模式特点
- 用url规范的路由,但跳转时不刷新页面
- 需要server端支持,因此无特殊需求可选择hash模式
- 前端路由有很多个(多个url),所以需要后端在接受任何url的时候都返回主文件
1
2
3
4
5
6
7
| 例如前端初始url: https:
后端没有做配置的情况下:
浏览器输入 https:
前端跳转了路由url变为: https:
后端配置,设置任何路由形式的访问都返回主文件
此时前端路由变化后,再次刷新页面就可以正常请求到主文件了
|
- H5 history 的核心API
- history.pushState (新增时即做页面渲染,因为新增不触发window.onpopstate)
- window.onpopstate(只有浏览器前进后退时才触发,history.pushState新增路由时不会触发)
1
2
3
4
5
6
7
8
9
10
11
12
13
14
15
16
17
18
19
20
21
22
23
24
25
26
27
28
29
30
31
32
33
34
35
36
37
| <!DOCTYPE html>
<html lang="en">
<head>
<meta charset="UTF-8">
<meta name="viewport" content="width=device-width, initial-scale=1.0">
<meta http-equiv="X-UA-Compatible" content="ie=edge">
<title>history API test</title>
</head>
<body>
<p>history API test</p>
<button id="btn1">修改 url</button>
<script>
document.addEventListener('DOMContentLoaded', () => {
console.log('load', location.pathname)
})
document.getElementById('btn1').addEventListener('click', () => {
const state = { name: 'page1' }
console.log('切换路由到', 'page1')
history.pushState(state, '', 'page1')
})
window.onpopstate = (event) => {
console.log('onpopstate', event.state, location.pathname)
}
</script>
</body>
</html>
|
hash和H5 history选择
- to B的系统推荐用hash ,简单易用,对url规范不敏感
- to C的系统,可以考虑选择H5 history ,但需要服务端支持
面试题汇总
1 v-show和v-if 的区别
- v-if条件为false时,对应的元素以及其子元素不会渲染。(通过Vue控制) 回流
- v-show条件为false时,对应的元素以及其子元素会渲染。只是将元素的display属性设置为none,所以没有显示出来。(通过css控制)重绘
- 总结:
- 当需要在显示与隐藏之间切片很频繁时,使用v-show
- 当只有少次切换时,通常使用v-if
2 为何v-for 中要用key
- 必须用key ,且不能是index和random
- diff 算法中通过tag和key来判断,是否是sameNode(结合比对方式)
- 减少渲染次数,提升渲染性能
3 描述Vue 组件生命周期(有父子组件的情况)
Chuckie’s Blog - Vue
4 vue 组件如何通讯
Chuckie’s Blog - Vue
- 父子组件props和this.$emit
- 自定义事件event.$no event.$off event.$emit
- vuex
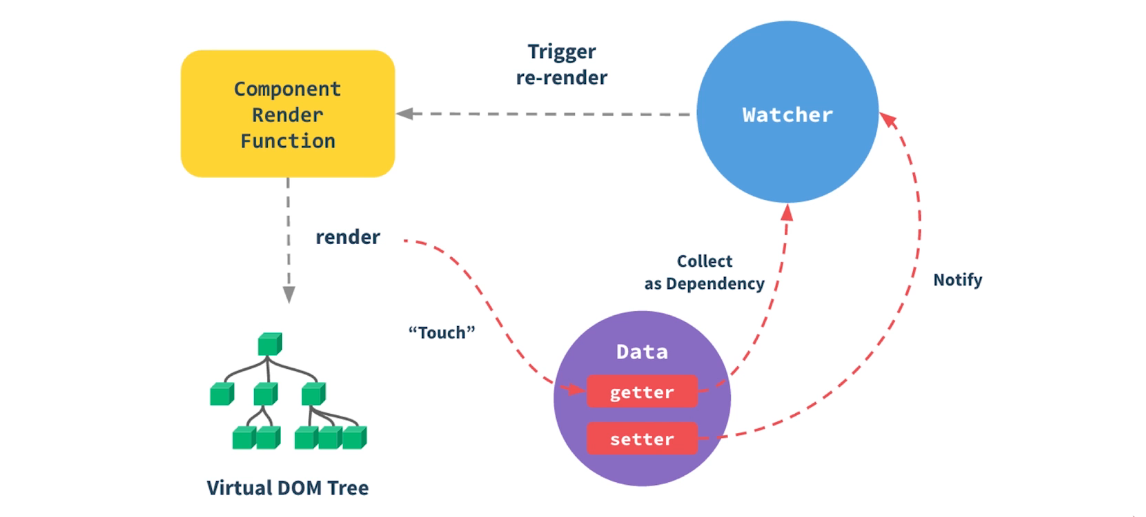
5 描述组件渲染和更新的过程(一个组件渲染到页面,修改data触发更新(数据驱动视图))
- 响应式:监听data属性getter setter (包括数组)
- 模板编译:模板到render函数,再到vnode
- vdom : patch(elem, vnode)和patch(vnode, newVnode)
- 初始渲染过程
- 解析模板为render函数(或在开发环境完成,通过webpack的vue-loader )
- 触发响应式,监听data属性getter setter
- 执行render函数,生成vnode, patch(elem, vnode), 在这个过程中会触发getter
- 更新过程.
- 修改data,触发setter ( 此前在getter中已被监听)
- 重新执行render函数,生成newVnode
- patch(vnode, newVnode)
- 异步渲染
- 回顾$nextTick
- 汇总data的修改,一次性更新视图
- 减少DOM操作次数,提高性能
6 双向数据绑定v-model的实现原理
- input元素的value = this.name(name是双向绑定的变量)
- 绑定input事件this.name = $event.target.value
- data 更新触发re-render
7 对MVVM的理解
Chuckie’s Blog - Vue
8 computed 有何特点
- computed 的计算结果会缓存,data不变不会重新计算
- 提高性能
9 为何组件data必须是一个函数?
- 每个组件就是一个class是一个类,每次使用组件就是对它的实例化,实例化就会执行data()函数,就会为每个使用组件的地方产生一个自己独立的存储空间,每个实例化的组件在修改data属性时不会相互影响
- 如果data不是一个函数,而是一个对象,则每个实例化的组件data都会指向同一个存储地址,当一个组件修改data属性时,其它组件的data就也修改了,会使组件之间相互影响
10 ajax请求应该放在哪个生命周期
- mounted
- JS是单线程的,ajax异步获取数据
- 放在mounted之前没有用,只会让逻辑更加混乱,
- 若放在mounted之前,由于js是单线程,且ajax是异步请求,所以还是会先进行页面渲染,再网络请求,而mounted恰恰就是在页面渲染后触发
11 如何将组件所有props传递给子组件?
- $props
<User v-bind= "$props”/>- 细节知识点,优先级不高
12 自定义v-model
13 多个组件有相同的逻辑,如何抽离?
14 何时要使用异步组件?
15 何时需要使用keep-alive ?
- 缓存组件,不需要重复渲染
- 如多个静态tab 页的切换
16 何时需要使用beforeDestory
- 解绑自定义事件event.$off
- 清除定时器
- 解绑自定义的DOM 事件,如window scroll 等
17 什么是作用域插槽
18 Vuex中action和mutation有何区别
- action中处理异步,mutation 不可以
- mutation做原子操作
- action可以整合多个mutation
19 Vue-router常用的路由模式
- hash 默认
- H5 history(需要服务端支持)
- 两者比较
20 如何配置Vue-router 异步加载
1
2
3
4
5
6
7
8
9
10
11
12
13
14
15
16
17
| export default new VueRouter(i
routes: [
{
path: '/',
component: ()=> import(
'./ ../ components/Navigator'
)
},{
path: ' /feedback ' ,
component:()=> import(
'./../ components/FeedBack'
)
}
]
})
|
21 请用vnode描述一个 DOM结构
22 监听data变化的核心API是什么
- Object.defineProperty
- 以及深度监听、监听数组
- 有何缺点
23 Vue如何监听数组变化
- Object.defineProperty不能监听数组变化
- 重新定义原型,重写push pop等方法,实现监听
- Proxy可以原生支持监听数组变化
24 请描述响应式原理
25 diff 算法的时间复杂度
- o(n)
- 在O(n^3)基础上做了一些调整(3个调整)
26 简述diff 算法过程
- patch(elem, vnode)和patch(vnode, newVnode)
- patchVnode和addVnodes和removeVnodes
- updateChildren ( key的重要性)
27 Vue为何是异步渲染,$nextTick何用?
- 异步渲染(以及合并data修改),以提高渲染性能
- $nextTick在 DOM更新完之后,触发回调, 但此时图片或视频的加载可能还没有完成
28 Vue常见性能优化方式
前端通用的性能优化
- 图片懒加载
- 代码压缩
- CSS放在head ,JS放在body最下面
- 尽早开始执行JS,用DOMContentLoaded触发
- 对DOM查询进行缓存
- 频繁DOM操作,合并到一起插入DOM结构
- 防抖
- 节流
webpack层面的优化(后面会讲)
使用SSR
二、Vue3
Vue3体积更小
CompositionAPI更好的类型推导??????
Vue3优势
1 Vue3比 Vue2有什么优势?
- 性能更好
- 体积更小?????
- 更好的代码组织
- 更好的逻辑抽离
- 更好的ts支持
- 更多新功能
Vue3生命周期
2 描述Vue3生命周期
- Options API生命周期
- beforeDestroy改为beforeUnmount(只改名)
- destroyed改为unmouted(只改名)
- 其他沿用Vue2的生命周期
- Composition API
- 需要引入
- setup()代替beforeCreate()和created()
1
2
3
4
5
6
7
8
9
10
11
12
13
14
15
16
17
18
19
20
21
22
23
24
25
26
27
28
29
30
| <script>
import { onBeforeMount, onMounted, onBeforeUpdate, onUpdated, onBeforeUnmount, onUnmounted } from 'vue'
export default {
setup() {
console.log('setup')
onBeforeMount(() => {
console.log('onBeforeMount')
})
onMounted(() => {
console.log('onMounted')
})
onBeforeUpdate(() => {
console.log('onBeforeUpdate')
})
onUpdated(() => {
console.log('onUpdated')
})
onBeforeUnmount(() => {
console.log('onBeforeUnmount')
})
onUnmounted(() => {
console.log('onUnmounted')
})
}
}
</script>
|
Composition API和Options API
3 如何看待Composition API和Options API ?
- Composition API (为大型项目而设计)
- 更好的代码组织
- 更好的逻辑复用(有一道专门的面试题)
- 更好的类型推导??????
- 如何选择?
- 不建议共用,会引起混乱
- 小型项目、业务逻辑简单,用Options API
- 中大型项目、逻辑复杂,用Composition API
- 别误解Composition API
- Composition API属于高阶技巧,不是基础必会
- Composition API是为解决复杂业务逻辑而设计
- Composition API就像Hooks在 React中的地位
ref、toRef、toRefs
4 如何理解ref toRef和toRefs ?
ref
- 生成值类型的响应式数据
- 可用于模板和reactive
- 通过
.value修改值和获取值, 模板、reactive中获取不需要通过.value
- 通过ref可以获取到标签
1
2
3
4
5
6
7
8
9
10
11
12
13
14
15
16
17
18
19
20
21
22
23
24
25
26
27
28
29
30
31
32
| <template>
<!-- 模板中获取不用.value -->
<p>ref demo {{ageRef}} {{state.name}}</p>
</template>
<script>
import { ref, reactive } from 'vue'
export default {
name: 'Ref',
setup() {
const ageRef = ref(20)
const nameRef = ref('Chuckie')
const state = reactive({
name: nameRef
})
setTimeout(() => {
console.log('ageRef', ageRef.value)
ageRef.value = 25
nameRef.value = 'ChuckieA'
}, 1500);
return {
ageRef,
state
}
}
}
</script>
|
1
2
3
4
5
6
7
8
9
10
11
12
13
14
15
16
17
18
19
20
21
22
23
|
<template>
<p ref="elemRef">我是一行文字</p>
</template>
<script>
import { ref, onMounted } from 'vue'
export default {
name: 'RefTemplate',
setup() {
const elemRef = ref(null)
onMounted(() => {
console.log('ref template', elemRef.value.innerHTML, elemRef.value)
})
return {
elemRef
}
}
}
</script>
|
toRef
- 一个普通对象要实现响应式用reactive
- reactive中对象的一个单独属性要单拎出来具有响应式用toRef
- toRef产出的值和reactive中原本的那个值指向同一个地址,修改会联动
- toRef 如果用于普通对象(非响应式对象),产出的结果不具备响应式
1
2
3
4
5
6
7
8
9
10
11
12
13
14
15
16
17
18
19
20
21
22
23
24
25
26
27
28
29
30
31
32
33
34
35
36
37
38
39
40
41
42
| <template>
<p>toRef demo - {{ageRef}} - {{state.name}} {{state.age}}</p>
</template>
<script>
import { ref, toRef, reactive } from 'vue'
export default {
name: 'ToRef',
setup() {
const state = reactive({
age: 20,
name: 'Chuckie'
})
const age1 = computed(() => {
return state.age + 1
})
const ageRef = toRef(state, 'age')
setTimeout(() => {
state.age = 25
}, 1500)
setTimeout(() => {
ageRef.value = 30
}, 3000)
return {
state,
ageRef
}
}
}
</script>
|
toRefs
- 将响应式对象( reactive封装)转换为普通对象(但对象中的值还具有响应式)
- 对象的每个属性,都是 ref 对象
- 两者(响应式对象和转换成的普通对象)保持引用关系, 即修改是联动了(修改响应式对象属性(state),普通对象属性也会修改)
- 用toRefs(state)的目的是:在模板中使用state中的属性时不用再通过state.属性的方式获取,直接通过属性名就可以获取
- toRefs如果用于普通对象(非响应式对象),产出的结果不具备响应式
1
2
3
4
5
6
7
8
9
10
11
12
13
14
15
16
17
18
19
20
21
22
23
24
25
26
27
28
29
30
31
32
| <template>
<!-- 用toRefs后,就不用通过state.age, state.name这个繁琐的方式再获取了 -->
<p>toRefs demo {{age}} {{name}}</p>
</template>
<script>
import { ref, toRef, toRefs, reactive } from 'vue'
export default {
name: 'ToRefs',
setup() {
const state = reactive({
age: 20,
name: 'Chuckie'
})
const stateAsRefs = toRefs(state) // 将响应式对象,变成普通对象,但对象中的值还具有响应式
// const { age: ageRef, name: nameRef } = stateAsRefs // 每个属性,都是 ref 对象
// return {
// ageRef,
// nameRef
// }
return stateAsRefs //具有响应式
return {
...state//直接解构state后返回就不具备响应式了
}
}
}
</script>
|
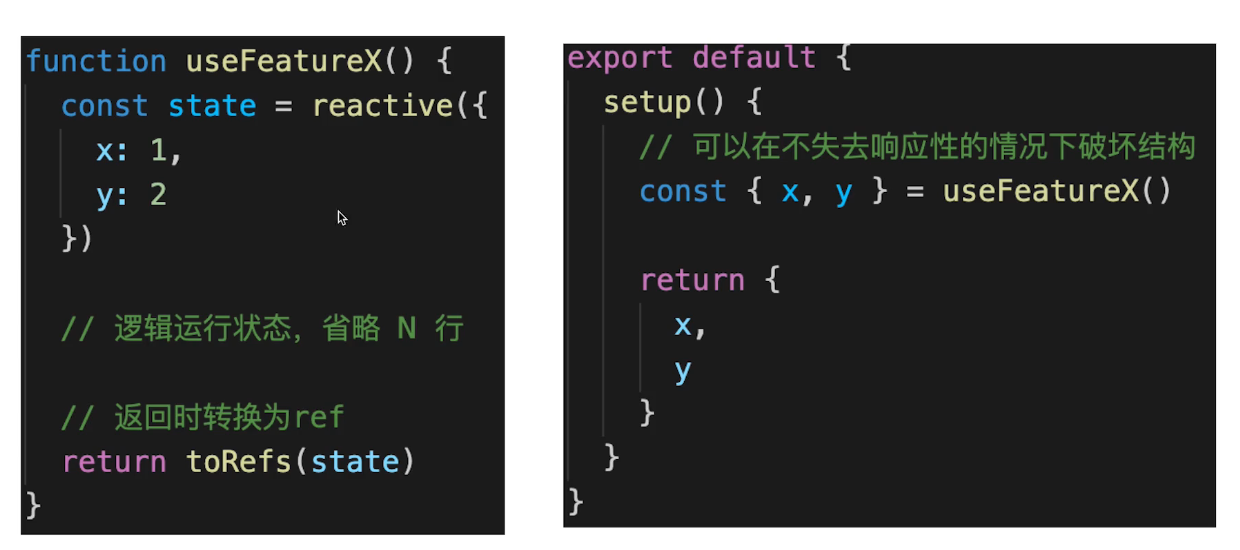
最佳使用方式
- reactive做对象的响应式,用ref做值类型响应式
- setup中返回toRefs(state),或者toRef(state,‘’xxx’)
- ref的变量命名都用xxxRef
- 合成函数返回响应式对象时,使用toRefs,便于使用方解构
进阶,深入理解
- 为何需要ref ?
- Vue3是用Proxy实现响应式,该方式只能对对象实现响应式,不能对值类型实现响应式,而ref使得值类型具有响应式
- setup中返回值类型,会丢失响应式,而ref使得值类型具有响应式
- 如在setup、computed、合成函数,都有可能返回值类型
- Vue 如不定义ref ,用户将自造ref ,反而混乱
1
2
3
4
|
const age1 = computed(() => {
return state.age + 1
})
|
- 为何需要.value ?
- ref是一个对象(不丢失响应式) ,value存储值类型的值
- 通过.value属性的get和set 实现响应式,将值类型转化为一个ref对象,ref对象的.value存储值类型的值,这时ref对象是一个对象就可以用Proxy实现对其属性的监听,就可以实现响应式了
- 用于模板、reactive时,不需要.value,其他情况都需要
- 为何需要toRef toRefs ?
- 初衷: 在不丢失响应式的情况下,对响应式对象的数据实现解构
- 前提︰针对的是响应式对象( reactive封装的)非普通对象
- 注意:不创造响应式,而是延续响应式
Vue3升级
v3迁移指南
5 Vue3升级了哪些重要的功能?
createApp
1
2
3
4
5
6
7
8
9
10
11
12
13
|
const app = new Vue({ })
Vue.use()
Vue.mixin()
Vue.component()
Vue.directive()
const app = Vue.createApp({ })
app.use()
app.mixin()
app.component()
app.directive()
|
emits属性
1
2
3
4
5
6
7
8
9
10
11
12
13
14
15
16
17
18
19
20
21
22
23
24
25
26
27
28
29
|
<template>
<HelloWorld msg="Hello Vue 3.0 + Vite" @onSayHello="sayHello"/>
</template>
<script>
import HelloWorld from './components/HelloWorld.vue'
export default {
name: 'App',
components: {
HelloWorld,
},
methods: {
sayHello(info) {
console.log('hello', info)
}
}
}
</script>
//子组件
export default {
emits: ['onSayHello'],
setup(props, { emit }) {
emit('onSayHello', 'vue3')//vue3是参数
}
}
|
多事件
1
2
|
<button @click="one($event), two($event)">Submit</button>
|
Fragment
- vue2中
<template>下必须有一个根标签包裹所有元素
- vue3中则不需要,可以直接在
<template>下写标签
1
2
3
4
5
6
7
|
<template>
<div class="blog-post">
<h3>{{title }}</h3>
<div v-html="content"></div>
</div>
</template>
|
1
2
3
4
5
|
<template>
<h3>{{title}}</h3>
<div v-html="content"></div>
</template>
|
v-model代替.sync
v3迁移指南-移除.sync
功能:使父组件传入子组件的属性随子组件的变化而实时变化
本质:一个语法糖,仍然是父子间通信的方式实现的
1
2
3
4
| <!-- vue 2.x-->
<MyComponent v-bind:title.sync="title"/>
<!-- vue 3.x-->
<MyComponent v-model:title="title" />
|
1
2
|
<ChildComponent v-model:title="pageTitle" />
|
1
2
3
4
5
6
7
8
9
10
11
12
13
|
export default {
props: {
title: String
},
emits: ['update:title'],
methods: {
changePageTitle(title) {
this.$emit('update:title', title)
}
}
}
|
异步组件
v3迁移指南-异步组件
需要使用defineAsyncComponent函数,import { defineAsyncComponent } from 'vue'
1
| const asyncModal = defineAsyncComponent(() => import('./Modal.vue'))
|
移除filter
v3迁移指南-移除过滤器
Teleport
v3迁移指南-Teleport
将弹出层直接挂载到body上
1
2
3
4
5
6
7
8
9
10
11
12
13
14
15
16
17
18
19
20
21
22
23
24
| app.component('modal-button', {
template: `
<button @click="modalOpen = true">
Open full screen modal! (With teleport!)
</button>
<teleport to="body"> //也可以传送到其它标签下,例如#hello,即传送到id为hello的标签下
<div v-if="modalOpen" class="modal">
<div>
I'm a teleported modal!
(My parent is "body")
<button @click="modalOpen = false">
Close
</button>
</div>
</div>
</teleport>
`,
data() {
return {
modalOpen: false
}
}
})
|
Suspense
v3迁移指南-Suspense
使用场景:配合异步组件使用,当异步组件没有加载完成时则显示loading状态
1
2
3
4
5
6
7
8
9
10
11
12
13
14
15
16
17
18
19
20
| <template>
<suspense>
<template #default>
<todo-list />
</template>
<template #fallback>
<div>
Loading...
</div>
</template>
</suspense>
</template>
<script>
export default {
components: {
TodoList: defineAsyncComponent(() => import('./TodoList.vue'))
}
}
</script>
|
Composition API
- reactive 实现响应式
- watch和watchEffect
- ref相关
- setup 等于vue2中的beforeCreate和created
- readonly 只读
- 生命周期钩子函数
Composition API逻辑复用
6 Composition API 如何实现代码逻辑复用?
- 抽离逻辑代码到一个函数,这个函数可以在多个组件中使用,这就是逻辑复用
- 函数命名约定为useXxxx格式( React Hooks也是)
- 在setup 中引用useXxx函数,逻辑复用的函数就是合成函数
1
2
3
4
5
6
7
8
9
10
11
12
13
14
15
16
17
18
19
| <template>
<p>mouse position {{x}} {{y}}</p>
</template>
<script>
import { reactive } from 'vue'
import useMousePosition from './useMousePosition'
export default {
name: 'MousePosition',
setup() {
const { x, y } = useMousePosition()
return {
x,
y
}
}
}
</script>
|
1
2
3
4
5
6
7
8
9
10
11
12
13
14
15
16
17
18
19
20
21
22
23
24
25
26
27
28
29
30
|
import { ref, onMounted, onUnmounted } from 'vue'
function useMousePosition() {
const x = ref(0)
const y = ref(0)
function update(e) {
x.value = e.pageX
y.value = e.pageY
}
onMounted(() => {
console.log('useMousePosition mounted')
window.addEventListener('mousemove', update)
})
onUnmounted(() => {
console.log('useMousePosition unMounted')
window.removeEventListener('mousemove', update)
})
return {
x,
y
}
}
export default useMousePosition
|
Vue3响应式
7 Vue3如何实现响应式?
Proxy基本使用
Proxy 与 Reflect 是 ES6 为了操作对象引入的 API
Proxy 与 Reflect用法
1
2
3
4
5
6
7
8
9
10
11
12
13
14
15
16
17
18
19
20
21
22
23
24
25
26
27
28
29
30
31
32
33
34
35
36
37
38
39
40
41
42
43
44
45
46
47
48
49
50
51
52
53
54
55
|
const data = ['a', 'b', 'c']
const proxyData = new Proxy(data, {
get(target, key, receiver) {
const ownKeys = Reflect.ownKeys(target)
if (ownKeys.includes(key)) {
console.log('get', key)
}
const result = Reflect.get(target, key, receiver)
return result
},
set(target, key, val, receiver) {
if (val === target[key]) {
return true
}
const result = Reflect.set(target, key, val, receiver)
console.log('set', key, val)
return result
},
deleteProperty(target, key) {
const result = Reflect.deleteProperty(target, key)
console.log('delete property', key)
return result
}
})
|
- Reflect作用
- 和Proxy能力一一对应
- 规范化、标准化、函数式
- 替代掉Object上的工具函数, 让Object成为一个存粹的数据结构
1
2
3
4
5
6
|
let target = [10,20,30]
condole.log(Reflect.ownKeys(target))
let target = {a:10, b:20}
condole.log(Reflect.ownKeys(target))
|
1
2
3
4
5
6
7
8
|
const obj = {a : 100, b : 200}
'a' in obj
Reflect.has(obj, 'a')
delete obj.b
Reflect.deleteProperty(obj, 'b')
|
1
2
3
4
5
|
const obj = {a : 100, b : 200}
Object.hasOwnPropertyNames(obj)
Reflect.ownKeys(obj)
|
Proxy实现响应式
Proxy结合Reflect可以实现对数组和对象的监听,且可以监听删除和增加新属性,且递归深度监听效率更高,完美解决了vue2中用Object.defineProperty实现响应式的问题
watch 和watchEffect
8 watch 和watchEffect的区别是什么?
- 两者都可监听data属性变化
- watch
- 需要开发者明确指定监听哪个属性
- 深度监听时拿不到旧值,因为深度监听的对象是引用类型,oldValue和newValue指向同一个地址
- watchEffect
- 会根据其中的属性,自动监听其变化,即代码块中某个属性变化了就会触发
- 初始化时,一定会执行一次(收集要监听的数据),类似watch的immediate:为true
1
2
3
4
5
6
7
8
9
10
11
12
13
14
15
16
17
18
19
20
21
22
23
24
25
26
27
28
29
30
31
32
33
34
35
36
37
38
39
40
41
42
43
44
45
46
47
48
49
50
51
52
53
54
55
56
57
58
59
60
61
62
63
64
65
66
67
68
69
70
71
72
73
74
75
76
77
| <template>
<p>watch vs watchEffect</p>
<p>{{numberRef}}</p>
<p>{{name}} {{age}}</p>
</template>
<script>
import { reactive, ref, toRefs, watch, watchEffect } from 'vue'
export default {
name: 'Watch',
setup() {
const numberRef = ref(100)
const state = reactive({
name: 'chuckie',
age: 20,
a:{
b:100
}
})
watchEffect(() => {
// 初始化时,一定会执行一次(收集要监听的数据)
console.log('hello watchEffect')
})
watchEffect(() => {
console.log('state.name', state.name)//name变化时触发
// 也可以在这里调用一个函数,函数内部有响应式数据变化也会触发watchEffrctd
})
watchEffect(() => {
console.log('state.age', state.age)//age变化时触发
})
watchEffect(() => {
//以下任何一个变量变化都会触发下面的代码执行
console.log('state.age', state.age)
console.log('state.name', state.name)
})
watch(numberRef, (newNumber, oldNumber) => {
console.log('ref watch', newNumber, oldNumber)
}
// , {
// immediate: true // 初始化之前就监听,可选
// }
)
setTimeout(() => {
numberRef.value = 200
}, 1500)
watch(
// 第一个参数,确定要监听哪个属性
() => state.a,
// 第二个参数,回调函数
(newAge, oldAge) => {
console.log('state watch', newAge, oldAge)//深度监听时,newAge和oldAge的值相同,因为newAge, oldAge是引用类型,指向同一个地址
},
// 第三个参数,配置项
{
immediate: true, // 初始化之前就监听,可选
deep: true // 深度监听
}
)
setTimeout(() => {
state.a.b = 25
}, 1500)
return {
numberRef,
...toRefs(state)
}
}
}
</script>
|
setup获取实例
9 setup 中如何获取组件实例?
- 在setup和其他Composition API中没有this
- 可通过
getCurrentInstance获取当前实例
- 若使用Options API可照常使用this
1
2
3
4
5
6
7
8
9
10
11
12
13
14
15
16
17
| <script>
import { onMounted, getCurrentInstance } from 'vue'
export default {
name: 'GetInstance',
data() {
return {
x: 1
}
},
setup() {
const instance = getCurrentInstance()
onMounted(() => {
console.log('x', instance.data.x)
})
}
}
</script>
|
Vue3为何比 Vue2快
10 Vue3为何比 Vue2快?
Proxy响应式
- 深度监听不用在第一次就一次性递归到底,在使用深层属性时才递归并实现监听
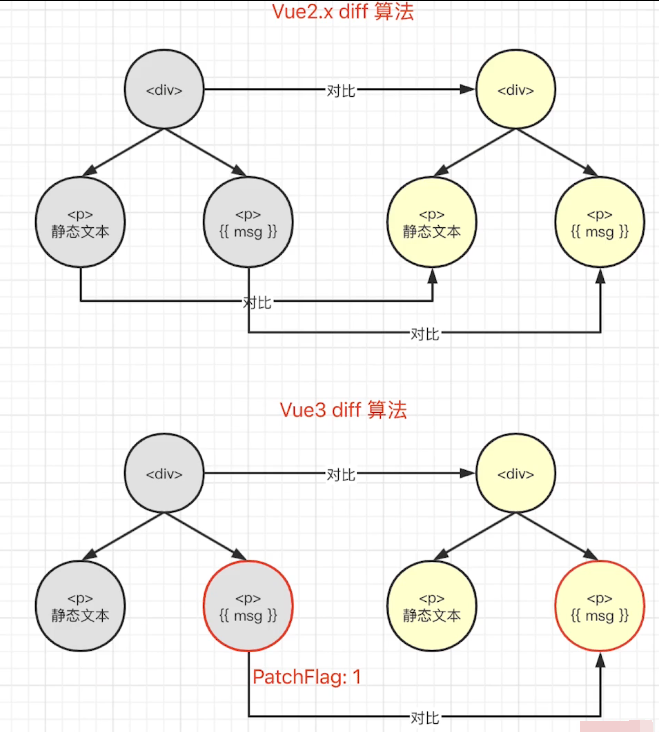
PatchFlag
Vue3模板编译测试工具:Vue3 Template Explorer
- 编译模板时,动态节点做标记,分为不同的类型,如TEXT、 PROPS、CLASS等
- 动态节点: 有插值表达式(有变量需要vue底层处理)的节点
- 静态节点:纯写死的节点,没有变量需要处理
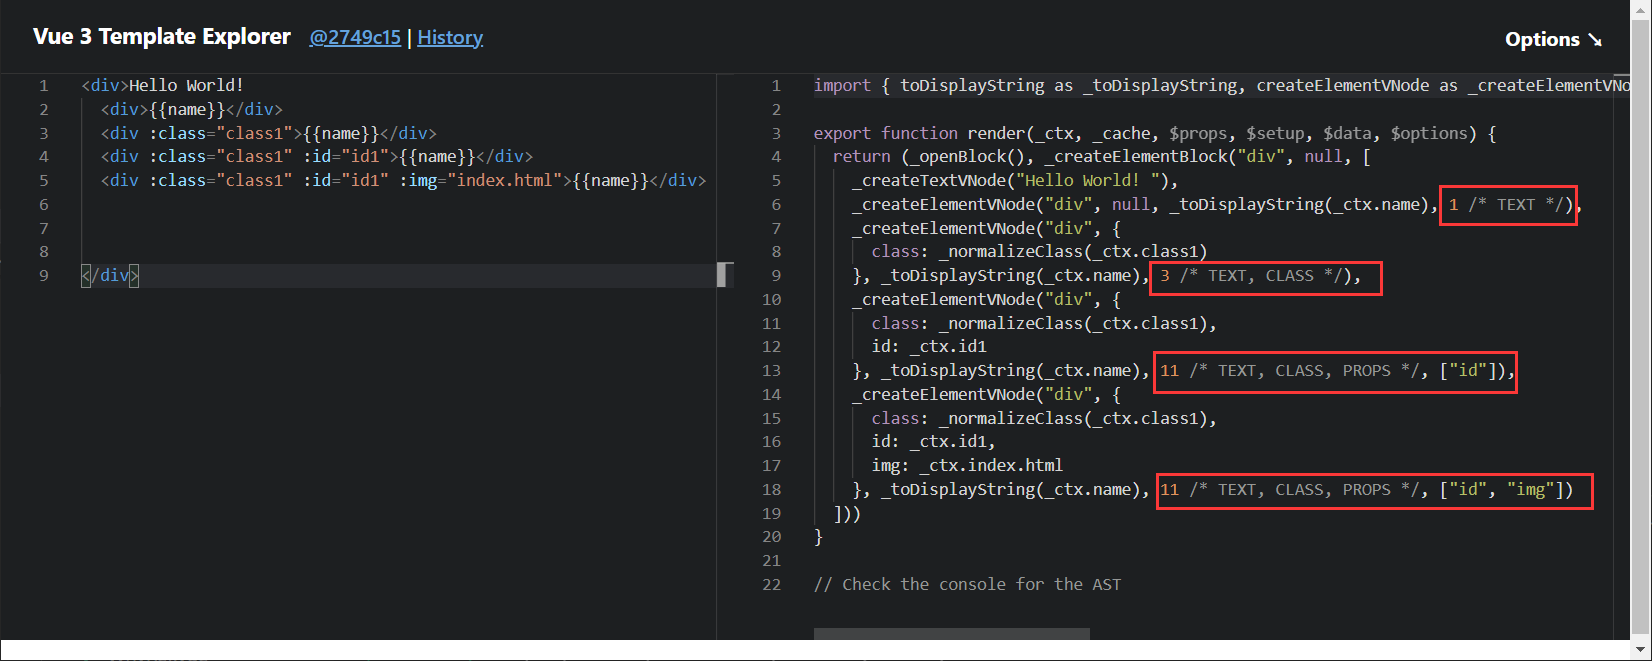
- diff算法时,可以区分静态节点,以及不同类型的动态节点,从而优化diff算法
- 只有标记了PatchFlag的vnode才进行比对
hoistStatic
- 将静态节点的定义,提升到父作用域,缓存起来(空间换时间)
- 多个(到一定的阈值后才会合并)相邻的静态节点,会被合并起来(编译优化)
1
2
3
4
5
6
| <div>
<div>Hello World</div>
<div>Hello World</div>
<div>Hello World</div>
<div :id= "ids">{{msg}}</div>
</div>
|
1
2
3
4
5
6
7
8
9
10
11
12
13
| const _hoisted_1 = _createElementVNode("div", null, "Hello World", -1 )
const _hoisted_2 = _createElementVNode("div", null, "Hello World", -1 )
const _hoisted_3 = _createElementVNode("div", null, "Hello World", -1 )
const _hoisted_4 = ["id"]
export function render(_ctx, _cache, $props, $setup, $data, $options) {
return (_openBlock(), _createElementBlock("div", null, [
_hoisted_1,
_hoisted_2,
_hoisted_3,
_createElementVNode("div", { id: _ctx.ids }, _toDisplayString(_ctx.msg), 9 , _hoisted_4)
]))
}
|
cacheHandler
- 缓存事件(空间换时间),每次执行render函数生成vnode时不用重新定义函数
1
2
3
| <div>
<div @click="clickHander">Hello World</div>
</div>
|
1
2
3
4
5
6
7
| export function render(_ctx, _cache, $props, $setup, $data, $options) {
return (_openBlock(), _createElementBlock("div", null, [
_createElementVNode("div", {
onClick: _cache[0] || (_cache[0] = (...args) => (_ctx.clickHander && _ctx.clickHander(...args)))
}, "Hello World")
]))
}
|
tree-shaking
- 模板编译时,根据不同的情况,引入不同的API(从vue中引入的进行模板编译的API),需要使用才引入
SSR 优化
使用SSR时就不能使用hoistStatic、cacheHandler
- 静态节点直接输出,绕过了vdom,即静态节点直接转换成了字符串 (编译优化)
- 动态节点,还是需要动态渲染
1
2
3
4
5
6
| <div>
<div >Hello World</div>
<div >Hello World</div>
<div >Hello World</div>
<div @click="clickHander">Hello World</div>
</div>
|
1
2
3
4
5
6
7
| import { mergeProps as _mergeProps } from "vue"
import { ssrRenderAttrs as _ssrRenderAttrs } from "vue/server-renderer"
export function ssrRender(_ctx, _push, _parent, _attrs, $props, $setup, $data, $options) {
const _cssVars = { style: { color: _ctx.color }}
_push(`<div${_ssrRenderAttrs(_mergeProps(_attrs, _cssVars))}><div>Hello World</div><div>Hello World</div><div>Hello World</div><div>Hello World</div></div>`)
}
|
Vite
11 Vite是什么?
- 一个前端打包工具,Vue作者发起的项目
- 借助Vue的影响力,发展较快,和webpack竞争
- 优势:开发环境下无需打包,启动快
- 开发环境使用ES6 Module ,无需打包(不用转成es5)—-非常快
- 生产环境使用rollup ,并不会快很多
1
2
3
4
5
6
7
8
9
10
11
12
13
14
15
16
17
| <!DOCTYPE html>
<html>
<head>
<meta charset="UTF-8">
<meta name="viewport" content="width=device-width, initial-scale=1.0">
<title>ES Module demo</title>
</head>
<body>
<p>基本演示</p>
<script type="module">
import { add, multi } from './src/math.js'
console.log('add res', add(10, 20))
console.log('multi res', multi(10, 20))
</script>
</body>
</html>
|
ES6 module
案例代码: L231-es-module-demo
核心点:
- 直接将代码通过ES6 Module的方式引入,不需要转换为ES5后再执行
Composition API和React Hooks
12 Composition API和 React Hooks的对比
- 前者setup只会被调用一次,而后者函数组件会被多次调用
- 前者无需useMemo(缓存数据) useCallback(缓存函数) ,因为setup只调用一次
- 前者无需顾虑调用顺序,而后者需要保证hooks的顺序一致
- 前者reactive + ref比后者useState ,要难理解
三、React
?
bind this
父子通信,子组件调用父组件方法
Chuckie’s Blog-React
- React 组件如何通讯
- JSX本质是什么
- context是什么,有何用途?
- shouldComponentUpdate的用途
- 描述redux单项数据流 (手写流程图)
- setState是同步还是异步
React使用
React基础知识点
JSX基本使用
- 变量、表达式
- class style
- 子元素和组件
1
2
3
4
5
6
7
8
9
10
11
12
13
14
15
16
17
18
19
20
21
22
23
24
25
26
27
28
29
30
31
32
33
34
35
36
37
38
39
40
41
42
43
44
45
46
47
48
49
50
51
52
53
54
55
56
57
58
59
60
61
62
63
64
65
| import React from 'react'
import './style.css'
import List from '../List'
class JSXBaseDemo extends React.Component {
constructor(props) {
super(props)
this.state = {
name: 'chuckie',
imgUrl: 'https://img1.mukewang.com/5a9fc8070001a82402060220-140-140.jpg',
flag: true
}
}
render() {
const pElem = <p>{this.state.name}</p>
return pElem
const exprElem = <p>{this.state.flag ? 'yes' : 'no'}</p>
return exprElem
const imgElem = <div>
<p>我的头像</p>
<img src="xxxx.png"/> // 静态属性
<img src={this.state.imgUrl}/> // 动态属性
</div>
return imgElem
const classElem = <p className={this.state.title}>设置 css class</p>
const classElem = <p className="title">设置 css class</p>
return classElem
const styleElem = <p style="fontSize: 30px, color: blue">设置 style</p>
const styleData = { fontSize: '30px', color: 'blue' }
const styleElem = <p style={styleData}>设置 style</p>
return styleElem
const rawHtml = '<span>富文本内容<i>斜体</i><b>加粗</b></span>'
const rawHtmlData = {
__html: rawHtml
}
const rawHtmlElem = <div>
<p dangerouslySetInnerHTML={rawHtmlData}></p> // 解析为html再显示
<p>{rawHtml}</p> // 不解析直接显示字符串
</div>
return rawHtmlElem
const componentElem = <div>
<p>JSX 中加载一个组件</p>
<hr/>
<List/>
</div>
return componentElem
}
}
export default JSXBaseDemo
|
1
2
3
4
5
6
7
8
9
10
11
12
13
14
15
16
17
18
19
20
21
22
23
24
25
26
27
28
29
30
31
32
33
34
| import React from 'react'
import './style.css'
class ConditionDemo extends React.Component {
constructor(props) {
super(props)
this.state = {
theme: 'black'
}
}
render() {
const blackBtn = <button className="btn-black">black btn</button>
const whiteBtn = <button className="btn-white">white btn</button>
return <div>
{ this.state.theme === 'black' && blackBtn }
</div>
}
}
export default ConditionDemo
|
1
2
3
4
5
6
7
8
9
10
11
12
13
14
15
16
17
18
19
20
21
22
23
24
25
26
27
28
29
30
31
32
33
34
35
36
37
38
39
| import React from 'react'
class ListDemo extends React.Component {
constructor(props) {
super(props)
this.state = {
list: [
{
id: 'id-1',
title: '标题1'
},
{
id: 'id-2',
title: '标题2'
},
{
id: 'id-3',
title: '标题3'
}
]
}
}
render() {
return <ul>
{ /* vue v-for */
this.state.list.map(
(item, index) => {
// 这里的 key 和 Vue 的 key 类似,必填,不能是 index 或 random
return <li key={item.id}>
index {index}; id {item.id}; title {item.title}
</li>
}
)
}
</ul>
}
}
export default ListDemo
|
事件
- bind this
- 对象普通方法需要使用bind this
- 在构造函数中绑定 只用bind一次 性能更高
- 不要在事件绑定的时候bind 这样每次触发事件都要bind一次 性能低
- 对象静态方法(箭头函数)不需要使用bind this
- 关于event参数
- vue中的event是原生事件
- React中的event是对原生事件封装后的事件
- 事件被挂载在document上, 和DOM事件、vue事件都不一样
- React17开始事件不再被挂载到document上了
- React17开始事件被挂载到root组件
- 有利于多个React版本并存,例如微前端
- React中通过event.nativeEvent获取原生事件
- React封装后的事件模拟出了DOM事件所有能力
- 传递自定义参数
1
2
3
4
5
6
7
8
9
10
11
12
13
14
15
16
17
18
19
20
21
22
23
24
25
26
27
28
29
30
31
32
33
34
35
36
37
38
39
40
41
42
43
44
45
46
47
48
49
50
51
52
53
54
55
56
57
58
59
60
61
62
63
64
65
66
67
68
69
70
71
72
73
74
75
76
77
78
79
80
81
82
83
84
85
86
87
88
89
90
| import React from 'react'
class EventDemo extends React.Component {
constructor(props) {
super(props)
this.state = {
name: 'chuckie',
list: [
{
id: 'id-1',
title: '标题1'
},
{
id: 'id-2',
title: '标题2'
},
{
id: 'id-3',
title: '标题3'
}
]
}
this.clickHandler1 = this.clickHandler1.bind(this)
}
render() {
return <ul>{this.state.list.map((item, index) => {
return <li key={item.id} onClick={this.clickHandler4.bind(this, item.id, item.title)}>
index {index}; title {item.title}
</li>
})}</ul>
}
clickHandler1() {
this.setState({
name: 'lisi'
})
}
clickHandler2 = () => {
this.setState({
name: 'lisi'
})
}
clickHandler3 = (event) => {
event.preventDefault()
event.stopPropagation()
console.log('target', event.target)
console.log('current target', event.currentTarget)
console.log('event', event)
console.log('event.__proto__.constructor', event.__proto__.constructor)
console.log('nativeEvent', event.nativeEvent)
console.log('nativeEvent target', event.nativeEvent.target)
console.log('nativeEvent current target', event.nativeEvent.currentTarget)
}
clickHandler4(id, title, event) {
console.log(id, title)
console.log('event', event)
}
}
export default EventDemo
|
表单
- 受控组件
- input textarea select用value
- checkbox radio用checked
1
2
3
4
5
6
7
8
9
10
11
12
13
14
15
16
17
18
19
20
21
22
23
24
25
26
27
28
29
30
31
32
33
34
35
36
37
38
39
40
41
42
43
44
45
46
47
48
49
50
51
52
53
54
55
56
57
58
59
60
61
62
63
64
65
66
67
68
69
70
71
72
73
74
75
76
77
78
79
80
81
82
| import React from 'react'
class FormDemo extends React.Component {
constructor(props) {
super(props)
this.state = {
name: 'chuckie',
info: '个人信息',
city: 'beijing',
flag: true,
gender: 'male'
}
}
render() {
return <div>
{/* <textarea onChange={this.onTextareaChange}>{this.state.info}</textarea> 这种方式是错误的,要用value属性 */}
<textarea value={this.state.info} onChange={this.onTextareaChange}/>
<p>{this.state.info}</p>
</div>
return <div>
<select value={this.state.city} onChange={this.onSelectChange}>
<option value="beijing">北京</option>
<option value="shanghai">上海</option>
<option value="shenzhen">深圳</option>
</select>
<p>{this.state.city}</p>
</div>
return <div>
<input type="checkbox" checked={this.state.flag} onChange={this.onCheckboxChange}/>
<p>{this.state.flag.toString()}</p>
</div>
return <div>
male <input type="radio" name="gender" value="male" checked={this.state.gender === 'male'} onChange={this.onRadioChange}/>
female <input type="radio" name="gender" value="female" checked={this.state.gender === 'female'} onChange={this.onRadioChange}/>
<p>{this.state.gender}</p>
</div>
}
onInputChange = (e) => {
this.setState({
name: e.target.value
})
}
onTextareaChange = (e) => {
this.setState({
info: e.target.value
})
}
onSelectChange = (e) => {
this.setState({
city: e.target.value
})
}
onCheckboxChange = () => {
this.setState({
flag: !this.state.flag
})
}
onRadioChange = (e) => {
this.setState({
gender: e.target.value
})
}
}
export default FormDemo
|
组件使用
- props传递数据
- props传递函数
- props类型检查
1
2
3
4
5
6
7
8
9
10
11
12
13
14
15
16
17
18
19
20
21
22
23
24
25
26
27
28
29
30
31
32
33
34
35
36
37
38
39
40
41
42
43
44
45
46
47
48
49
50
51
52
53
54
55
56
57
58
59
60
61
62
63
64
65
66
67
68
69
70
71
72
73
74
75
76
77
78
79
80
81
82
83
84
85
86
87
88
89
90
91
92
93
| import React from 'react'
import PropTypes from 'prop-types'
class Input extends React.Component {
constructor(props) {
super(props)
this.state = {
title: ''
}
}
render() {
return <div>
<input value={this.state.title} onChange={this.onTitleChange}/>
<button onClick={this.onSubmit}>提交</button>
</div>
}
onTitleChange = (e) => {
this.setState({
title: e.target.value
})
}
onSubmit = () => {
const { submitTitle } = this.props
submitTitle(this.state.title)
this.setState({
title: ''
})
}
}
Input.propTypes = {
submitTitle: PropTypes.func.isRequired
}
class List extends React.Component {
constructor(props) {
super(props)
}
render() {
const { list } = this.props
return <ul>{list.map((item, index) => {
return <li key={item.id}>
<span>{item.title}</span>
</li>
})}</ul>
}
}
List.propTypes = {
list: PropTypes.arrayOf(PropTypes.object).isRequired
}
class TodoListDemo extends React.Component {
constructor(props) {
super(props)
this.state = {
list: [
{
id: 'id-1',
title: '标题1'
},
{
id: 'id-2',
title: '标题2'
},
{
id: 'id-3',
title: '标题3'
}
]
}
}
render() {
return <div>
<Input submitTitle={this.onSubmitTitle}/>
<List list={this.state.list}/>
</div>
}
onSubmitTitle = (title) => {
this.setState({
list: this.state.list.concat({
id: `id-${Date.now()}`,
title
})
})
}
}
export default TodoListDemo
|
setState
- 不可变值 (赋值前不能修改原state, 对数组的操作都要是纯函数操作)
- 可能是异步更新 (传入对象或函数都是以下情况)
- 正常使用是异步更新state,需要在回调函数中才能拿到state新值
- 同步更新情况
- setTimeout 中 setState 是同步的
- 自己定义的 DOM 事件,setState 是同步的,例如在 componentDidMount 中自定义的事件
- 可能会被合并
1
2
3
4
5
6
7
8
9
10
11
12
13
14
15
16
17
18
19
20
21
22
23
24
25
26
27
28
29
30
31
32
33
34
35
36
37
38
39
40
41
42
43
44
45
46
47
48
49
50
51
52
53
54
55
56
57
58
59
60
61
62
63
64
65
66
67
68
69
70
71
72
73
74
75
76
77
78
79
80
81
82
83
84
85
86
87
88
89
90
91
92
93
94
95
96
97
98
99
100
101
102
103
104
105
106
107
108
109
110
111
112
113
114
115
| import React from 'react'
class StateDemo extends React.Component {
constructor(props) {
super(props)
this.state = {
count: 0
}
}
render() {
return <div>
<p>{this.state.count}</p>
<button onClick={this.increase}>累加</button>
</div>
}
increase = () => {
this.setState({
count: this.state.count + 1
})
this.setState({
count: this.state.count + 1
}, () => {
console.log('count by callback', this.state.count)
})
console.log('count', this.state.count)
setTimeout(() => {
this.setState({
count: this.state.count + 1
})
console.log('count in setTimeout', this.state.count)
}, 0)
this.setState({
count: this.state.count + 1
})
this.setState({
count: this.state.count + 1
})
this.setState({
count: this.state.count + 1
})
this.setState((prevState, props) => {
return {
count: prevState.count + 1
}
})
this.setState((prevState, props) => {
return {
count: prevState.count + 1
}
})
this.setState((prevState, props) => {
return {
count: prevState.count + 1
}
})
}
bodyClickHandler = () => {
this.setState({
count: this.state.count + 1
})
console.log('count in body event', this.state.count)
}
componentDidMount() {
document.body.addEventListener('click', this.bodyClickHandler)
}
componentWillUnmount() {
document.body.removeEventListener('click', this.bodyClickHandler)
}
}
export default StateDemo
const list5Copy = this.state.list5.slice()
list5Copy.splice(2, 0, 'a')
this.setState({
list1: this.state.list1.concat(100),
list2: [...this.state.list2, 100],
list3: this.state.list3.slice(0, 3),
list4: this.state.list4.filter(item => item > 100),
list5: list5Copy
})
this.setState({
obj1: Object.assign({}, this.state.obj1, {a: 100}),
obj2: {...this.state.obj2, a: 100}
})
|
生命周期
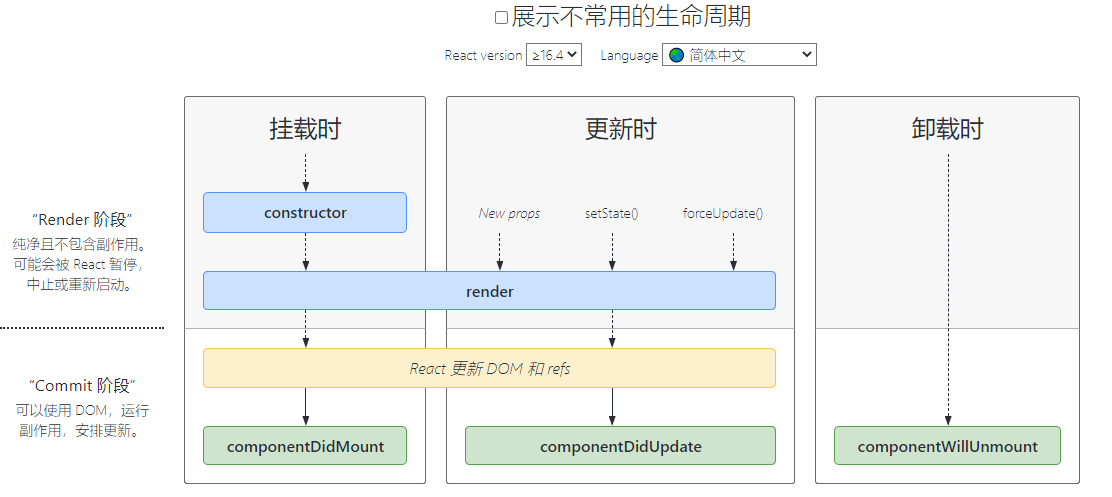
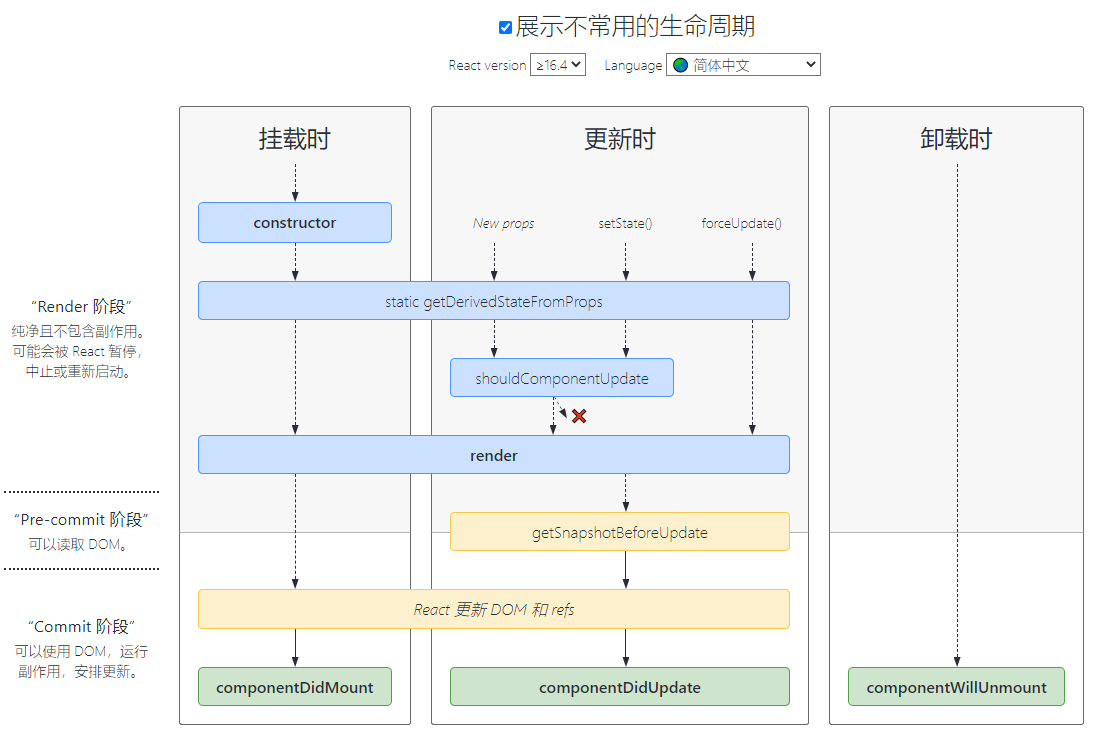
以下是React17(含)以后的生命周期函数
componentDidMount() 对应于vue中mounted()componentDidUpdate()对应于vue中updated()componentWillUnmount()对应于vue中beforeUnmount()
React高级特性
函数组件
- 纯函数,输入props, 输出JSX
- 没有实例,没有生命周期,没有state,减少了性能的消耗,性能更高
- 不能扩展其他方法
非受控组件
受控组件:自己实现双向绑定,通过state就可以拿到节点变化的value
非受控组件:state只是给节点赋初始值,后续节点value的变化与state无关,也就是不受state控制,如果要拿到节点变化的value只能在ref的配合下通过DOM拿到节点,再拿到实时变化的value
非受控组件使用场景:
- 必须手动操作DOM元素, setState实现不了
- 文件上传
<input type=file>
- 某些富文本编辑器,需要传入DOM元素
- ref
- defaultValue defaultChecked
- 给dom节点赋初始值
- input textarea select给value赋值时要用defaultValue
- checkbox radio给checked赋值时要用defaultChecked
- 手动操作DOM元素
1
2
3
4
5
6
7
8
9
10
11
12
13
14
15
16
17
18
19
20
21
22
23
24
25
26
27
28
29
30
31
32
33
34
35
36
37
38
39
40
41
42
43
44
45
46
47
48
49
| import React from 'react'
class App extends React.Component {
constructor(props) {
super(props)
this.state = {
name: 'chuckie',
flag: true,
}
this.nameInputRef = React.createRef()
this.fileInputRef = React.createRef()
}
render() {
return <div>
{/* 使用 defaultValue 而不是 value ,使用 ref */}
<input defaultValue={this.state.name} ref={this.nameInputRef}/>
{/* state 并不会随着改变 */}
<span>state.name: {this.state.name}</span>
<br/>
<button onClick={this.alertName}>alert name</button>
</div>
return <div>
<input
type="checkbox"
defaultChecked={this.state.flag}
/>
</div>
return <div>
<input type="file" ref={this.fileInputRef}/>
<button onClick={this.alertFile}>alert file</button>
</div>
}
alertName = () => {
const elem = this.nameInputRef.current
alert(elem.value)
}
alertFile = () => {
const elem = this.fileInputRef.current
alert(elem.files[0].name)
}
}
export default App
|
Portals
传送门,类似vue中Teleport
- 核心API:
ReactDOM.createPortal(模板,挂载的目标节点)
1
2
3
4
5
6
7
8
9
10
11
12
13
14
15
16
17
18
19
20
21
22
23
24
25
26
27
28
29
| import React from 'react'
import ReactDOM from 'react-dom'
class PortalsDemo extends React.Component {
constructor(props) {
super(props)
this.state = {
}
}
render() {
return ReactDOM.createPortal(
<div className="modal">{this.props.children}</div>,
document.body // 挂载的目标DOM节点
)
}
}
export default PortalsDemo
// 父组件使用
<PortalsDemo>Modal 内容</PortalsDemo>
|
context
使用场景:公共信息(语言、主题)传递给每个组件
不使用的原因:
1
2
3
4
5
6
7
8
9
10
11
12
13
14
15
16
17
18
19
20
21
22
23
24
25
26
27
28
29
30
31
32
33
34
35
36
37
38
39
40
41
42
43
44
45
46
47
48
49
50
51
52
53
54
55
56
57
58
59
60
61
| import React from 'react'
const ThemeContext = React.createContext('light')
function ThemeLink (props) {
return <ThemeContext.Consumer>
{ value => <p>link's theme is {value}</p> }
</ThemeContext.Consumer>
}
class ThemedButton extends React.Component {
render() {
const theme = this.context
return <div>
<p>button's theme is {theme}</p>
</div>
}
}
ThemedButton.contextType = ThemeContext
function Toolbar(props) {
return (
<div>
<ThemedButton />
<ThemeLink />
</div>
)
}
// 顶层组件
class App extends React.Component {
constructor(props) {
super(props)
this.state = {
theme: 'light'
}
}
render() {
return <ThemeContext.Provider value={this.state.theme}>
<Toolbar />
<hr/>
<button onClick={this.changeTheme}>change theme</button>
</ThemeContext.Provider>
}
changeTheme = () => {
this.setState({
theme: this.state.theme === 'light' ? 'dark' : 'light'
})
}
}
export default App
|
异步组件
- import()
- React.lazy
- React.Suspense 和vue中的Suspense 类似
1
2
3
4
5
6
7
8
9
10
11
12
13
14
15
16
17
18
19
20
21
22
23
24
| import React from 'react'
const ContextDemo = React.lazy(() => import('./ContextDemo'))
class App extends React.Component {
constructor(props) {
super(props)
}
render() {
return <div>
<p>引入一个动态组件</p>
<hr />
{/* fallbac是默认展示的效果 */}
<React.Suspense fallback={<div>Loading...</div>}>
<ContextDemo/>
</React.Suspense>
</div>
}
}
export default App
|
高阶组件HOC
逻辑抽离
使用
1
2
3
4
5
6
7
8
9
10
11
12
|
const HOCFactory = (Component) => {
class HOC extends React. Component {
render(){
return <Component {... this.props} />
}
}
return HOC
}
const EnhancedComponent1 = HOCFactory (WrappedComponent1)
const EnhancedComponent2 = HOCFactory (WrappedComponent2)
|
案例: 获取鼠标位置的公共需求
- withMouse中实现获取鼠标位置的功能
- 哪个组件需要使用这个功能,调用withMouse,并将组件自己传入,返回的则是加上这个功能后的组件
1
2
3
4
5
6
7
8
9
10
11
12
13
14
15
16
17
18
19
20
21
22
23
24
25
26
27
28
29
30
31
32
33
34
35
36
37
38
39
40
41
| import React from 'react'
const withMouse = (Component) => {
class withMouseComponent extends React.Component {
constructor(props) {
super(props)
this.state = { x: 0, y: 0 }
}
handleMouseMove = (event) => {
this.setState({
x: event.clientX,
y: event.clientY
})
}
render() {
return (
<div style={{ height: '500px' }} onMouseMove={this.handleMouseMove}>
{}
<Component {...this.props} mouse={this.state}/>
</div>
)
}
}
return withMouseComponent
}
const App = (props) => {
const a = props.a
const { x, y } = props.mouse // 接收 mouse 属性
return (
<div style={{ height: '500px' }}>
<h1>The mouse position is ({x}, {y})</h1>
<p>{a}</p>
</div>
)
}
export default withMouse(App)
|
Render Props
逻辑抽离
使用
1
2
3
4
5
6
7
8
9
10
11
12
13
14
15
16
17
18
19
20
|
class Factory extends React.Component {
constructor() {
this.state = {
}
}
render(){
return <div>{this.praps.render(this.state)}</div>
}
}
const App = ()=>(
<Factory render={
(props) => <p>{props.a} {props.b} ...</p>
}/>
)
|
案例
1
2
3
4
5
6
7
8
9
10
11
12
13
14
15
16
17
18
19
20
21
22
23
24
25
26
27
28
29
30
31
32
33
34
35
36
37
38
39
40
41
42
43
44
45
46
| import React from 'react'
import PropTypes from 'prop-types'
class Mouse extends React.Component {
constructor(props) {
super(props)
this.state = { x: 0, y: 0 }
}
handleMouseMove = (event) => {
this.setState({
x: event.clientX,
y: event.clientY
})
}
render() {
return (
<div style={{ height: '500px' }} onMouseMove={this.handleMouseMove}>
{}
{this.props.render(this.state)}
</div>
)
}
}
Mouse.propTypes = {
render: PropTypes.func.isRequired // 必须接收一个 render 属性,而且是函数
}
const App = (props) => (
<div style={{ height: '500px' }}>
<p>{props.a}</p>
<Mouse render={
({ x, y }) => <h1>The mouse position is ({x}, {y})</h1>
}/>
</div>
)
/**
* 即,定义了 Mouse 组件,只有获取 x y 的能力。
* 至于 Mouse 组件如何渲染,App 说了算,通过 render prop 的方式告诉 Mouse 。
*/
export default App
|
React性能优化
shouldComponentUpdate (简称SCU )
- SCU默认返回true ,即React默认重新渲染所有子组件
- React为什么不直接底层支持比对来避免不必要的渲染,反而要开发者来进行比对,判断是否需要重新渲染
- 因为比对必须配合”不可变值”的规则,但不是每个开发者都会遵循这个规则,如果没有遵循这个规则,则会在比对中报错,在报错和性能的抉择中React选择不出错
- 可先不用SCU ,有性能问题时再考虑使用
1
2
3
4
5
6
7
8
9
10
11
12
13
14
15
16
17
18
19
20
21
22
23
24
25
26
27
28
29
30
31
32
33
34
35
36
37
38
39
40
41
42
43
44
45
46
47
48
49
50
51
52
53
54
55
56
57
58
59
60
61
62
63
64
65
66
67
68
69
70
71
72
73
74
75
76
77
78
79
80
81
82
83
84
85
86
87
88
89
90
91
92
93
94
95
96
97
98
99
100
101
102
103
104
105
106
107
108
109
110
111
112
113
114
115
116
117
118
119
120
121
122
| import React from 'react'
import PropTypes from 'prop-types'
class Input extends React.Component {
constructor(props) {
super(props)
this.state = {
title: ''
}
}
render() {
return <div>
<input value={this.state.title} onChange={this.onTitleChange}/>
<button onClick={this.onSubmit}>提交</button>
</div>
}
onTitleChange = (e) => {
this.setState({
title: e.target.value
})
}
onSubmit = () => {
const { submitTitle } = this.props
submitTitle(this.state.title)
this.setState({
title: ''
})
}
}
Input.propTypes = {
submitTitle: PropTypes.func.isRequired
}
class List extends React.Component {
constructor(props) {
super(props)
}
render() {
const { list } = this.props
return <ul>{list.map((item, index) => {
return <li key={item.id}>
<span>{item.title}</span>
</li>
})}</ul>
}
}
List.propTypes = {
list: PropTypes.arrayOf(PropTypes.object).isRequired
}
class Footer extends React.Component {
constructor(props) {
super(props)
}
render() {
return <p>
{this.props.text}
{this.props.length}
</p>
}
componentDidUpdate() {
console.log('footer did update')
}
shouldComponentUpdate(nextProps, nextState) {
if (nextProps.text !== this.props.text
|| nextProps.length !== this.props.length) {
return true
}
return false
}
}
class TodoListDemo extends React.Component {
constructor(props) {
super(props)
this.state = {
list: [
{
id: 'id-1',
title: '标题1'
},
{
id: 'id-2',
title: '标题2'
},
{
id: 'id-3',
title: '标题3'
}
],
footerInfo: '底部文字'
}
}
render() {
return <div>
<Input submitTitle={this.onSubmitTitle}/>
<List list={this.state.list}/>
{/* Footer是静态节点,父组件每次更新其实它是不需要更新的,这里就需要用到shouldComponentUpdate */}
<Footer text={this.state.footerInfo} length={this.state.list.length}/>
</div>
}
onSubmitTitle = (title) => {
this.setState({
list: this.state.list.concat({
id: `id-${Date.now()}`,
title
})
})
}
}
export default TodoListDemo
|
1
2
3
4
5
6
7
8
9
10
11
12
13
14
15
16
17
18
19
20
21
22
23
24
25
26
27
28
29
30
31
32
33
34
35
36
37
38
39
40
41
42
43
44
45
46
47
48
49
50
51
52
53
54
55
56
57
58
59
60
61
62
63
64
65
66
67
68
69
70
71
72
73
74
75
76
77
78
79
80
81
82
83
84
85
86
87
88
89
90
91
92
93
94
95
96
97
98
99
100
101
102
103
104
105
106
107
108
109
110
111
112
113
|
import React from 'react'
import PropTypes from 'prop-types'
import _ from 'lodash'
class Input extends React.Component {
constructor(props) {
super(props)
this.state = {
title: ''
}
}
render() {
return <div>
<input value={this.state.title} onChange={this.onTitleChange}/>
<button onClick={this.onSubmit}>提交</button>
</div>
}
onTitleChange = (e) => {
this.setState({
title: e.target.value
})
}
onSubmit = () => {
const { submitTitle } = this.props
submitTitle(this.state.title)
this.setState({
title: ''
})
}
}
Input.propTypes = {
submitTitle: PropTypes.func.isRequired
}
class List extends React.Component {
constructor(props) {
super(props)
}
render() {
const { list } = this.props
return <ul>{list.map((item, index) => {
return <li key={item.id}>
<span>{item.title}</span>
</li>
})}</ul>
}
shouldComponentUpdate(nextProps, nextState) {
if (_.isEqual(nextProps.list, this.props.list)) {
return false
}
return true
}
}
List.propTypes = {
list: PropTypes.arrayOf(PropTypes.object).isRequired
}
class TodoListDemo extends React.Component {
constructor(props) {
super(props)
this.state = {
list: [
{
id: 'id-1',
title: '标题1'
},
{
id: 'id-2',
title: '标题2'
},
{
id: 'id-3',
title: '标题3'
}
]
}
}
render() {
return <div>
<Input submitTitle={this.onSubmitTitle}/>
<List list={this.state.list}/>
</div>
}
onSubmitTitle = (title) => {
this.setState({
list: this.state.list.concat({
id: `id-${Date.now()}`,
title
})
})
}
}
export default TodoListDemo
|
PureComponent和React.memo
- PureComponent , SCU中实现了浅比较
- 通过PureComponent 构建的组件,不需要自己定义shouldComponentUpdate,因为已经默认有了shouldComponentUpdate,且对参数做了浅比较,若浅比较相等则返回false,不重复渲染;若浅比较不相等则返回true,重新渲染
- 浅比较已适用大部分情况(尽量不要做深度比较)
1
2
3
4
5
6
7
8
9
10
11
12
13
14
15
| class List extends React.PureComponent {
constructor(props) {
super(props)
}
render() {
const { list } = this.props
return <ul>{list.map((item, index) => {
return <li key={item.id}>
<span>{item.title}</span>
</li>
})}</ul>
}
shouldComponentUpdate() {}
}
|
1
2
3
4
5
6
7
8
9
10
11
| function MyComponent (props) {
}
function areEqual(prevProps,nextProps) {
}
export default React.memo(MyComponent, areEqual) ;
|
不可变值immutable.js
Giuhub地址: immutable.js
- 为了配合React中“不可变值”规则的使用,使用
immutable.js就可以完全保证开发者时遵循”不可变值”规则的
- immutable.js基于共享数据(不是深拷贝) , 速度块
- 有一定学习和迁移成本,按需使用
Redux
基本概念
- store state
- action
- reducer
单项数据流
- dispatch(action)
- reducer -> newState
- subscribe触发通知
react- redux
< Provider> connect- connect
- mapStateT oProps mapDispatchToProps
异步action
中间件
React-router
四、webpack
- 前端代码为何要进行构建和打包?
- module chunk bundle分别什么意思,有何区别?
- loader和plugin 的区别?
- webpack 如何实现懒加载?
- webpack常见性能优化
- babel-runtime和 babel-polyfill的区别
五、框架综合应用
- 基于React设计一个todolISt (组件结构,redux state 数据结构)
- 基于Vue设计一个购物车(组件结构,vuex state 数据结构)


