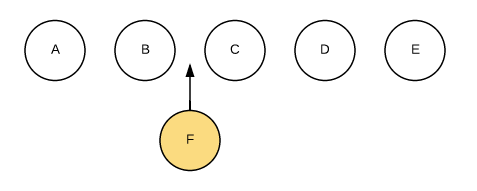
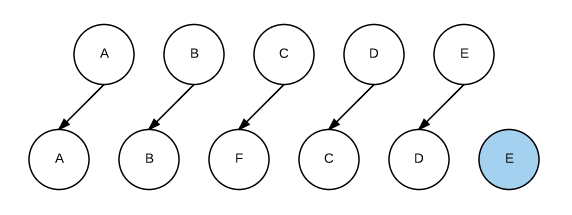
1
2
3
4
5
6
| const cartList = store.state.cartList 情况1
const { cartList } = toRefs(store.state) 情况2
以上两者有什么区别
为什么computed中情况2 不能监视数据的变化??????
|
一、Vue基础
Vue官网-Vue2.x
Vue官网-Vue3
Vue官网导航使用指南视频
1 Vue安装及使用
1.1 直接使用<script>引入
以下安装及使用基于Vue2.x
*引入方式: *
- 方式一:直接CDN引入
- 官网位置:官网-学习-教程-安装-直接用
<script>引入-CDN
- 可以选择引入开发环境版本还是生产环境版本,将相应地址在html中通过
<script>引入
1
2
3
4
| <!-- 开发环境版本,包含了有帮助的命令行警告 -->
<script src="https://cdn.jsdelivr.net/npm/vue/dist/vue.js"></script>
<!-- 生产环境版本,优化了尺寸和速度 -->
<script src="https://cdn.jsdelivr.net/npm/vue"></script>
|
- 方式二: 下载和引入
- 官网位置:官网-学习-教程-安装-直接用
<script>引入
- 选择开发版本或生产版本直接下载一个js文件(开发阶段下载开发版本)
- 将下载的文件再在html文件中通过
<script>引入
使用Vue:
目录结构
- 在项目中新建js文件夹 ,若是以上方式二引入Vue则需要将下载的vue.js文件 放入js文件夹下
- 在项目中新建html文件,并通过
<script>引入Vue
1
2
3
4
5
6
7
8
9
10
11
12
13
| <!DOCTYPE html>
<html lang="en">
<head>
<meta charset="UTF-8">
<meta http-equiv="X-UA-Compatible" content="IE=edge">
<meta name="viewport" content="width=device-width, initial-scale=1.0">
<title>vue-demo</title>
<script src="./src/vue.js"></script> //方式二引入
<script src="https://cdn.jsdelivr.net/npm/vue@2.6.14/dist/vue.js"></script>//方式一引入
</head>
<body>
</body>
</html>
|
创建Vue对象,传入options:{}
1
2
3
4
5
6
7
8
9
10
11
12
13
14
15
16
17
18
19
20
21
22
23
24
| <!DOCTYPE html>
<html lang="en">
<head>
<meta charset="UTF-8">
<meta http-equiv="X-UA-Compatible" content="IE=edge">
<meta name="viewport" content="width=device-width, initial-scale=1.0">
<title>vue-demo</title>
<script src="./src/vue.js"></script>
</head>
<body>
<div id="app">{{message}}
<h1>{{name}}</h1>
</div>
<script>
const app = new Vue({
el:'#app',
data:{
message:'你好呀 hello vue',
name : 'maxthon'
}
})
</script>
</body>
</html>
|
1.2 npm及CLI安装
npm直接安装vue
使用脚手架
(仅第一次执行)∶全局安装@vue/cli
npm install -g @vue/cli
切换到要创建项目的目录,然后使用命令创建项目, 执行后会弹出选择安装vue2.x或vue3,自行选择;创建好的项目就已经接受git托管了
vue create 项目名称
启动项目
npm run serve
1.3 单页组件
单页组件视频教程
1.4 初始化项目
2 Vue中的MVVM
MVVM维基百科
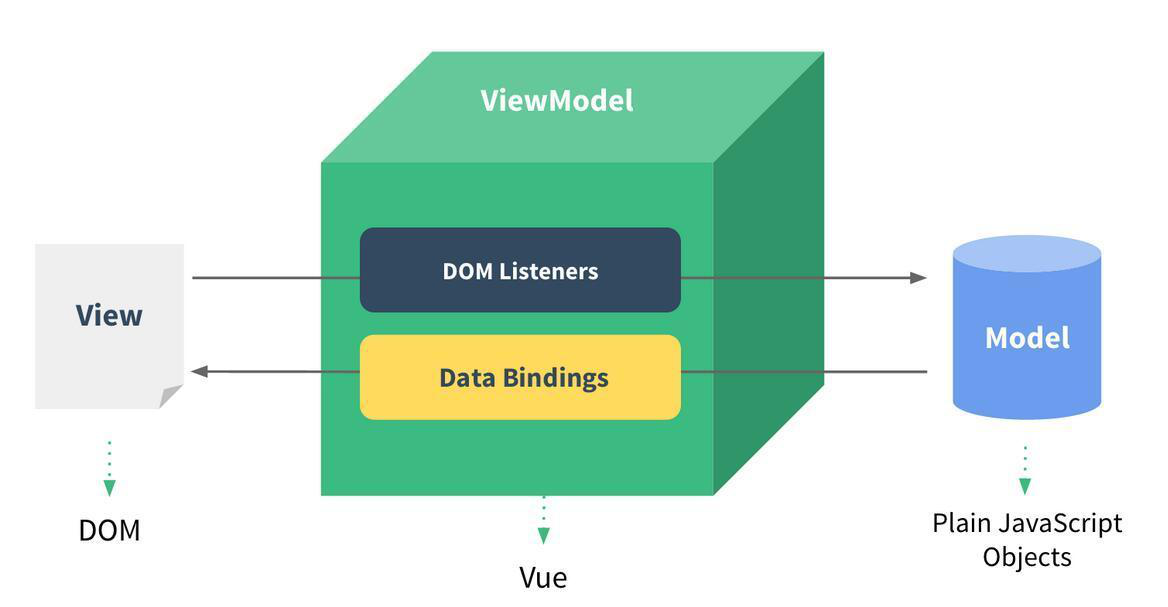
View
- DOM层。
- 给用户展示各种信息。
- 对应Vue中的模板:el
Model
VueModel
- 视图模型层:View和Model沟通的桥梁。
- 实现了Data Binding,也就是数据绑定,将Model的改变实时的反应到View中
- 实现了DOM Listener,也就是DOM监听,当DOM发生一些事件(点击、滚动、touch等)时,可以监听到,并在需要的情况下改变对应的Data。
- 对应Vue中的Vue实例对象
3 传入Vue的options
- 创建Vue对象的时候,传入了一些options:{}
- {}中包含了el属性:该属性决定了这个Vue对象挂载到哪一个元素上。
- {}中包含了data属性:该属性中通常会存储一些数据
- 这些数据可以是我们直接定义出来的。
- 也可能是来自网络,从服务器加载的。
- {}中包含了methods属性:该属性中定义了函数
- {}中包含了computed 属性: 计算属性
1
2
3
4
5
6
7
8
9
10
11
12
13
14
15
16
17
18
19
20
21
22
23
24
25
26
27
28
29
30
31
| <div id="app">{{message}}
<h1>{{name}}</h1>
<ul>
<li v-for="item in movies">{{item}}</li>
</ul>
<h1>当前计数:{{count}}</h1>
<button v-on:click="add">+</button>
<button v-on:click="sub">-</button>
</div>
<script src="../js/vue.js"></script>
<script>
const app = new Vue({
el:'#app',
data:{
message:'你好呀 hello vue',
name : 'jack ma',
movies:['心灵捕手','阿甘正传','星际穿越'],
count:0
},
methods:{
add(){
console.log('add')
this.count++
},
sub(){
console.log('sub')
this.count--
}
}
})
</script>
|
4 Vue生命周期
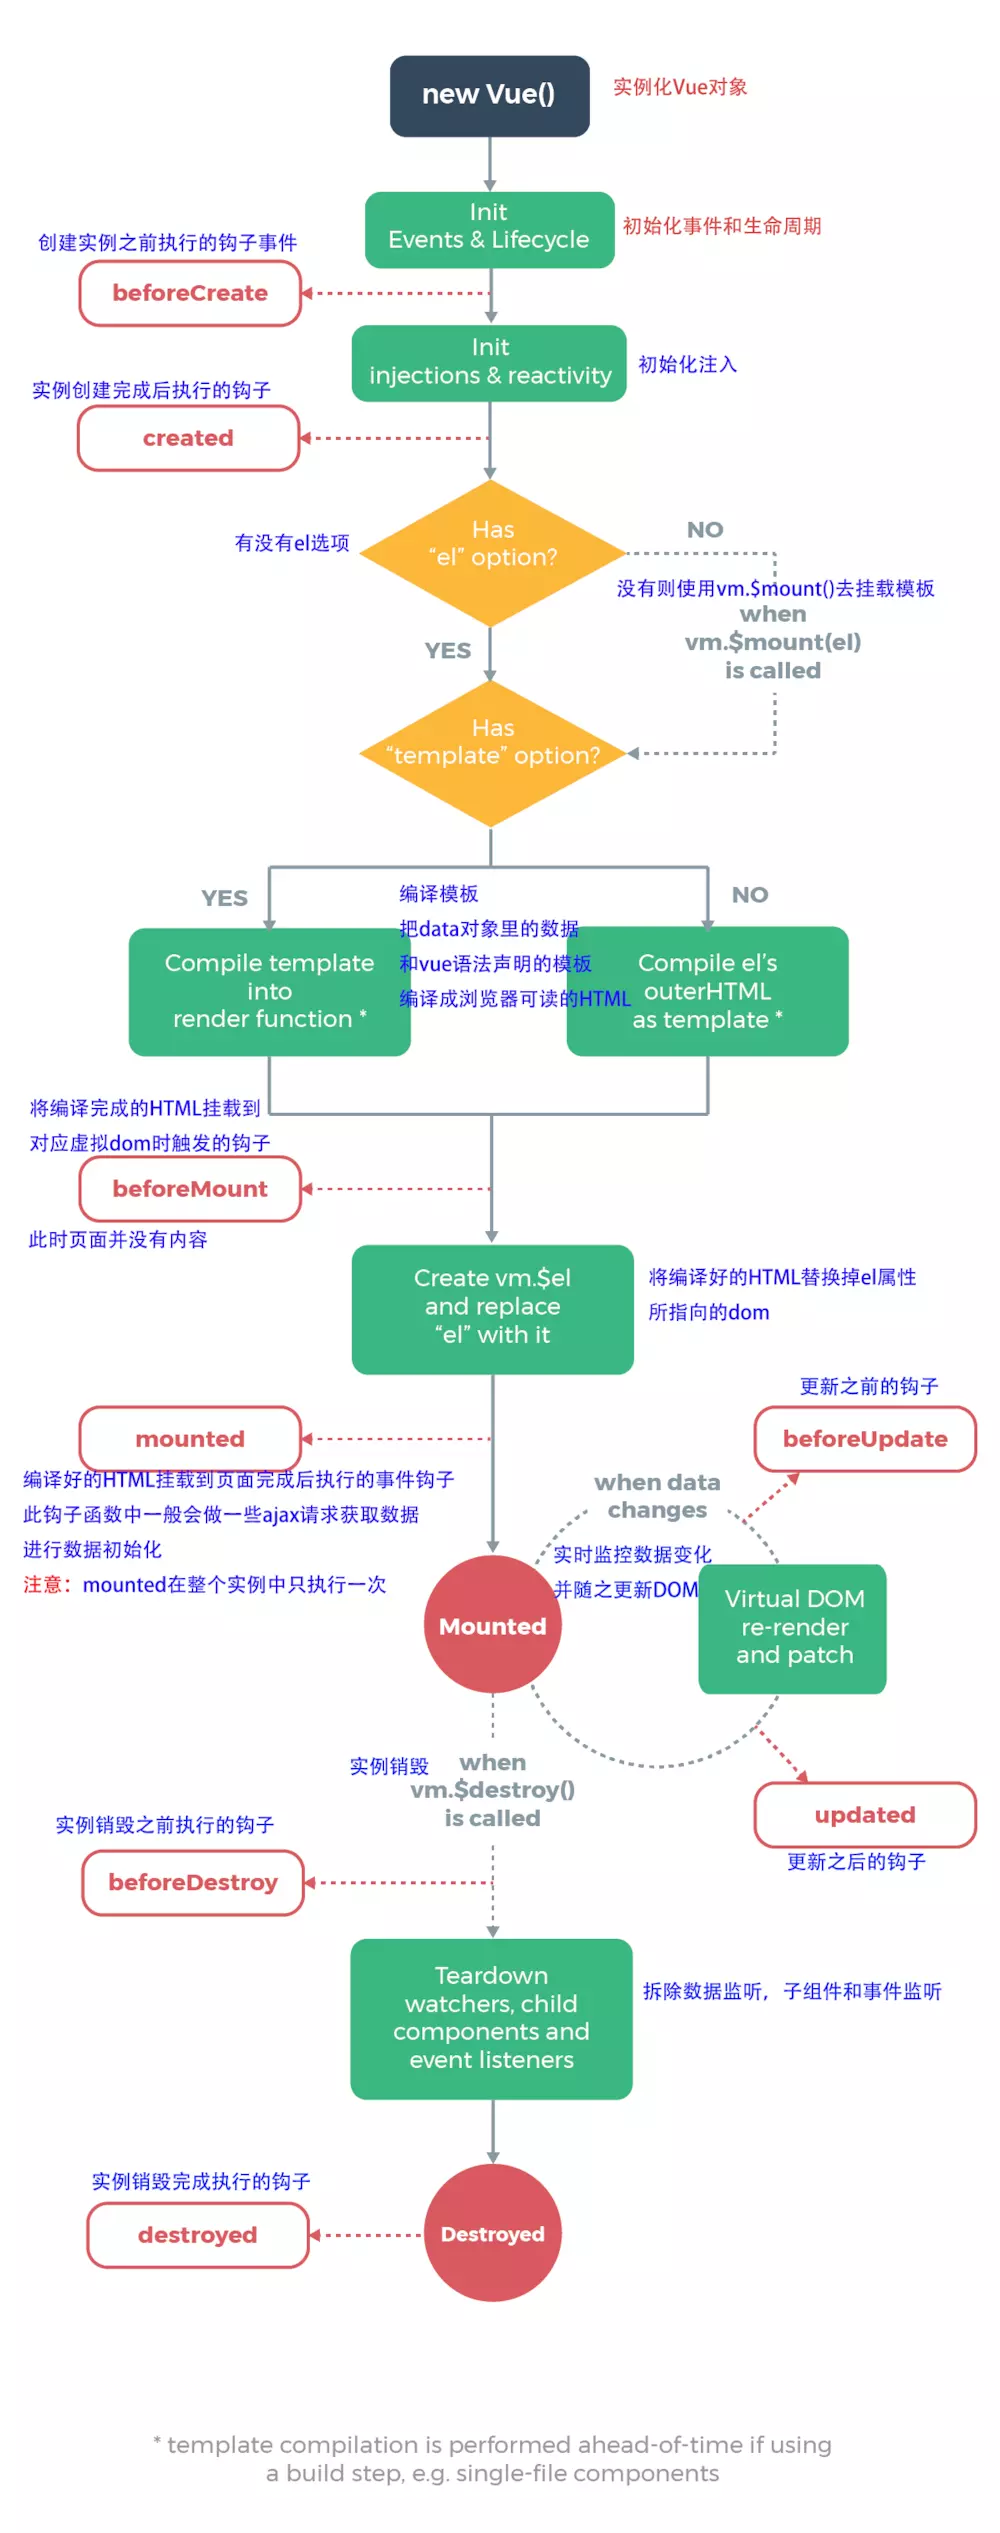
4.1 生命周期各时间节点易错点
- created()中获取不了组件及元素
报错原因:
- el是在created()周期函数之后才挂载到Vue中的
- 所以在created()中获取的组件或元素为空
解决办法:
- 将获取组件及元素的操作放到mounted()周期函数中执行
- mouted()中可能数据还没有加载完成
- updated()中DOM渲染还没有完成
- $nextTick()中图片还没有加载完成
1
2
3
| this.$nextTick(() => {
//DOM渲染完成后需要执行的操作
})
|
5 vue.config.js配置
1
2
3
4
5
6
7
| module.exports = {
devServer:{
port: 8999,
open: tru
}
}
|
二、Vue基础语法
1 插值操作
mustache语法(双大括号)
v-once
- 该指令表示元素和组件只渲染一次,view层展示的数据不会随着model层数据的变化而改变。
1
2
3
4
5
6
7
8
9
10
11
12
| <div id="app">
<h1 v-once>{{name}}</h1>
</div>
<script src="../js/vue.js"></script>
<script>
const app = new Vue({
el:'#app',
data:{
name : 'jack ma'
}
})
</script>
|
v-html
- 该指令用于解析html代码
- 当数据内容本身就是html代码时可以只用这个指令解析并展示
- v-html :会有XSS风险,会覆盖子组件

v-text
- v-text作用和Mustache比较相似:都是用于将数据显示在界面中
- v-text通常情况下,接受一个string类型
1
2
3
4
5
6
7
8
9
10
11
12
13
14
15
16
17
18
| <div id="app">
<h1 >{{name}}</h1>---------1
<h1 v-text="name"></h1>----2
</div>
<script src="../js/vue.js"></script>
<script>
const app = new Vue({
el:'#app',
data:{
name : 'jack ma'
}
})
</script>
//展示效果相同
jack ma------1
jack ma------2
|
v-pre
- v-pre用于跳过这个元素和它子元素的编译过程,用于显示原本的Mustache语法。
1
2
3
4
5
6
7
8
9
10
11
12
13
14
15
16
17
18
| <div id="app">
<h1 >{{name}}</h1>---------1
<h1 v-pre >{{name}}</h1>----2
</div>
<script src="../js/vue.js"></script>
<script>
const app = new Vue({
el:'#app',
data:{
name : 'jack ma'
}
})
</script>
//展示效果相同
jack ma------1
{{name}}------2
|
v-cloak
- 在vue实例编译完成之前,浏览器会直接显示未编译的Mustache标签。
- 为了避免这个问题,设置
v-cloak指令可以 不显示Mustache标签,直到编译结束再显示编译之后的效果
- [v-cloak]{} 设置未编译完成之前的显示效果
1
2
3
4
5
6
7
8
9
10
11
12
13
14
15
16
17
| <div id="app">
<h1 v-cloak>{{name}}</h1>
</div>
<script src="../js/vue.js"></script>
<script>
const app = new Vue({
el:'#app',
data:{
name : 'jack ma'
}
})
</script>
<style>
[v-cloak] {
display: none;
}
</style>
|
2 绑定属性
v-bind
v-bind绑定class
1 对象语法
1
2
3
| //'active'、'line'为类名
//isActive、isLine 为标志位 只有true、false取值 控制类是否生效
<h2 class="title" :class="{'active': isActive, 'line': isLine}">Hello World</h2>
|
2 数组语法
1
2
| //'active'、'line'为类名
<h2 class="title" :class="['active’, 'line']">Hello World</h2>
|
1
2
3
4
5
6
7
8
9
10
11
12
13
| <div id="app">
<h1 :class="[active, line]">{{name}}</h1>
</div>
<script src="../js/vue.js"></script>
<script>
const app = new Vue({
el:'#app',
data:{
active : {color: red},
line: {font-size: 10px}
}
})
</script>
|
v-bind绑定style
1 对象语法
- style后面跟的是一个对象类型
- 对象的key是CSS属性名称
- 对象的value是具体赋的值,值可以来自于data中的属性
1
| :style="{color: currentColor, fontSize: fontSize + 'px'}"
|
2 数组语法
1
2
3
4
5
| <div :style="[baseStyles, overridingStyles]"></div>
data: {
baseStyles:{backGroundColor:'red'} //注意转换成驼峰形势
}
|
3 计算属性
computed
computed VS methods
- computed 和 methods中定义的方法都可以达到对data数据加工的效果
- 但是:计算属性会进行缓存,如果多次使用时,计算属性只会调用一次 即只会计算一次 然后将计算结果保存,避免了重复无用的计算,节省了计算能力。
4 watch
当属性发送变化时就会触发
- watch 监听引用类型,拿不到oldVal, 因为oldVal 和 val都是存储的引用地址,而引用地址是没有变化的只是引用的堆中的值类型发生了变化
1
2
3
4
5
6
7
8
9
10
11
12
13
14
15
16
17
18
19
20
21
22
23
24
25
26
27
28
29
30
31
32
33
34
35
36
37
38
39
40
41
42
43
44
45
| <template>
<div>
<input v-model="name"/>
<input v-model="info.city"/>
</div>
</template>
<script>
export default {
data() {
return {
name: '双越',
info: {
city: '北京'
}
}
},
watch: {
name(oldVal, val) {
console.log('watch name', val, oldVal)
},
info: {
handler(oldVal, val) {
console.log('watch info', val, oldVal)
},
deep: true,
immediate: true
},
'info.city'(oldVal, val) {
console.log('watch city', val, oldVal)
}
}
}
</script>
|
5 事件监听
v-on
v-on参数
v-on 修饰符
.stop: 阻止冒泡.prevent: 阻止默认事件的调用 例如form的submit(提交).native:监听组件根元素的原生事件。.once :只触发一次回调。
DOM原生事件列表
DOM原生事件列表
6 条件判断
v-if、v-else-if、v-else
v-if VS v-show
- v-if条件为false时,对应的元素以及其子元素不会渲染。(通过Vue控制)
- v-show条件为false时,对应的元素以及其子元素会渲染。只是将元素的display属性设置为none,所以没有显示出来。(通过css控制)
- 总结:
- 当需要在显示与隐藏之间切片很频繁时,使用v-show
- 当只有少次切换时,通常使用v-if
7 遍历循环
v-for
遍历数组
- item: 数组中的元素
- index: 数组中元素的索引
1
| v-for=(item, index) in items
|
遍历对象
1
2
| (属性值,属性名,属性索引) in info
(value, key, index) in info
|
:key
8 双向绑定
v-model
v-model:radio
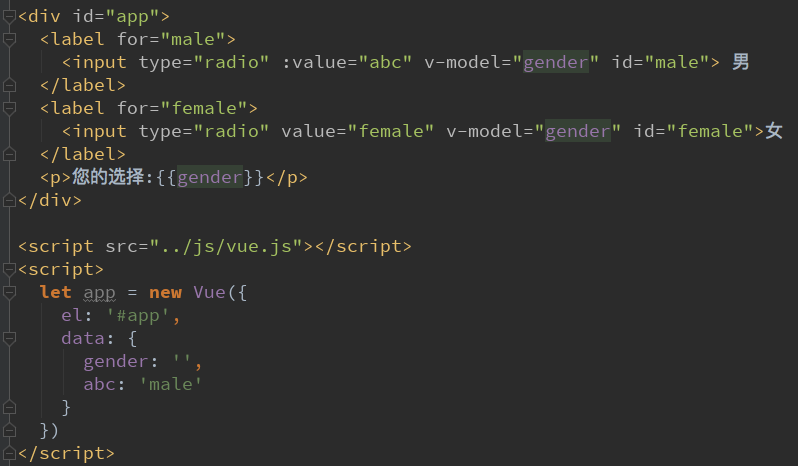
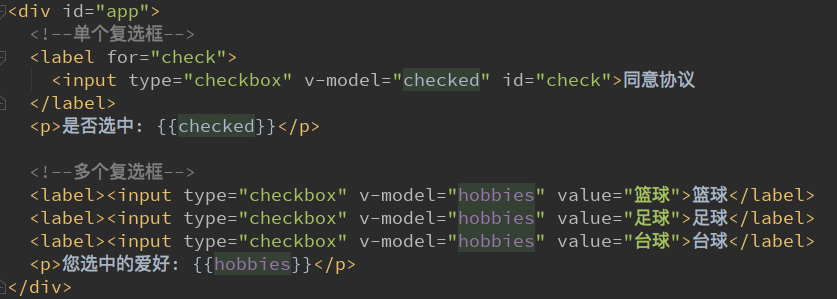
v-model:checkbox
- 单个勾选框:
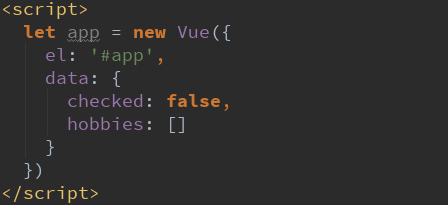
- v-model即为布尔值.
- 此时input的value并不影响v-model的值。
- 多个复选框:
- 当是多个复选框时,因为可以选中多个,所以对应的data中属性是一个数组。
- 当选中某一个时,就会将input的value添加到数组中。
v-model:select
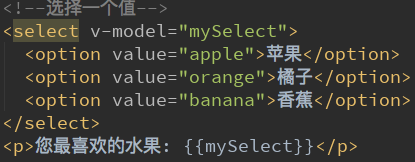
- 单选:
- 只能选中一个值。
- v-model绑定的是一个值。
- 当我们选中option中的一个时,会将它对应的value赋值到mySelect中
- 多选:可以选中多个值。
- v-model绑定的是一个数组。
- 当选中多个值时,就会将选中的option对应的value添加到数组mySelects中
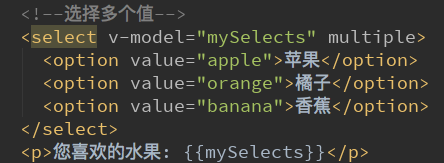
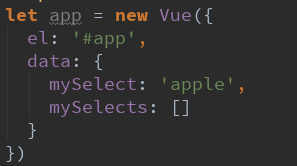
v-model修饰符
- lazy修饰符:
- 默认情况下,v-model默认是在input事件中同步输入框的数据的。
- 也就是说,一旦有数据发生改变对应的data中的数据就会自动发生改变。
- lazy修饰符可以让数据在失去焦点或者回车时才会更新:
- number修饰符:
- 默认情况下,在输入框中无论我们输入的是字母还是数字,都会被当做字符串类型进行处理。
- 但是如果我们希望处理的是数字类型,那么最好直接将内容当做数字处理。
- number修饰符可以让在输入框中输入的内容自动转成数字类型:
- trim修饰符:
- 如果输入的内容首尾有很多空格,通常我们希望将其去除
- trim修饰符可以过滤内容左右两边的空格
1
2
3
| v-model.lazy="message"
v-model.number="message"
v-model.trim="message"
|
9本地存储
1
2
3
4
5
| localStorage.islogn = 'xxxx'
const cartListString = JSON.stringify(cartList)
localStorage.cartList = cartListString
|
1
2
3
4
5
6
| const islogn localStorage.islogn
或者
const { isLogin } = localStorage
JSON.parse(localStorage.cartList)
|
三、Vue组件化开发
1 组件化开发基础内容
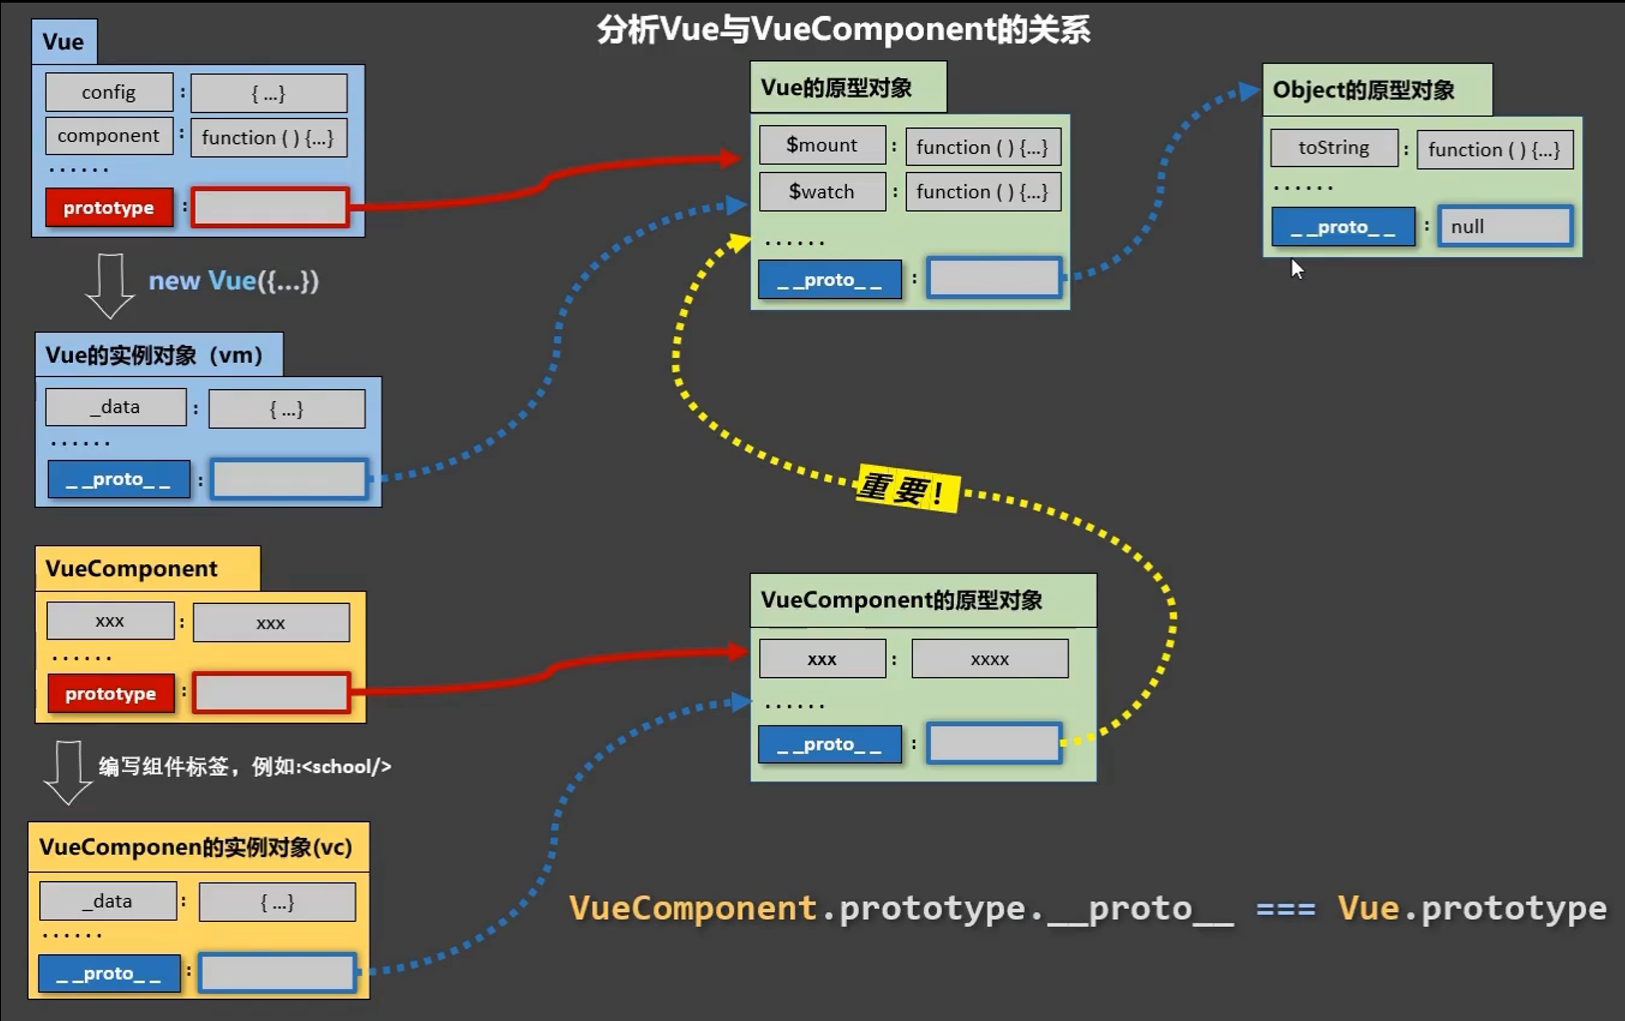
1.1 注册组件
- 创建组件构造器
Vue.extend()
- 传入自定义组件的模板
template
- Vue2.x后这种写法就不再使用
- 注册组件
Vue.component()
- 将组件构造器注册为一个组件,并且给它起一个组件的标签名称。
- 传递两个参数:1、注册组件的标签名 2、组件构造器
- 使用组件
1
2
3
4
5
6
7
8
9
10
11
12
13
14
15
16
17
18
19
20
21
22
| <div id="app">
<!-- 3 使用组件 -->
<m-cpn></m-cpn>
</div>
<script src="../js/vue.js"></script>
<script>
// 1 创建组件构造器
const myComponent = Vue.extend({
template: `
<div>
<h2>组件标题</h2>
<p>我是组件内容</p>
</div>
`
})
// 2 注册组件 并定义组件标签的名称
Vue.component('m-cpn', myComponent)
const app = new Vue({
el:'#app'
})
</script>
|
1.2 全局组件与局部组件
- 全局组件
- 调用Vue.component()注册组件时,组件的注册是全局的。通该方法注册的组件可以在任意Vue实例下使用。
1
2
3
4
5
6
7
8
9
10
11
12
13
14
15
16
17
18
19
20
21
22
23
24
25
26
27
28
29
30
31
|
<div id="app1">
<!-- 3 使用组件 -->
<m-cpn></m-cpn>
</div>
<div id="app2">
<!-- 3 使用组件 -->
<m-cpn></m-cpn>
</div>
<script src="../js/vue.js"></script>
<script>
// 1 创建组件构造器
const myComponent = Vue.extend({
template: `
<div>
<h2>组件标题</h2>
<p>我是组件内容</p>
</div>
`
})
// 2 注册组件 并定义组件标签的名称
Vue.component('m-cpn', myComponent)
const app1 = new Vue({
el:'#app1'
})
const app2 = new Vue({
el:'#app2'
})
</script>
|
- 局部组件
- 若组件是在某个Vue实例中注册的,那么这个组件是局部组件,只能在这个Vue实例中使用。
1
2
3
4
5
6
7
8
9
10
11
12
13
14
15
16
17
18
19
20
21
22
23
24
25
26
27
28
29
30
31
32
|
<div id="app1">
<!-- 3 使用组件 -->
<m-cpn></m-cpn>
</div>
<div id="app2">
<!-- 3 使用组件 -->
<m-cpn></m-cpn>
</div>
<script src="../js/vue.js"></script>
<script>
// 1 创建组件构造器
const myComponent = Vue.extend({
template: `
<div>
<h2>组件标题</h2>
<p>我是组件内容</p>
</div>
`
})
const app1 = new Vue({
el:'#app1',
components: {
'my-cpn': myComponent // 2 注册组件 并定义组件标签的名称
}
})
const app2 = new Vue({
el:'#app2'
})
</script>
|
1.3 父组件与子组件
- 传入组件构造器可以有: 模板
template,还可以注册子组件components
1
2
3
4
5
6
7
8
9
10
11
12
13
14
15
16
17
18
19
20
21
22
23
24
25
26
27
28
29
30
31
32
33
34
35
| <div id="app">
<!-- 3 使用组件 -->
<parent-cpn></parent-cpn>
</div>
<script src="../js/vue.js"></script>
<script>
// 1 创建子组件构造器
const myComponent1 = Vue.extend({
template: `
<div>
<h2>我是子组件</h2>
<p>我是子组件内容</p>
</div>
`
})
// 2 创建父组件构造器
const myComponent2 = Vue.extend({
template: `
<div>
<h2>我是父组件</h2>
<p>我是父组件内容</p>
</div>
`,
components: {
'child-cpn': myComponent1 //父组件中注册子组件
}
})
const app = new Vue({
el:'#app',
components: {
'parent-cpn': myComponent2 //Vue实例中注册父组件
}
})
</script>
|
1.4 注册组件语法糖
- 注册全局组件语法糖
1
2
3
4
5
6
7
8
| Vue.component('m-cpn', {
template: `
<div>
<h2>组件标题</h2>
<p>我是组件内容</p>
</div>
`
})
|
- 注册局部组件语法糖
1
2
3
4
5
6
7
8
9
10
11
12
13
| const app = new Vue({
el:'#app',
components: {
'parent-cpn': {
template: `
<div>
<h2>组件标题</h2>
<p>我是组件内容</p>
</div>
`
}
}
})
|
1.5 模板分离写法
- 使用
<script>标签实现
1
2
3
4
5
6
7
8
9
10
11
12
13
14
15
16
17
18
19
20
21
22
23
24
25
| <!-- 使用组件 -->
<div id="app">
<m-cpn></m-cpn>
</div>
<!-- 组件模板 -->
<script type="text/x-template" id="myCpn">
<div>
<h2>组件标题</h2>
<p>我是组件内容</p>
</div>
</script>
<script src="../js/vue.js"></script>
<!-- Vue实例 -->
<script>
const app = new Vue({
el:'#app',
components: {
'm-cpn': {
template: '#myCpn'
}
}
})
</script>
|
- 使用
<template>标签实现
1
2
3
4
5
6
7
8
9
10
11
12
13
14
15
16
17
18
19
20
21
22
23
24
25
| <!-- 使用组件 -->
<div id="app">
<m-cpn></m-cpn>
</div>
<!-- 组件模板 -->
<template id="myCpn">
<div>
<h2>组件标题</h2>
<p>我是组件内容</p>
</div>
</template>
<script src="../js/vue.js"></script>
<!-- Vue实例 -->
<script>
const app = new Vue({
el:'#app',
components: {
'm-cpn': {
template: '#myCpn'
}
}
})
</script>
|
1.6 组件数据存储
- data在组件中必须是一个函数
- 因为组件会在多个位置使用,若data是对象形式,那么多个使用的位置就会指向同一个数据内存地址,一个位置修改数据,其他地方也会发生改变,导致组件相互影响,不能单独使用。若data是函数形式,在多个位置使用该组件时,会data函数会返回一个属于使用时组件自己的数据存储地址,使得组件使用是隔离的,不会互相影响。
1
2
3
4
5
6
7
8
9
10
11
12
13
14
15
16
17
18
19
20
21
22
23
24
25
26
27
28
29
30
31
|
<div id="app">
<m-cpn></m-cpn>
</div>
<template id="myCpn">
<div>
<h2>组件标题</h2>
<p>我是组件内容</p>
<p>{{message}}</p>
</div>
</template>
<script src="../js/vue.js"></script>
// Vue实例
<script>
const app = new Vue({
el:'#app',
components: {
'm-cpn': {
template: '#myCpn',
data(){
return {
message: '我是组件数据'
}
}
}
}
})
</script>
|
2 父子间通信
2.1 父级向子级传递
2.2 子级向父级传递
通过自定义事件实现子级向父级传递数据和事件
1
2
3
4
5
6
7
8
9
10
11
12
13
14
15
16
17
18
19
20
21
22
23
24
25
26
27
28
29
30
31
32
33
34
35
36
37
38
39
40
41
42
43
44
45
46
47
48
49
50
51
52
53
54
55
| <!--父组件模板-->
<div id="app">
<cpn @item-click="cpnClick"></cpn>
</div>
<!--子组件模板-->
<template id="cpn">
<div>
<button v-for="item in categories"
@click="btnClick(item)">
{{item.name}}
</button>
</div>
</template>
<script src="../js/vue.js"></script>
<script>
// 1.子组件
const cpn = {
template: '#cpn',
data() {
return {
categories: [
{id: 'aaa', name: '热门推荐'},
{id: 'bbb', name: '手机数码'},
{id: 'ccc', name: '家用家电'},
{id: 'ddd', name: '电脑办公'},
]
}
},
methods: {
btnClick(item) {
// 发射事件: 自定义事件
this.$emit('item-click', item)
}
}
}
// 2.父组件
const app = new Vue({
el: '#app',
data: {
message: '你好啊'
},
components: {
cpn
},
methods: {
cpnClick(item) {
console.log('cpnClick', item);
}
}
})
</script>
|
3 父子组件的直接访问
3.1 父访问子
3.1.1 $children
语法:
1
2
3
4
5
6
7
8
9
|
this.$children
this.$children[i]
this.$children[i].属性
this.$children[i].方法
|
$children的缺陷
3.1.2 $refs
语法:
3.2 子访问父
3.2.1 $parent
语法:
1
2
3
4
5
6
|
this.$parent
this.$parent.属性
this.$parent.方法
|
- 不建议使用该方式操作父组件数据 因为这样会提高耦合度 容易引起一些问题 也不便于维护
3.2.2 $root
3.3 非父子访问
- 非父子组件关系包括多个层级的组件,也包括兄弟组件的关系。
3.3.1 中央事件总线
事件总线类似于Vuex, 只是Vuex用于管理状态, 事件总线用于管理事件
应用场景:
使用:
- main.js中新建Vue实例作为事件总线:
Vue.prototype.$bus = new Vue()
1
2
3
4
5
6
| Vue.prototype.$bus = new Vue()
new Vue({
router,
render: h => h(App),
}).$mount('#app')
|
1
| this.$bus.$emit('发出事件名',参数)
|
1
2
3
| this.$bus.$on('发出事件名', (参数) => {
//处理事件
})
|
- 组件取消全局事件的监听
- 注意在组件销毁的生命周期函数(beforeDestory)中执行取消该组件自定义的全局事件
1
| this.$bus.$off('发出事件名', 函数名) //函数名:需要取消事件监听的函数
|
4 插槽
插槽官网教程
1
2
3
4
5
6
7
8
| //父组件
<template>
<div>
<Son >//子组件
<div>{{值}}</div>//放入插槽的内容
</Son>
</div>
</template>
|
1
2
3
4
5
6
7
8
| //子组件
<template>
<a>
<slot>
默认值显示当前这行话 ,即父组件不传内容时显示
</slot>
</a>
</template>
|
- 作用域插槽
- 父组件可以拿到子组件data中的值并将该值作为插入的一部分插入
1
2
3
4
5
6
7
8
9
10
11
| //父组件
<template>
<div>
<Son >//子组件
<template v-slot="slotProps">//自定义名
//此时的slotProps.slotData及指向了子组件data的website对象并可访问
{{slotProps.slotData.title}}//slotData子组件中定义,title子组件data中属性
</template>
</Son>
</div>
</template>
|
1
2
3
4
5
6
7
8
9
10
11
12
13
14
15
16
17
18
19
20
21
22
| //子组件
<template>
<a>
<slot :slotData="website">//父组件可以通过slotData拿到data中的website对象
{{website.subTitle}} <!-- 默认值显示 subTitle ,即父组件不传内容时 -->
</slot>
</a>
</template>
<script>
export default {
data() {
return {
website: {
url: 'http://wangEditor.com/',
title: 'wangEditor',
subTitle: '轻量级富文本编辑器'
}
}
}
}
</script>
|
1
2
3
4
5
6
7
8
9
10
11
12
13
14
15
16
17
| //父组件
<template>
<div>
<Son >//子组件
<!--缩写<template #header> -->
<template v-slot:header>
<h1>将插入header slot中</h1>
</template>
<p>将插入到main slot 中,即未命名的slot</p>
<template v-slot:footer>
<p>将插入到footer slot中</p>
</template>
</Son>
</div>
</template>
|
1
2
3
4
5
6
7
8
9
10
11
12
13
14
| //子组件
<template>
<div>
<header>
<slot name="header"></slot>
</ header>
<main>
<slot></slot>//默认插入位置
</ main>
<footer>
<slot name="footer"></slot>
</footer>
</div>
</template>
|
脚手架3中 配置文件别名
- 在根目录下新建vue.config.js
1
2
3
4
5
6
7
8
9
10
11
12
13
14
15
| //vue.config.js
module.exports = {
configureWebpack:{
resolve: {
alias: {
'assets': '@/assets',
'common': '@/common',
'components': '@/components',
'network': '@/network',
'store': '@/store',
'views': '@/views',
}
}
}
}
|
混入
混入提供了一种将组件中共有的部分抽离实现可复用的功能。组件中的任何部分都可抽离(data,methods,生命周期函数等)
定义:
1
2
3
4
5
6
7
8
9
10
11
12
13
14
15
16
| const mixin = {
data: function () {
return {
message: 'hello',
foo: 'abc'
}
},
created: function () {
this.hello()
},
methods: {
hello: function () {
console.log('hello from mixin!')
}
}
}
|
使用:
1
2
3
4
| //app对象中就包含了 mixin对象中的data、methods、生命周期函数
const app = new Vue({
mixins: [mixin],
})
|
混入规则:
- 1 data(数据)合并冲突 以组件数据优先
- 2 同名钩子函数将合并为一个数组,因此都将被调用。另外,混入对象的钩子将在组件自身钩子之前调用。
- 3 值为对象的选项,例如
methods、components 和 directives,将被合并为同一个对象。两个对象键名冲突时,取组件对象的键值对。
getters方法->组件计算属性
将vuex中的getter中的方法直接转化成组件的计算属性
store定义:
1
2
3
4
5
6
7
8
9
10
11
|
const state = {
cartList: []
}
export default {
cartLength(state){
return state.cartList.length
}
}
|
使用:
1
2
3
4
5
6
7
8
9
10
11
12
13
14
15
16
|
import { mapGetters } from 'vuex'
computed: {
...mapGetters(['cartLength']),
...mapGetters({
length: 'cartLength'
})
}
<p>{{cartLength}}</p> //1 不改别名用法
<p>{{length}}</p>
|
actions方法->组件方法
将vuex中的actions中的方法直接转化成组件的方法中的方法
store定义:
1
2
3
4
5
6
7
8
9
10
11
12
|
export default {
addCart(context, payload){
return new Promise((resolve, reject) => {
if(...){
resolve('成功')
}else{
resolve('成功')
}
})
}
}
|
使用:
1
2
3
4
5
6
7
8
9
10
11
12
13
14
15
16
17
18
19
20
21
22
|
import { mapActions } from 'vuex'
methods: {
...mapActions(['addCart'])
...mapActions({
add: 'addCart'
})
}
this.$store.dispatch('addCart', cart).then((res) => {
console.log(res)
})
this.addCart(cart).then((res) => {
console.log(res)
})
|
零碎知识点
1
2
| //例:获取scroll组件到顶部的距离
this.$refs.scroll.$el.offsetTop
|
四、Vue3
源码:L264-code
不熟悉的特性
Non-Props
非 Prop 的 Attribute
1
2
3
4
5
6
7
8
9
10
11
12
13
14
15
16
17
18
19
20
21
22
23
24
25
26
27
28
29
30
31
32
33
34
35
36
37
38
39
40
41
42
43
44
45
46
47
48
49
50
51
52
53
54
| <!DOCTYPE html>
<html lang="en">
<head>
<meta charset="UTF-8">
<meta name="viewport" content="width=device-width, initial-scale=1.0">
<title>lesson 17</title>
<script src="https://unpkg.com/vue@next"></script>
</head>
<body>
<div id="root"></div>
</body>
<script>
const app = Vue.createApp({
template: `
<div>
<counter msg="hello" msg1="hello1" @update="change"/>
<counter1 msg="hello" msg1="hello1" />
</div>
`,
methods:{
change(){
console.log('update')
}
}
});
app.component('counter', {
mounted() {
console.log(this.$attrs.msg);
console.log(this.$attrs)
this.$attrs.onUpdate()
},
template: `
<div :msg="$attrs.msg">Counter</div>
<div v-bind="$attrs">Counter</div> //所有属性都绑定到该元素上
<div :msg1="$attrs.msg1">Counter</div>
`
});
app.component('counter1', {
template: `
<div>Counter</div>
`
});
const vm = app.mount('#root');
</script>
</html>
|
v-model
自定义组件上使用v-model
v-model作用于子组件 —- 直接参考官方文档
- 默认写法,单个v-model
- 多个绑定,多个v-model
- 处理v-model修饰符
1
| <my-component v-model="bookTitle"></my-component>
|
1
2
3
4
5
6
7
8
9
10
11
12
| app.component('my-component', {
props: {
modelValue: String
},
emits: ['update:title'],
template: `
<input
type="text"
:value="modelValue"
@input="$emit('update:modelValue', $event.target.value)">
`
})
|
- 关键有两点
:value="modelValue" 绑定传入的属性@input="$emit('update:modelValue', $event.target.value)" 内容修改时传出修改的内容
- 自定义组件响应式案例
- 实现输入框内容在组件内是双向绑定的,且与外部的变量也是双向绑定的,主要利用了computed的get和set函数
1
2
3
4
5
6
7
8
9
10
11
12
13
14
15
16
17
18
19
20
21
22
23
24
25
26
27
28
29
30
| <template>
<div class="pb-3">
<input
v-model="inputRef.val"
>
</div>
</template>
<script lang="ts">
import { defineComponent, reactive, computed } from 'vue'
export default defineComponent({
name: 'ValidateInput',
props: {
modelValue: String
},
setup (props, context) {
const inputRef = reactive({
val: computed({
get: () => props.modelValue || '',
set: val => {
context.emit('update:modelValue', val) // 当inputRef.value.val变化时触发
}
})
})
return {
inputRef
}
}
})
</script>
|
Provide / Inject
Provide / Inject
将父组件的参数直接传递到孙子组件
- 传递data中的属性时,需要以返回对象的方式传递
- 响应式的处理方式
directive
自定义指令
plugin
插件
源码:plugin (数据校验案例)
defineComponent
可以使得包裹的对象有类型提示, 例如打set 就会自动提示setup
1
2
3
4
5
6
7
8
9
| const compontent = defineComponent({
name: '',
props:{
msg:{
required: true,
type: String
}
}
})
|
setup参数
1
2
3
4
5
6
7
8
9
10
11
12
13
14
15
| const compontent = defineComponent({
name: '',
props:{
msg:{
required: true,
type: String
}
}
setup(props, context){
context.attrs
context.slots
context.emit
}
})
|
Teleport
传送门,即将一些弹窗组件挂载在别的地方,而不是嵌在当前组件中,这样弹窗组件样式和当前组件样式就不会相互影响
手动挂载
定义弹窗组件
- 通过标签
<teleport>表明当前组件是传送门组件 通过to指明要挂载的位置
1
2
3
4
5
6
7
8
9
10
11
12
13
14
15
16
17
18
19
20
21
22
23
24
25
26
27
28
29
30
31
32
33
34
35
36
37
38
39
40
| <template>
<teleport to="#modal">
<div id="center" v-if="isOpen">
<h2><slot>this is a modal</slot></h2>
<button @click="buttonClick">Close</button>
</div>
</teleport>
</template>
<script lang="ts">
import { defineComponent } from 'vue'
export default defineComponent({
props: {
isOpen: Boolean,
},
emits: {
'close-modal': null
},
setup(props, context) {
const buttonClick = () => {
context.emit('close-modal')
}
return {
buttonClick
}
}
})
</script>
<style>
#center {
width: 200px;
height: 200px;
border: 2px solid black;
background: white;
position: fixed;
left: 50%;
top: 50%;
margin-left: -100px;
margin-top: -100px;
}
</style>
|
挂载弹窗组件
- 挂载位置:根目录/public/index.html
1
2
3
4
5
6
7
8
9
10
11
12
13
14
15
16
17
18
| <!DOCTYPE html>
<html lang="en">
<head>
<meta charset="utf-8">
<meta http-equiv="X-UA-Compatible" content="IE=edge">
<meta name="viewport" content="width=device-width,initial-scale=1.0">
<link rel="icon" href="<%= BASE_URL %>favicon.ico">
<title><%= htmlWebpackPlugin.options.title %></title>
</head>
<body>
<noscript>
<strong>We're sorry but <%= htmlWebpackPlugin.options.title %> doesn't work properly without JavaScript enabled. Please enable it to continue.</strong>
</noscript>
<div id="app"></div>
<div id="modal"></div>
</body>
</html>
|
使用弹窗组件
1
2
3
4
5
6
7
8
9
10
| const modalIsOpen = ref(false)
const openModal = () => {
modalIsOpen.value = true
}
const onModalClose = () => {
modalIsOpen.value = false
}
<button @click="openModal">Open Modal</button><br/>
<modal :isOpen="modalIsOpen" @close-modal="onModalClose"> My Modal !!!!</modal>
|
自动挂载
应用场景:开发者在使用弹窗组件时,还需要去根目录/public/index.html手动挂载,这会非常麻烦,所以需要自动挂载,即使用组件时,组件自动去挂载
- setup()生命周期是先于页面初始化的,所以可以在setup()直接拿到
document.body并在其中添加挂载的节点,这样就完成了自动挂载
- 注意:组件销毁前要移除挂载的这个节点,因为组件可能多次使用,只添加不移除就会导致document.body中有冗余的挂载节点
1
2
3
4
5
6
7
8
9
10
11
12
13
14
15
16
17
18
19
20
| <template>
<teleport to="#loader"> //挂载节点的id
<div>
组件内容
</div>
</teleport>
</template>
<script lang="ts">
import { defineComponent, onUnmounted } from 'vue'
export default defineComponent({
setup () {
const node = document.createElement('div') //新建节点 即组件要挂载的节点
node.id = 'loader' //将新建节点的id设置为相应值
document.body.appendChild(node) //将新节点添加到 document.body中
onUnmounted(() => {
document.body.removeChild(node) //组件销毁前要移除挂载的这个节点
})
}
})
</script>
|
Suspense
等待异步组件时渲染一些额外内容,让应用有更好的用户体验
定义异步组件
- 在 setup 返回一个 Promise
- 这个promise包裹的对象自动具有响应式
1
2
3
4
5
6
7
8
9
10
11
12
13
14
15
16
17
| //AsyncShow.vue
<template>
<img :src="result && result.message">
</template>
<script lang="ts">
import axios from 'axios'
import { defineComponent } from 'vue'
export default defineComponent({
async setup() {
const rawData = await axios.get('https://dog.ceo/api/breeds/image')
return {
result: rawData.data
}
}
})
</script>
|
使用异步组件
#default : 展示异步组件,可以展示多个异步组件,且当多个异步组件都加载完成后才一起显示#fallback: 在异步组件还没加载完成时展示的内容
1
2
3
4
5
6
7
8
9
| <Suspense>
<template #default>
<async-show />
<dog-show />
</template>
<template #fallback>
<h1>Loading !...</h1>
</template>
</Suspense>
|
捕获异步组件的错误
1
2
3
4
5
6
7
8
9
10
11
12
13
14
15
16
17
18
19
20
21
22
23
24
25
26
27
28
29
30
31
32
33
34
35
36
37
38
39
| <template>
<div id="app">
<p>{{error}}</p> // 将捕获的错误展示在页面上
<Suspense>
<template #default>
<div>
<async-show />
<dog-show />
</div>
</template>
<template #fallback>
<h1>Loading !...</h1>
</template>
</Suspense>
</div>
</template>
<script lang="ts">
import { ref, onErrorCaptured } from 'vue'
import AsyncShow from './components/AsyncShow.vue'
import DogShow from './components/DogShow.vue'
export default {
name: 'App',
components: {
AsyncShow,
DogShow,
},
setup() {
const error = ref(null)
onErrorCaptured((e: any) => {
error.value = e
return true //错误是否向上传递
})
return {
error
}
}
};
</script>
|
PropType
构造函数断言成一个类型
1
2
|
type: Array as PropType<ColumnProps[]>,
|
父子间通信
子级向父级传递
emits
1
2
3
4
5
6
7
8
9
10
| <script lang="ts">
import { defineComponent} from 'vue'
export default defineComponent({
emits: ['file-uploaded', 'file-uploaded-error'], //组件内定义的向外部发送信息的事件名
setup (props, context) {
context.emit('file-uploaded')// 向外部发送事件,不传递参数
context.emit('file-uploaded-error', res)// 向外部发送事件,传递参数res
}
})
</script>
|
事件总线
mitt
- vue3取消了vue2中自带的事件总线$bus
- vue3中通过第三方库mitt实现事件总线
VueX实现
Vue3中的动画
Animate.css
新脚手架
1
| npm uninstall vue-cli -g
|
(仅第一次执行)∶全局安装@vue/cli
npm install -g @vue/cli
npm install -g @vue/cli@版本号
切换到要创建项目的目录,然后使用命令创建项目, 执行后会弹出选择安装vue2.x或vue3,自行选择;创建好的项目就已经接受git托管了
vue create 项目名称
启动项目
npm run serve
五、vue-router
Vue-Router官方文档
1 安装
脚手架创建项目时就安装vue-router
vue create 项目名称- 选择
Manually select features自定义安装的插件
- 空格选择
Router
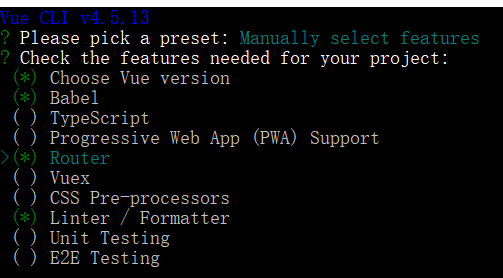
- 选择vue3:
3.x
- 是否选择history模式路由,不选择,则默认选择为hash模式路由

- 选择仅错误时提醒ESlint

使用过程中安装
1
| npm install vue-router@版本号
|
2 使用路由
2.1 配置控制跳转
1
2
3
4
5
| import { createApp } from 'vue'
import App from './App.vue'
import router from './router'
createApp(App).use(store).use(router).mount('#app')
|
1
2
3
4
5
6
7
8
9
10
11
12
13
14
15
| import { createRouter, createWebHashHistory } from 'vue-router'
const routes = [
{
path: '/',
name: 'Home',
component: () => import( '../views/home/Home')
}
]
const router = createRouter({
history: createWebHashHistory(),
routes
})
export default router
|
1
2
3
4
5
6
7
8
9
| <template>
<router-view/> //自动根据路由地址显示相应的组件
</template>
<script>
export default {
name: 'App'
}
</script>
|
2.2 js控制跳转
跳转到指定页面
1
2
3
4
5
6
7
8
9
10
11
12
13
14
15
16
17
18
| <template>
<div class="wrapper__login-button" @click="handleLogin">登录</div>
</template>
<script>
import { useRouter } from 'vue-router' //引入
export default {
name: 'Login',
setup () {
const router = useRouter() //实例化
const handleLogin = () => {
router.push({ name: 'Home' }) //设置要跳转的页面, Home是路由名
//router.push('/home')
}
return { handleLogin }
}
}
</script>
|
返回上一个页面
1
2
3
4
5
6
7
8
| import { useRouter } from 'vue-router'
const useBackEffect = () => {
const router = useRouter()
const handleBack = () => {
router.back()
}
return { handleBack }
}
|
2.3 标签控制跳转
<to="/shop"> </router-link>- 去掉a标签的下划线
1
2
3
4
5
6
7
8
9
10
11
12
13
14
15
16
| // 路由跳转不带参数的情况
<template>
<div class="nearby">
<router-link to="/shop"> // <router-link :to="{name: 'shop'}"> || <router-link :to="{path: '/shop'}">
<ShopInfo />
</router-link>
</div>
</template>
<style lang="scss" scoped>
.nearby{
a{
text-decoration: none;
}
}
</style>
|
2.4 路由参数
2.4.1 传递参数
配置
1
2
3
4
5
6
7
| const routes = [
{
path: '/shop/:id',
name: 'Shop',
component: () => import( '../views/shop/Shop')
}
]
|
js跳转带参
- 使用
router.push方法,并用${}添加参数
1
2
3
4
5
6
7
8
9
10
11
12
13
14
15
16
17
18
19
20
21
22
23
24
25
26
| <template>
<div class="nearby">
<ShopInfo v-for="item in nearbyList" :key="item._id" :item="item" @click="handleToShop(item._id)"/>
</div>
</template>
<script>
import { useRouter } from 'vue-router'
// 跳转到shop页面
const useToShopEffect = () => {
const router = useRouter()
const handleToShop = (id) => {
router.push(`/shop/${id}`)
}
return { handleToShop }
}
export default {
name: 'Nearby',
components: { ShopInfo },
setup () {
return { nearbyList, handleToShop }
}
}
</script>
|
标签跳转带参
1
2
3
4
5
6
7
8
9
10
11
12
13
14
15
16
| // 路由跳转不带参数的情况
<template>
<div class="nearby">
<router-link v-for="item in nearbyList" :key="item._id" :to="`/shop/${item._id}`">
<ShopInfo :item="item" />
</router-link>
</div>
</template>
<style lang="scss" scoped>
.nearby{
a{
text-decoration: none;
}
}
</style>
|
2.4.2 获取参数
- 通过useRoute获取当前路由相关的信息,例如:params、path、query等
1
2
3
4
5
6
7
| import { useRoute } from 'vue-router'
const useShopInfoEffect = () => {
const route = useRoute()
console.log(route.params.id)
}
|
3 路由守卫
全局守卫
- 任何路由每次跳转之前调用
- 使用场景:只有登录后才能正常跳转,如果没有登录,则会默认跳转到登录页面
/router/index.js中使用router.beforeEach设置全局路由守卫
- to : 路由跳转的目标路由
- from : 路由跳转的原始路由
- next : 调用则表示允许跳转
- 接收跳转到的路由的组件名,则干预跳转的页面
- next(), 不传参数则表示不做干预,保持原来的跳转
1
2
3
4
5
6
7
| router.beforeEach((to, from ,next) => {
const { isLogin } = localStorage;
const { name } = to;
const isLoginOrRegister = (name === "Login" || name === "Register");
(isLogin || isLoginOrRegister) ? next() : next({ name: 'Login'});
})
|
单独守卫
- 跳转到当前路由之前调用
- 使用场景: 已经登录了,地址为登录页时,不应该显示登录页,而是自动跳转到首页
/router/index.js中的routes模块中使用router.beforeEach设置单独路由守卫
1
2
3
4
5
6
7
8
9
10
11
12
13
14
15
16
17
18
19
20
21
22
23
24
| const routes = [
{
path: '/',
name: 'Home',
component: Home
},
{
path: '/login',
name: 'Login',
component: Login,
beforeEnter (to, from, next) {
const isLogin = localStorage.isLogin
if (isLogin) {
next({ name: 'Home' })
} else {
next()
}
}
}
]
|
元信息
官网
使用场景仍然是权限控制
- 其实元信息可以理解为标识需要同权限(要求)的路由,便于路由判断
- 注意:’./router/index.ts’中使用store直接导入
1
2
3
4
5
|
import store from '../store'
import { useStore } from 'Vuex'
const store = useStore()
|
1
2
3
4
5
6
7
8
9
10
11
12
13
14
15
16
17
18
19
20
21
22
23
24
25
26
27
28
29
30
31
32
33
34
35
36
37
38
39
40
41
42
43
44
45
| import { createRouter, createWebHashHistory } from 'vue-router'
import store from '../store'
const routes = [
{
path: '/',
name: 'Home',
component: () => import( '../views/Home.vue')
},
{
path: '/login',
name: 'Login',
component: () => import( '../views/Login.vue'),
meta: { redirectAlreadyLogin: true }
},
{
path: '/column/:id',
name: 'ColumnDetail',
component: () => import( '../views/ColumnDetail.vue')
},
{
path: '/create',
name: 'CreatePost',
component: () => import( '../views/CreatePost.vue'),
meta: { requiredLogin: true }
}
]
const router = createRouter({
history: createWebHashHistory(),
routes
})
router.beforeEach((to, from, next) => {
const { isLogin } = store.state.user
console.log(isLogin)
if (to.meta.requiredLogin && !isLogin) {
next({ name: 'Login' })
} else if (to.meta.redirectAlreadyLogin && isLogin) {
next('/')
} else {
next()
}
})
export default router
|
4 动态路由
又叫异步路由
在需要展示页面的时候才加载相关资源
/* webpackChunkName: "about" */: about 用于调试显示
1
2
3
4
5
6
7
8
9
10
11
12
13
| import Home from '../views/home/Home'
const routes = [
{
path: '/',
name: 'Home',
component: Home
},
{
path: '/shop',
name: 'Shop',
component: () => import( '../views/shop/Shop')
}
]
|
六、VueX
Vuex官方文档
1安装
终端命令安装
脚手架创建项目时就安装VueX
vue create 项目名称- 选择
Manually select features自定义安装的插件
- 空格选择
Vuex
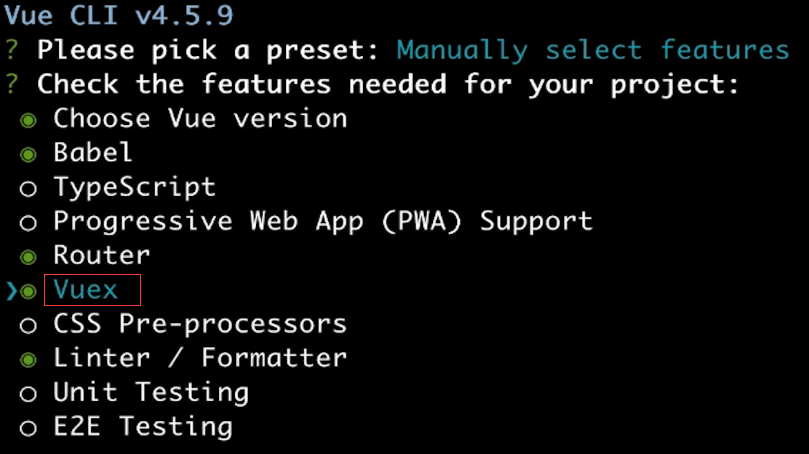
2 使用
2.1 基本概念
main.js中注册使用
1
2
3
4
5
| import { createApp } from 'vue'
import App from './App.vue'
import store from './store'
createApp(App).use(store).mount('#app')
|
store/index.js基础代码
1
2
3
4
5
6
7
8
9
10
11
12
13
14
| import { createStore } from 'vuex'
export default createStore({
state: {
},
mutations: {
},
getters: {
},
actions: {
},
modules: {
}
})
|
2.2 数据支持ts
1
2
3
4
5
6
7
8
9
10
11
12
13
14
15
16
17
18
19
| import { createStore } from 'vuex'
import { testData, testPosts, ColumnProps, PostProps } from '../testData'
export interface UserProps {
isLogin: boolean;
name?: string;
id?: string;
}
export interface GlobalDataProps {
columns: ColumnProps[];
posts: PostProps[];
user: UserProps;
}
export default createStore<GlobalDataProps>({
state: {
columns: testData,
posts: testPosts,
user: { isLogin: false }
}
})
|
2.3 使用store数据
1
2
3
4
5
6
7
8
9
10
11
12
13
14
| <script lang="ts">
import { defineComponent } from 'vue'
import { useStore } from 'vuex'
import { GlobalDataProps } from '../store' // GlobalDataProps数据类型
export default defineComponent({
name: 'Home',
setup () {
const store = useStore<GlobalDataProps>() //支持泛型
const list = computed(() => store.state.columns) // 用计算属性获取,才能实时获取变化的store数据
return { list }
}
})
</script>
|
2.4 mutations
需要修改store中数据时 则需要在mutations中写方法进行修改,便于记录对store的每次修改
Mutation 必须是同步函数
定义修改store中数据的方法
- 第一个参数为state, 即store中的state
- 第二个参数开始自定义,也可以没有
1
2
3
4
5
6
7
8
9
10
11
12
13
14
15
16
17
18
19
20
21
| import { createStore } from 'vuex'
export interface UserProps {
isLogin: boolean;
name?: string;
id?: string;
}
export interface GlobalDataProps {
user: UserProps;
}
export default createStore<GlobalDataProps>({
state: {
user: { isLogin: false }
},
mutations: {
login (state, user) {
state.user.isLogin = true
state.user.name = user.name
state.user.id = user.id
}
}
})
|
调用修改store数据的方法
- 使用
store.commit调用mutations中的方法
- 第一个参数为要调用的mutations中的方法名
- 第二个参数为自定义的参数值
1
2
3
4
5
6
7
8
9
10
11
12
13
| <script lang="ts">
import { defineComponent, ref } from 'vue'
import { useRouter } from 'vue-router'
import { useStore } from 'vuex'
export default defineComponent({
name: 'Login'
setup () {
const store = useStore()
store.commit('login', { name: 'chuckie', id: 1 })
}
}
})
</script>
|
2.5 getters
官网教程
Getter使用场景:获取store中数据,且需要对store中的数据过滤时使用
类似computed,计算结果会缓存,只有当依赖值改变才会重新计算
定义
- 获取store数据不传参情况: 直接返回计算结果
- 获取store数据传参情况: 返回一个函数,函数接受参数并计算结果返回
1
2
3
4
5
6
7
8
9
10
11
12
13
14
15
16
17
18
19
20
21
22
23
24
25
26
27
| import { createStore } from 'vuex'
import { testData, testPosts, ColumnProps, PostProps } from '../testData'
export interface UserProps {
isLogin: boolean;
name?: string;
id?: string;
}
export interface GlobalDataProps {
columns: ColumnProps[];
posts: PostProps[];
user: UserProps;
}
export default createStore<GlobalDataProps>({
state: {
columns: testData,
posts: testPosts,
user: { isLogin: false }
}
getters: {
getColumnsLen (state) {
return state.columns.length
},
getColumnById: (state) => (id: number) => {
return state.columns.find(c => c.id === id)
}
}
})
|
使用
- 通过
store.getters.方法调用getters方法
1
2
3
4
5
6
7
8
9
10
11
12
13
14
15
16
17
18
| <script lang="ts">
import { computed, defineComponent, ref } from 'vue'
import { useStore } from 'vuex'
export default defineComponent({
name: 'ColumnDetail',
setup () {
const store = useStore()
const currentId = ref(0)
let columnLen = ref(0)
columnLen = store.getters.getColumnsLen //获取不传参属性
const column = computed(() => store.getters.getColumnById(currentId)) //获取传参属性
return {
columnLen,
column
}
}
})
</script>
|
2.6 actions
Action 类似于 mutation,不同在于:
- Action 提交的是 mutation,而不是直接变更状态
- Action 可以包含任意异步操作
单个action
定义
- actions中定义异步请求函数,函数中通过axios发送异步请求
- 异步请求成功后,在回调里调用mutations中的方法修改store中的数据
1
2
3
4
5
6
7
8
9
10
11
12
13
14
15
16
17
18
19
20
21
22
23
24
25
26
27
28
29
30
31
32
33
34
35
36
37
38
39
40
41
42
43
44
45
| import { createStore } from 'vuex'
import axios from 'axios'
export interface ImageProps {
_id?: string;
url?: string;
createdAt?: string;
fitUrl?: string;
}
export interface ColumnProps{
_id: string,
title: string,
avatar?: ImageProps,
description: string
}
export interface PostProps {
id: number;
title: string;
content: string;
image?: string;
createdAt: string;
columnId: number;
}
export interface GlobalDataProps {
columns: ColumnProps[];
posts: PostProps[];
}
export default createStore<GlobalDataProps>({
state: {
columns: [],
posts: []
},
mutations: {
fetchColums (state, rawData) {
state.columns = rawData.data.list
}
},
actions: {
fetchColums (context) {
axios.get('/columns').then(res => {
context.commit('fetchColums', res.data)
})
}
}
})
|
使用
1
2
3
4
5
6
7
8
9
10
11
12
13
14
15
16
17
| <script lang="ts">
import { computed, defineComponent, onMounted } from 'vue'
import { useStore } from 'vuex'
import { GlobalDataProps } from '../store'
export default defineComponent({
name: 'Home',
setup () {
const store = useStore<GlobalDataProps>()
onMounted(() => {
store.dispatch('fetchColums') // 调用actions中方法发送异步请求
})
const list = computed(() => store.state.columns)
return { list }
}
})
</script>
|
组合action
定义
案例说明:
先登录,再获取用户信息
将这两个操作可以合并到一个action中
1
2
3
4
5
6
7
8
9
10
11
12
13
14
15
16
17
18
19
20
21
22
23
24
25
26
27
28
29
30
31
32
33
34
35
36
37
38
39
40
41
42
43
44
45
46
47
48
49
50
51
52
53
| import { createStore } from 'vuex'
import { instance, get, post } from '../utils/resques'
export interface UserProps {
isLogin: boolean;
_id?: string;
email?: string;
nickName: string;
column?: number;
}
export interface GlobalDataProps {
token: string;
user: UserProps;
}
export default createStore<GlobalDataProps>({
state: {
token: '',
user: { isLogin: false, column: 1, nickName: 'chuckie!!!' }
},
mutations: {
login (state, rawData) {
console.log('login', rawData)
const { token } = rawData.data
state.token = token
console.log('login', token)
instance.defaults.headers.common.Authorization = token
},
fetchCurrentUser (state, rawData) {
console.log('fetchCurrentUser', rawData)
state.user = { isLogin: true, ...rawData.data }
}
},
actions: {
async login (context, payload) {
const data = await post('user/login', payload)
context.commit('login', data)
return data
},
async fetchCurrentUser (context) {
const data = await get('user/current')
context.commit('fetchCurrentUser', data)
return data
},
loginAndFetch ({ dispatch }, loginData) {
return dispatch('login', loginData).then((res) => {
return dispatch('fetchCurrentUser')
})
}
}
})
|
使用
1
2
3
4
|
store.dispatch('loginAndFetch', payload).then((res) => {
console.log(res)
})
|
3 数据持久化
将VueX的数据通过本地缓存持久化
1
2
3
4
5
6
7
8
9
10
11
12
13
14
15
16
17
18
19
20
21
22
23
24
25
26
27
28
29
30
31
32
33
34
35
36
37
38
39
40
41
42
43
44
45
46
47
48
49
50
51
52
53
54
55
56
57
| import { createStore } from 'vuex'
const setLocalCartList = (state) => {
const { cartList } = state
const cartListString = JSON.stringify(cartList)
localStorage.cartList = cartListString
}
const getLocalCartList = () => {
try {
return JSON.parse(localStorage.cartList)
} catch (e) {
return {}
}
}
export default createStore({
state: {
cartList: getLocalCartList()
},
mutations: {
changeShopName (state, payload) {
const { shopId, shopName } = payload
const shopInfo = state.cartList[shopId] || {
shopName: '',
productList: {}
}
shopInfo.shopName = shopName
state.cartList[shopId] = shopInfo
setLocalCartList(state)
}
},
actions: {
},
modules: {
}
})
|
七、插件
normalize.css
移动端不同浏览器的标签样式不一样
normalize.css用于使得不同浏览器上标签样式一直
类似css适配中用到的reset css
1
| npm install normalize.css --save
|
八、开发常用操作
*的方式写多个一样的标签
vue中全局引入样式
- 在根目录下新建
style文件,文件夹下可以新建css、lcss、scss的文件
- 再在
style下新建index.css将其它样式文件都引入到这个文件中,
- 再在
main.js中引入index.css即可, 使得在main.js中只会引入一次,不用每个都引入,因为所有要引入的样式文件都在index.css中引入了
1
| import './style/index.css'
|
vue中使用scss
scss官网
- 在创建项目时,选择安装css预处理:
CSS Pre-processors
- 在引入文件时同css只是文件名后缀为
.scss
- style部分添加
lang="scss"
1
2
| <style lang="scss">
</style>
|
vue中scoped
vue中引入本地资源
- 通过 require(‘@/assets/….’)
1
| column.avatar = require('@/assets/column.jpg')
|
vue中的<pre>
1
2
3
4
5
6
7
8
9
10
11
12
13
14
15
16
17
18
19
| <template>
<pre>{{route}}</pre>
</template>
<script lang="ts">
import { defineComponent } from 'vue'
import { useRoute } from 'vue-router'
export default defineComponent({
name: 'ColumnDetail',
setup () {
const route = useRoute()
return {
route
}
}
})
</script>
<style scoped>
</style>
|
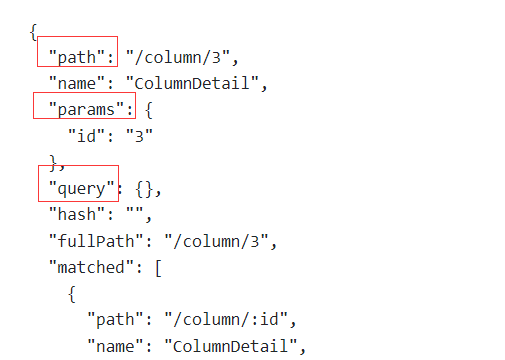
vue中开发环境获取
在main.ts中通过以下代码可获取当前是开发版本还是上线版本
1
| process.env.NODE_ENV === 'development' 表示是开发b
|
vue中组件的函数化调用
- 1 位置是 main.ts中挂载的app实例
- 2 位置是 组件函数化调用中创建的节点和挂载的vue实例(用组件创建)
- 3 位置是2中的组件的传送门创建的node节点
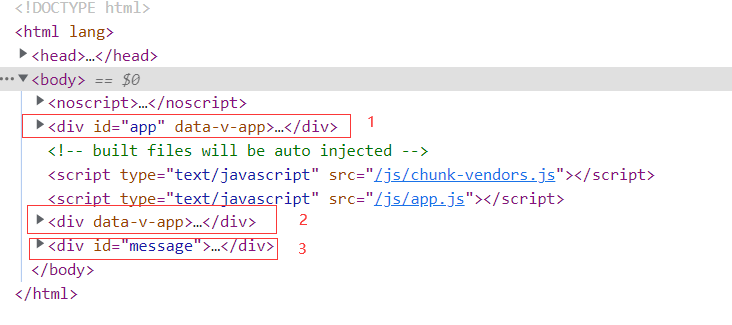
- createApp创建vue实例
- mount(): 挂载实例到node节点上 参数为node节点
- unmount():卸载实例
1
2
3
4
5
6
7
8
9
10
11
12
13
14
15
16
17
18
19
20
| import { createApp } from 'vue'
import Message from './Message.vue'
export type MessageType = 'success' | 'error' | 'default'
const createMessage = (message: string, type: MessageType, timeout = 2000) => {
const messageInstance = createApp(Message, {
message,
type
})
const mountNode = document.createElement('div')
document.body.appendChild(mountNode)
messageInstance.mount(mountNode)
setTimeout(() => {
messageInstance.unmount()
document.body.removeChild(mountNode)
}, timeout)
}
export default createMessage
|
vue中支持markdown渲染
markdown-it
安装markdown-it
1
2
3
4
|
npm install markdown-it --save
npm i --save-dev @types/markdown-it
|
使用
1
2
3
4
5
6
7
8
9
10
| <template>
<div v-html="currentHTML"></div> // v-htm语法直接渲染转换好的html
</template>
<script lang="ts">
import MarkdownIt from 'markdown-it' // 引入
const md = new MarkdownIt() // 实例化
const contetntest = '### 123, **hhhh**, kkkk, ```jdfjadjlf```' // 要转换的markdown文本
const content = md.render(contetntest) // render()方法将markdown文本转换成html文本
</script>
|


