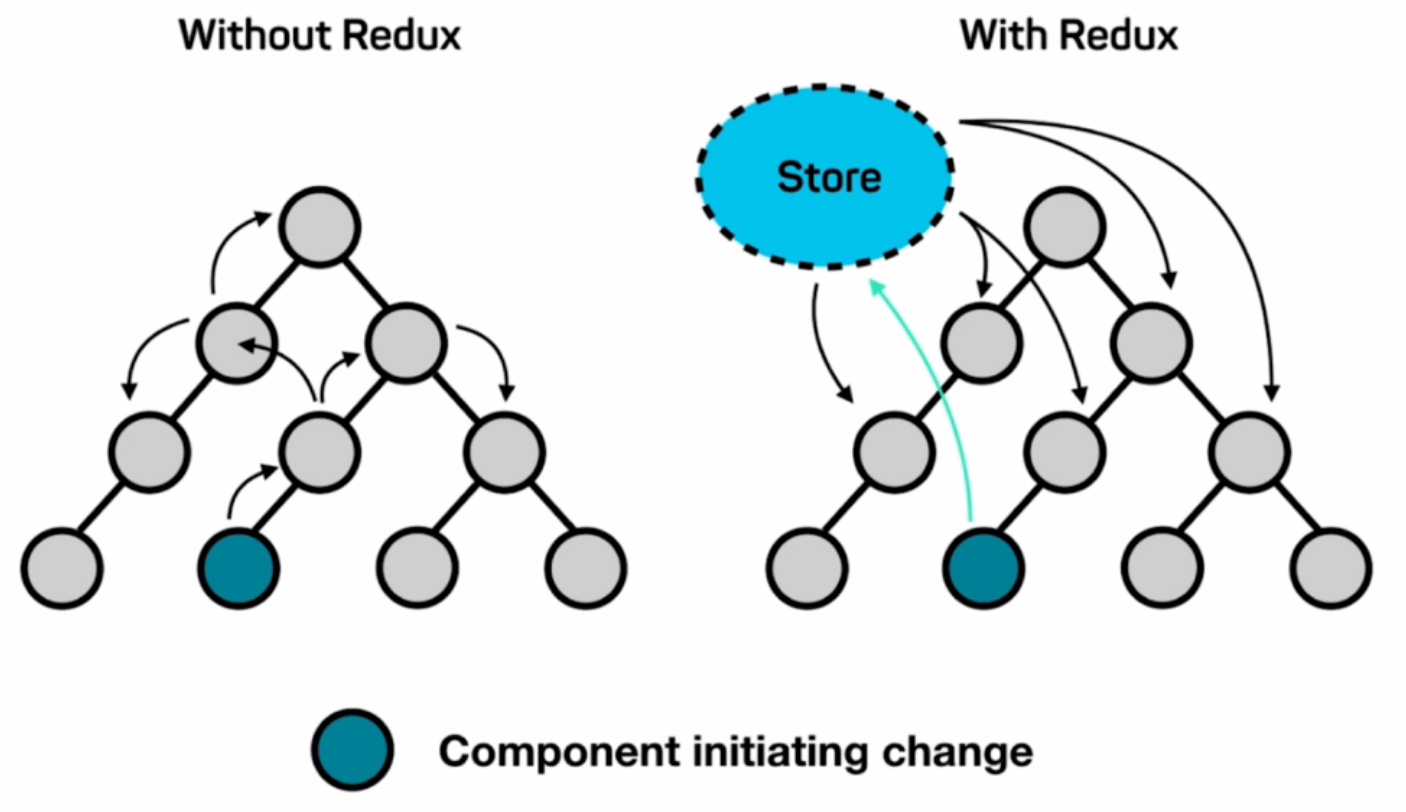
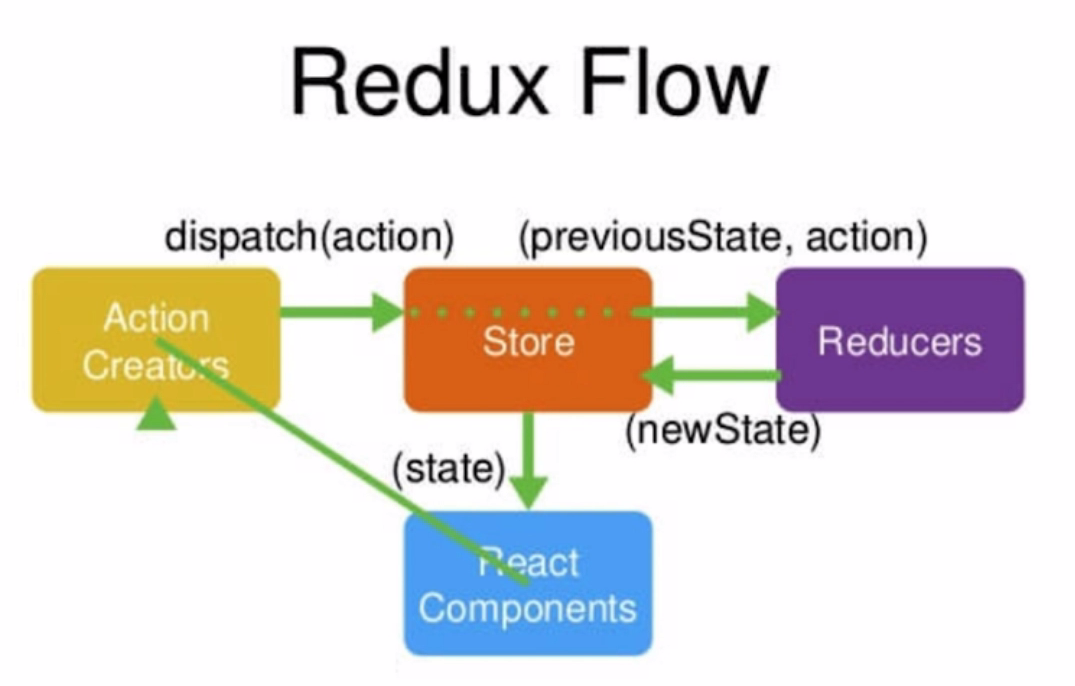
Redux基础
1 Redux简介
安装
1
npm install --save redux

2 Redux 使用流程

新建
store和reducer目录结构如下:- src (项目的源文件夹)
- store (用于管理全局数据的文件夹)
- index.js (定义store)
- reducer.js (定义reducer)
- store (用于管理全局数据的文件夹)
- src (项目的源文件夹)
编辑
index.js1
2
3
4
5
6import { createStore } from 'redux'
import reducer from './reducer'
const store = createStore(reducer, window.__REDUX_DEVTOOLS_EXTENSION__ && window.__REDUX_DEVTOOLS_EXTENSION__())
export default store编辑
reducer.js- state: 修改前的全局数据
- state = defaultState 为全局数据设置默认值
- action: 组件传来的需要修改的数据
1
2
3
4
5
6
7const defaultState = {
//在此处自定义全局数据的默认值
}
export default (state = defaultState, action) => {
return state
}- state: 修改前的全局数据
组件中操作全局数据
4.1 组件中引入全局数据仓库
1
import store from './store/index'
4.2 组件中获取全局数据
1
store.getState()
4.3 组件中修改全局数据
- 通过
action来间接修改 —- 大项目一般使用actionCreaters来间接修改 - 组件中定义的
action本质上只是告诉store要做何修改,修改的数据什么,真正的修改是在reducer中进行的 - 通过
store.dispatch(action)将action提交给store处理
1
2
3
4
5
6
7
8
9
10
11
12const action = {
type: '修改操作简称', //在reducer中对比这个简称 做出相应的修改操作
属性: 值 //设置此次修改的数据名(属性)、数据值
}
store.dispatch(action)
//案例
const action = {
type: 'change_input_value',
value: 'hello'
}
store.dispatch(action)- 通过
4.4 在
reducer根据action修改全局数据reducer中其实也不能修改store的数据,所以需要深拷贝原来的数据,然后修改拷贝来的数据,将修改后的数据返回给store,store中再做数据更新reducer必须是纯函数- 给定确定的输入就一定会有确定的输出,给定输入:state、action 则确定输出:newState || state
- 函数中不能有网络请求、时间相关操作(new Date() setTimeout等)
- 不能有副作用,只是修改newState 不要有其它操作
- 给定确定的输入就一定会有确定的输出,给定输入:state、action 则确定输出:newState || state
1
2
3
4
5
6
7
8
9
10
11
12
const defaultState = {
inputValue: '1232131',
}
export default (state = defaultState, action) => {
if(action.type === 'change_input_value'){ //判断是什么操作(与组件定义一致)
const newState = JSON.parse(JSON.stringify(state)) //深拷贝
newState.inputValue = action.value // 修改数据
return newState //返回给了stroe
}
return state
}4.5 组件中监听
store中数据的变化,并实时获取,刷新组件中的数据store.subscribe(): 当store中的数据发生变化时,该函数就会执行handleStoreChange: 自定义函数,当store.subscribe()执行时 在该自定义函数中获取store更新后的数据
1
2
3
4
5store.subscribe(this.handleStoreChange)
handleStoreChange() {
this.setState(store.getState()) // store.getState()获取store数据
}
3 action types的拆分
使用流程:
在
src/store文件夹下新建actionTypes.js- 将所有
action的type定义成常量并导出
1
2
3
4//案例
export const CHANGE_INPUT_VALUE = 'change_input_value'
export const ADD_TO_LIST = 'add_to_list'
export const DEL_LIST = 'del_list'- 将所有
在
reducer.js、actionCreators.js等文件文件中使用 需要导入1
2//导入
import {CHANGE_INPUT_VALUE, ADD_TO_LIST, DEL_LIST} from './actionTypes'
拆分的好处:
- 当
type用常量时,如果拼写错误,编译时会报错,便于快速定位BUG - 如果
type使用的是字符串,当字符串拼写错误时,编译时不会报拼写的错误,很能快速定位BUG
4 actionCreators
actionCreators用于管理action,避免action在组件中直接定义
使用流程:
在
src/store下新建actionCreators.js- 在文件中定义好
action,实例化action时调用相应的函数并传入参数见即可
1
2
3
4
5
6
7
8
9
10
11
12
13
14
15
16//案例
import {CHANGE_INPUT_VALUE, ADD_TO_LIST, DEL_LIST} from './actionTypes'
export const getInputChangeAction = (value) => ({
type: CHANGE_INPUT_VALUE,
value
})
export const getAddItemAction = () => ({
type: ADD_TO_LIST
})
export const getDelItemAction = (index) => ({
type: DEL_LIST,
index
})- 在文件中定义好
在组件中使用
1
2
3
4
5
6
7import {getInputChangeAction, getAddItemAction, getDelItemAction} from './store/actionCreators'
//e.target.value是传入的参数
changeInputValue(e){
const action = getInputChangeAction(e.target.value)
store.dispatch(action)
}
5 store拆分到组件中
5.1 目录设置
- 组件目录
- store
- actionCreators.js
- actionTypes.js
- reducer.js
- index.js (store文件夹默认导出文件)
- store
5.2 reducer的拆分
在组件所在文件夹下新建
store/reducer.js- 将组件中使用的数据及对数据的操作写在该文件中,操作同全局
reducer- 数据的定义
- action的处理
- 本质是对全局的
reducer做了拆分,将组件相关的数据写到本文件中,便于管理
案例:
1
2
3
4
5
6
7
8
9
10
11
12
13
14
15import {SEARCH_FOCUSED} from '../../../store/actionTypes' //注意引入路径的变化
const defaultState = {
focused: false
}
export default (state = defaultState, action) => {
if (action.type === SEARCH_FOCUSED){
const newState = JSON.parse(JSON.stringify(state)) //深拷贝
newState.focused = true // 修改数据
return newState //返回给了stroe
}
return state;
}- 将组件中使用的数据及对数据的操作写在该文件中,操作同全局
在全局
reducer.js中合并各组件的reducerheaderReducer(自定义名): 从组件中引入拆分的reducer.jsheader(自定义名) : 给组件中的reducer设置名称,便于管理
1
2
3
4
5
6
7
8
9//src/store/reducer.js
import { combineReducers } from 'redux'
import headerReducer from '../common/header/store/reducer' //从组件中引入拆分的`reducer.js`
const reducer = combineReducers({
header: headerReducer //给组件中的`reducer`设置名称,便于管理
})
export default reducer;组件中使用数据时改变调用路径
header: 组件管理的reducer- 由于在全局reducer中合并reducer所以多了一层访问
1
2
3
4
5
6
7
8
9
10
11
12
13//没有拆分时访问
const mapStateToProps = (state) => {
return {
focused: state.focused
}
}
//拆分后访问
const mapStateToProps = (state) => {
return {
focused: state.header.focused
}
}
5.3 actionTypes的拆分
- 注意
type字符串中最好加上组件名,避免冲突 - 案例:
1 | export const SEARCH_FOCUSED = 'header/search_focused' //header为组件名 |
5.4 actionCreators的拆分
- 案例:
1 | import {SEARCH_FOCUSED, SEARCH_BLUR} from './actionTypes' |
5.5 index.js的编写
index.js: 主要是把store文件夹中的文件导入 然后统一导出- 其它文件需要引入
store中文件时路径只需要写到store文件夹一级即可
1 | import headerReducer from './reducer' |
6 immutable
6.1 immutable.js管理store
使用imumutable.js来管理store的数据的原因:
store的数据是不能被改变的,这也是之前在reucer.js中使用深拷贝store中的数据的原因immutable.js可以确保其管理的对象的数据不会别改变- 为了避免
store数据被误操作而改变,选择immutable.js来管理store这样store就一定不会被改变了、
immutable.js简介:
Giuhub地址: immutable.js
安装:
1
npm install immutable --save
immutable.js使用:
在每个
reducer.js中引入重构
reucer.js引入:
import {fromJS} from 'immutable'fromJS()函数包裹数据对象修改数据
1
2
3
4
5
6
7
8
9
10state.set('属性名', 属性值)
//多个属性时
state.set('属性名1', 属性值1).set('属性名2', 属性值2)
//merge()方法
state.merge({
属性名1: 属性值1,
属性名2: 属性值2
})
获取数据
在组件中获取数据时使用
1
2state.header.get('属性名') //header是组件层
state.getIn(['header','属性名'])
案例:
1
2
3
4
5
6
7
8
9
10
11
12
13
14
15
16
17
18//reducer.js
import {SEARCH_FOCUSED} from './actionTypes'
import {fromJS} from 'immutable'
const defaultState = fromJS({
focused: false
})
export default (state = defaultState, action) => {
if (action.type === SEARCH_FOCUSED){
return state.set('focused', true)
}
return state;
}
//组件中获取数据
state.header.get('focused')
6.2 redux-immutable全局使用
Gihub地址: redux-immutable
安装:
1
npm install redux-immutable --save
使用:
- 修改全局
reducer.js—src/store/reducer.js
1
2
3
4//修改前
import { combineReducers } from 'redux'
//修改后
import { combineReducers } from 'redux-immutable'- 获取数据方式的改变
- header是组件名
1
2
3
4
5
6//修改前
state.header.get('focused')
//修改后
state.get('header').get('focused')
上面写法等价于下面写法:
state.getIn(['header','focused'])- 修改全局
6.3 使用immutable常见问题
6.3.1 存入store的对象都需是immutable对象
当使用immutable来管理store时,存入store的数据必须都是immutable的格式,否则或出错
案例:
1 | //reducer.js |
6.3.2 immutbale数组不能用list[i]的方式取数据
解决方案:
将immutable数组转换成普通数组再使用
list.toJS()
Redux进阶
1 Redux-thunk 中间件
- GIthub地址:
Redux-thunk - 对
Redux-thunk中间件的理解- 此中间件是指在
action和store中间 注意是Redux的中间件,而不是React的中间件 - 此中间件就是对
dispatch重新做了一次封装- 当传入的action是对象时 ,直接交给store处理
- 当传入的action是函数时 ,先执行函数,若函数中有对象形式的action再交给store处理
- 此中间件是指在

安装:
1
npm install redux-thunk --save
配置:
scr/store/index.js中配置 —- 只有thunk中间件的情况- 1 添加
applyMiddleware: 用于给Redux添加中间件 - 2 导入
redux-thunk - 3 添加
thunk中间件
- 1 添加
1
2
3
4
5
6
7
8
9import { createStore, applyMiddleware } from 'redux' ----1----
import thunk from 'redux-thunk'; -----2-----
import reducer from './reducer'
const store = createStore(
reducer,
applyMiddleware(thunk) ------3-----
//window....: 也是中间件 配合redux-devtools使用
export default storescr/store/index.js中配置 —- 有多个中间件的情况
1
2
3
4
5
6
7
8
9
10
11
12
13
14
15
import { createStore, applyMiddleware, compose } from 'redux'
import thunk from 'redux-thunk';
import reducer from './reducer'
const composeEnhancers = window.__REDUX_DEVTOOLS_EXTENSION_COMPOSE__ ? window.__REDUX_DEVTOOLS_EXTENSION_COMPOSE__({}) : compose;
const enhancer = composeEnhancers(
applyMiddleware(thunk)
);
const store = createStore(
reducer,
enhancer
)
export default store使用:
- 网络请求写在
src/store/actionCreator.js中- dispatch : 直接将action传给store处理
- 函数内可以直接调用
actionCreator.js中的其他函数
1
2
3
4
5
6
7
8
9export const getTodoList = () => {
return (dispatch) => {
axios.get('http://152.136.185.210:8000/api/n3/home/multidata').then((res) => {
const item = res.data.data.banner.list[0].acm
const action = getAddItemAxios(item)
dispatch(action)
})
}
}- 组件中调用该网络请求函数
1
2
3
4import {getTodoList} from './store/actionCreators'
const action = getTodoList()
store.dispatch(action)- 网络请求写在
2 Redux-saga 中间件
Github地址: Redux-saga
安装:
1
npm install redux-saga --save
配置:官方配置教程
- 在
src/store/index.js中配置
1
2
3
4
5
6
7
8
9
10
11
12
13
14
15
16import { createStore, applyMiddleware, compose } from 'redux'
import createSagaMiddleware from 'redux-saga' //导入redux-saga
import reducer from './reducer'
import mySaga from './sagas' // 导入saga文件
const sagaMiddleware = createSagaMiddleware() //实例化saga
const composeEnhancers = window.__REDUX_DEVTOOLS_EXTENSION_COMPOSE__ ? window.__REDUX_DEVTOOLS_EXTENSION_COMPOSE__({}) : compose;
const enhancer = composeEnhancers(
applyMiddleware(sagaMiddleware) //添加saga为redux的中间件
);
const store = createStore(reducer, enhancer)
sagaMiddleware.run(mySaga) // 执行saga文件
export default store- 在
编辑
sagas.js: 官方教程- 在
src/store下新建sagas.js文件 - 组件中创建
action通过store.dispatch(action)会将action同时传给sagas.js和reducer.js\ - 若
<action.type>匹配sagas.js中的设置,则执行sagas.js中对应的函数 - 即在
action和store之间多了saga做中间处理
1
2
3
4
5
6
7
8
9
10
11
12
13//sagas.js
import { takeEvery } from 'redux-saga/effects'
function* <函数名>() {
}
function* mySaga() {
yield takeEvery(<action.type>, <函数名>);
}
export default mySaga;- 在
saga中间件处理异步请求并更新store数据的流程- 1 定义
action让saga可以抓取
1
2
3
4//actionCreators.js
export const getTodoList = () => ({
type: GET_TODOLIST,
})- 2 组件中实例化
action并发送action
1
2const action = getTodoList()
store.dispatch(action)- 3
sagas.js中接收action并发送网络请求- 网络请求不在使用
promise.then() - 使用
yield语法处理网络请求 put接口用于将action发送给store处理
- 网络请求不在使用
1
2
3
4
5
6
7
8
9
10
11
12
13
14
15
16
17import { put, takeEvery } from 'redux-saga/effects'
import axios from 'axios'
import { GET_TODOLIST } from './actionTypes'
import { getAddItemAxios } from './actionCreators' //将请求的数据更新到store的action
function* getTodolist() {
const res = yield axios.get('http://152.136.185.210:8000/api/n3/home/multidata')
const item = res.data.data.banner.list[0].acm
const action = getAddItemAxios(item)
yield put(action)
}
function* mySaga() {
yield takeEvery(GET_TODOLIST, getTodolist);
}
export default mySaga;- 4 更新
store数据
1
2
3
4
5
6
7
8
9
10
11
12//actionCreators.js
export const getAddItemAxios = (item) => ({
type: ADD_TO_LISTUP,
item
})
//reducer.js
if(action.type === ADD_TO_LISTUP){
const newState = JSON.parse(JSON.stringify(state))
newState.list.push(action.item)
return newState
}- 1 定义
3 React-redux
Github地址:react-redux
安装:
1
npm install react-redux --save
3.1 API : Provider
理解:
<Provider>声明了其包裹的组件可以直接与store建立联系,通过API:connect更方便的获取和修改store中数据
使用:
1 | //src/store/index.js |
3.2 API:connect
只有<Provider>包裹的组件才可以使用connect与store建立连接
导入
connect方法1
import { connect } from 'react-redux'
导出组件
- 本质是返回
connect函数的执行结果 其执行结果就是将派发action等业务逻辑加到了组件中
1
export default connect(mapStateToProps, mapDispatchToProps)(TodoList);
- 本质是返回
获取
store数据的方式的改变- 不建立连接时的方式
1
2
3
4
5
6//1 导入store
import store from './store/index'
//2 将store的所有数据赋值给组件的state
this.state = store.getState()
//3 通过this.state使用
this.state.属性- 建立连接后的方式
1
2
3
4
5
6
7
8//1 将store中的数据单个的赋值给组件的props ----注意:可以单个赋值-----
const mapStateToProps = (state) => {
return {
inputValue: state.inputValue
}
}
//2 通过this.props使用
this.props.inputValue修改
store数据的方式的变化- 不建立连接时的方式
1
2
3
4
5
6
7
8
9
10
11
12
13
14// 1 派发action的函数写在组件中 通过this.dispatch派发
class TodoList extends Component {
constructor(props) {
super(props)
this.changeInputValue = this.changeInputValue.bind(this)
}
render() { }
changeInputValue(e){
const action = getInputChangeAction(e.target.value)
this.dispatch(action)
}
}
//2 通过this.函数名 调用函数 需要绑定this
this.changeInputValue- 建立连接后的方式
1
2
3
4
5
6
7
8
9
10
11//1 派发action的函数写在mapDispatchToProps中 通过dispatch派发
const mapDispatchToProps = (dispatch) => {
return {
changeInputValue(e){
const action = getInputChangeAction(e.target.value)
dispatch(action)
}
}
}
//2 通过this.props.函数名 调用函数 不需要绑定this
this.props.changeInputValuestore数据改变,组件绑定的数据或自动刷新,不需要再订阅store的变化
1
2
3
4store.subscribe(this.handleStoreChange) //不再需要此订阅
handleStoreChange() {
this.setState(store.getState())
}
案例:
1 | //组件.js |